Welcome to the Triptico User Guide!
This guide contains lots of information to help you to make the most of Triptico in your school, college or business.
If you have a question which is not answered by this guide then please use the contact form on the Triptico home page to get in touch.
Create an Account
In order to begin using Triptico you will need to visit the Triptico home page and create an account.
This will enable you to sign-in to the website and begin creating engaging learning activities and lessons of your own!
If you have an existing Triptico account that you would like to reactivate then please get in touch via the contact form on the Triptico home page and we can help with this.
Tip!
If you would be interested in purchasing multiple accounts - for a department, school, college, district or business - then we have some amazing offers available.
Sign In
In the top right corner of the Triptico home page you will see the 'Sign In' button:
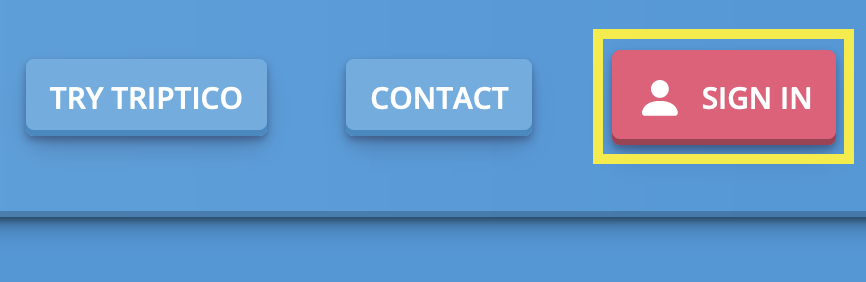
Press this button, type your username and password and you will be redirected to your Triptico home page.
You can access your Triptico account on any device, in any location and at any time. For example, if you create and save a Triptico activity or lesson at home then it will be available to you whenever and wherever you sign in to your Triptico account.
Open a Saved File
The first page that you will see when you sign in to your Triptico account is the 'Saved Files' page.
You can also visit this page by clicking the 'Saved Files' button:

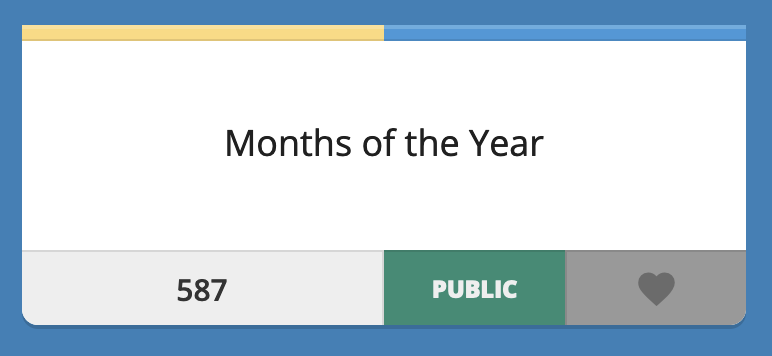
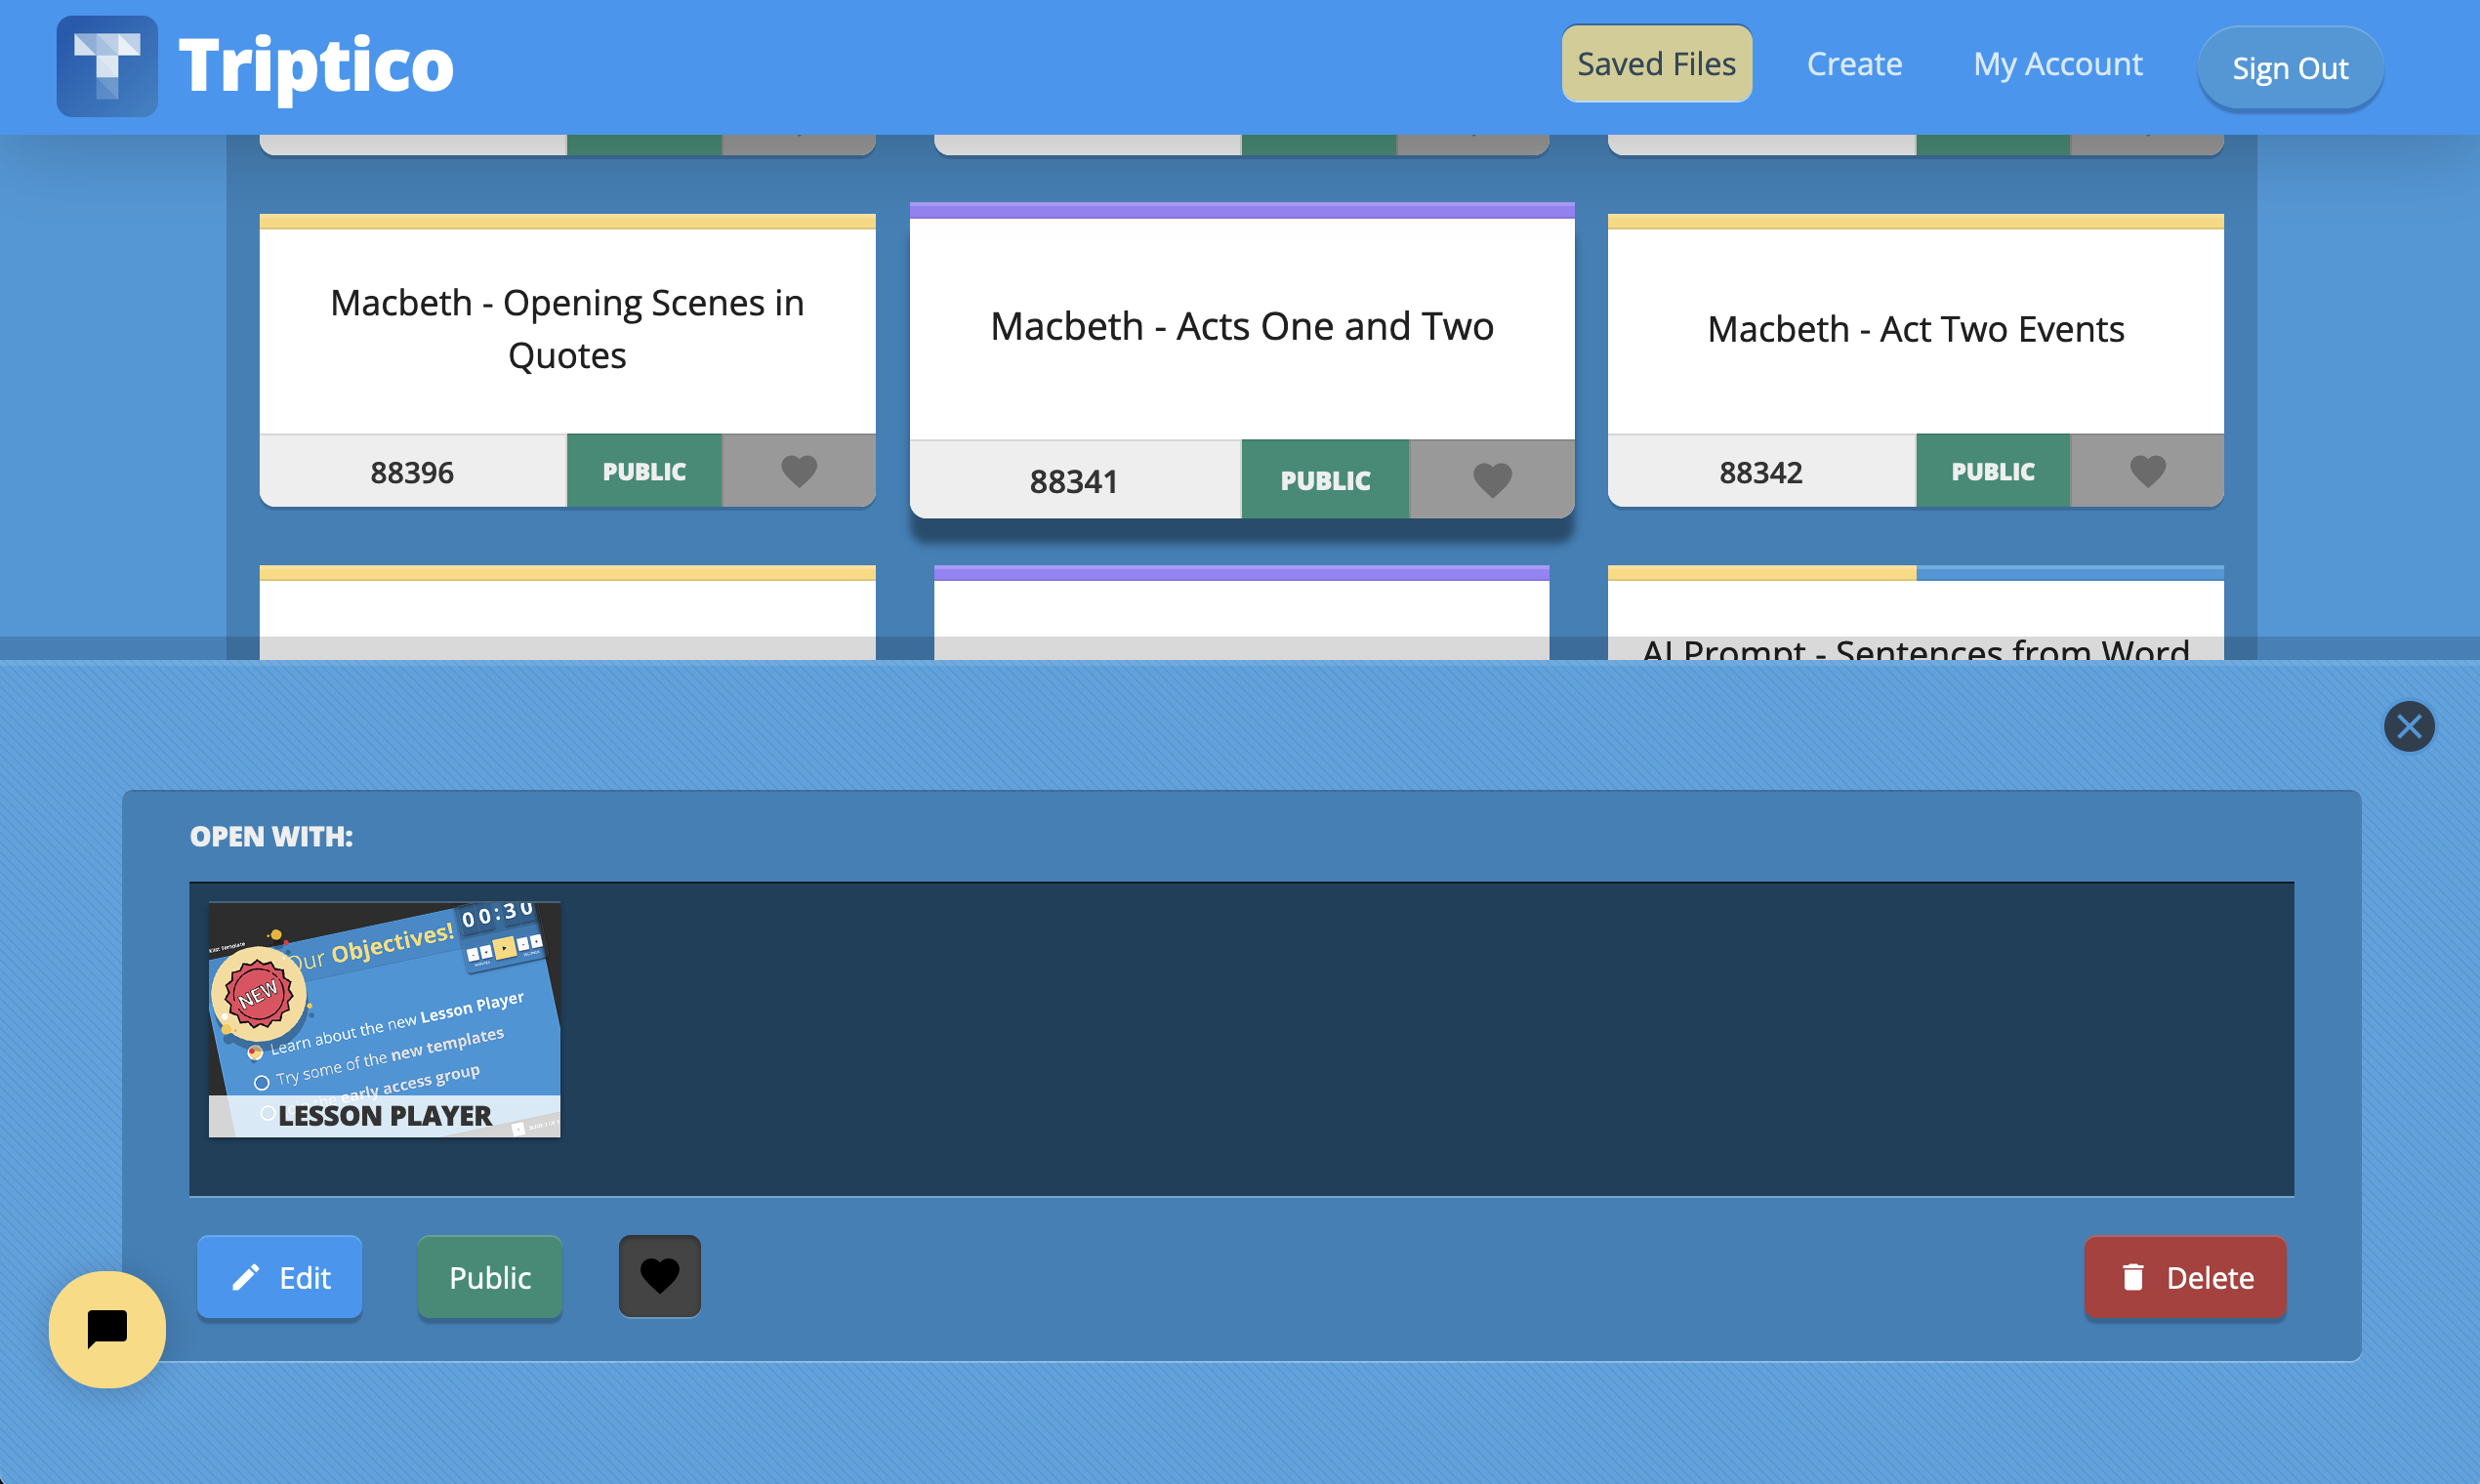
Saved files look like this:
When you click on a saved file, a new panel will appear containing all of the resources that you can open it with. The same saved file can be opened with lots of different resources:
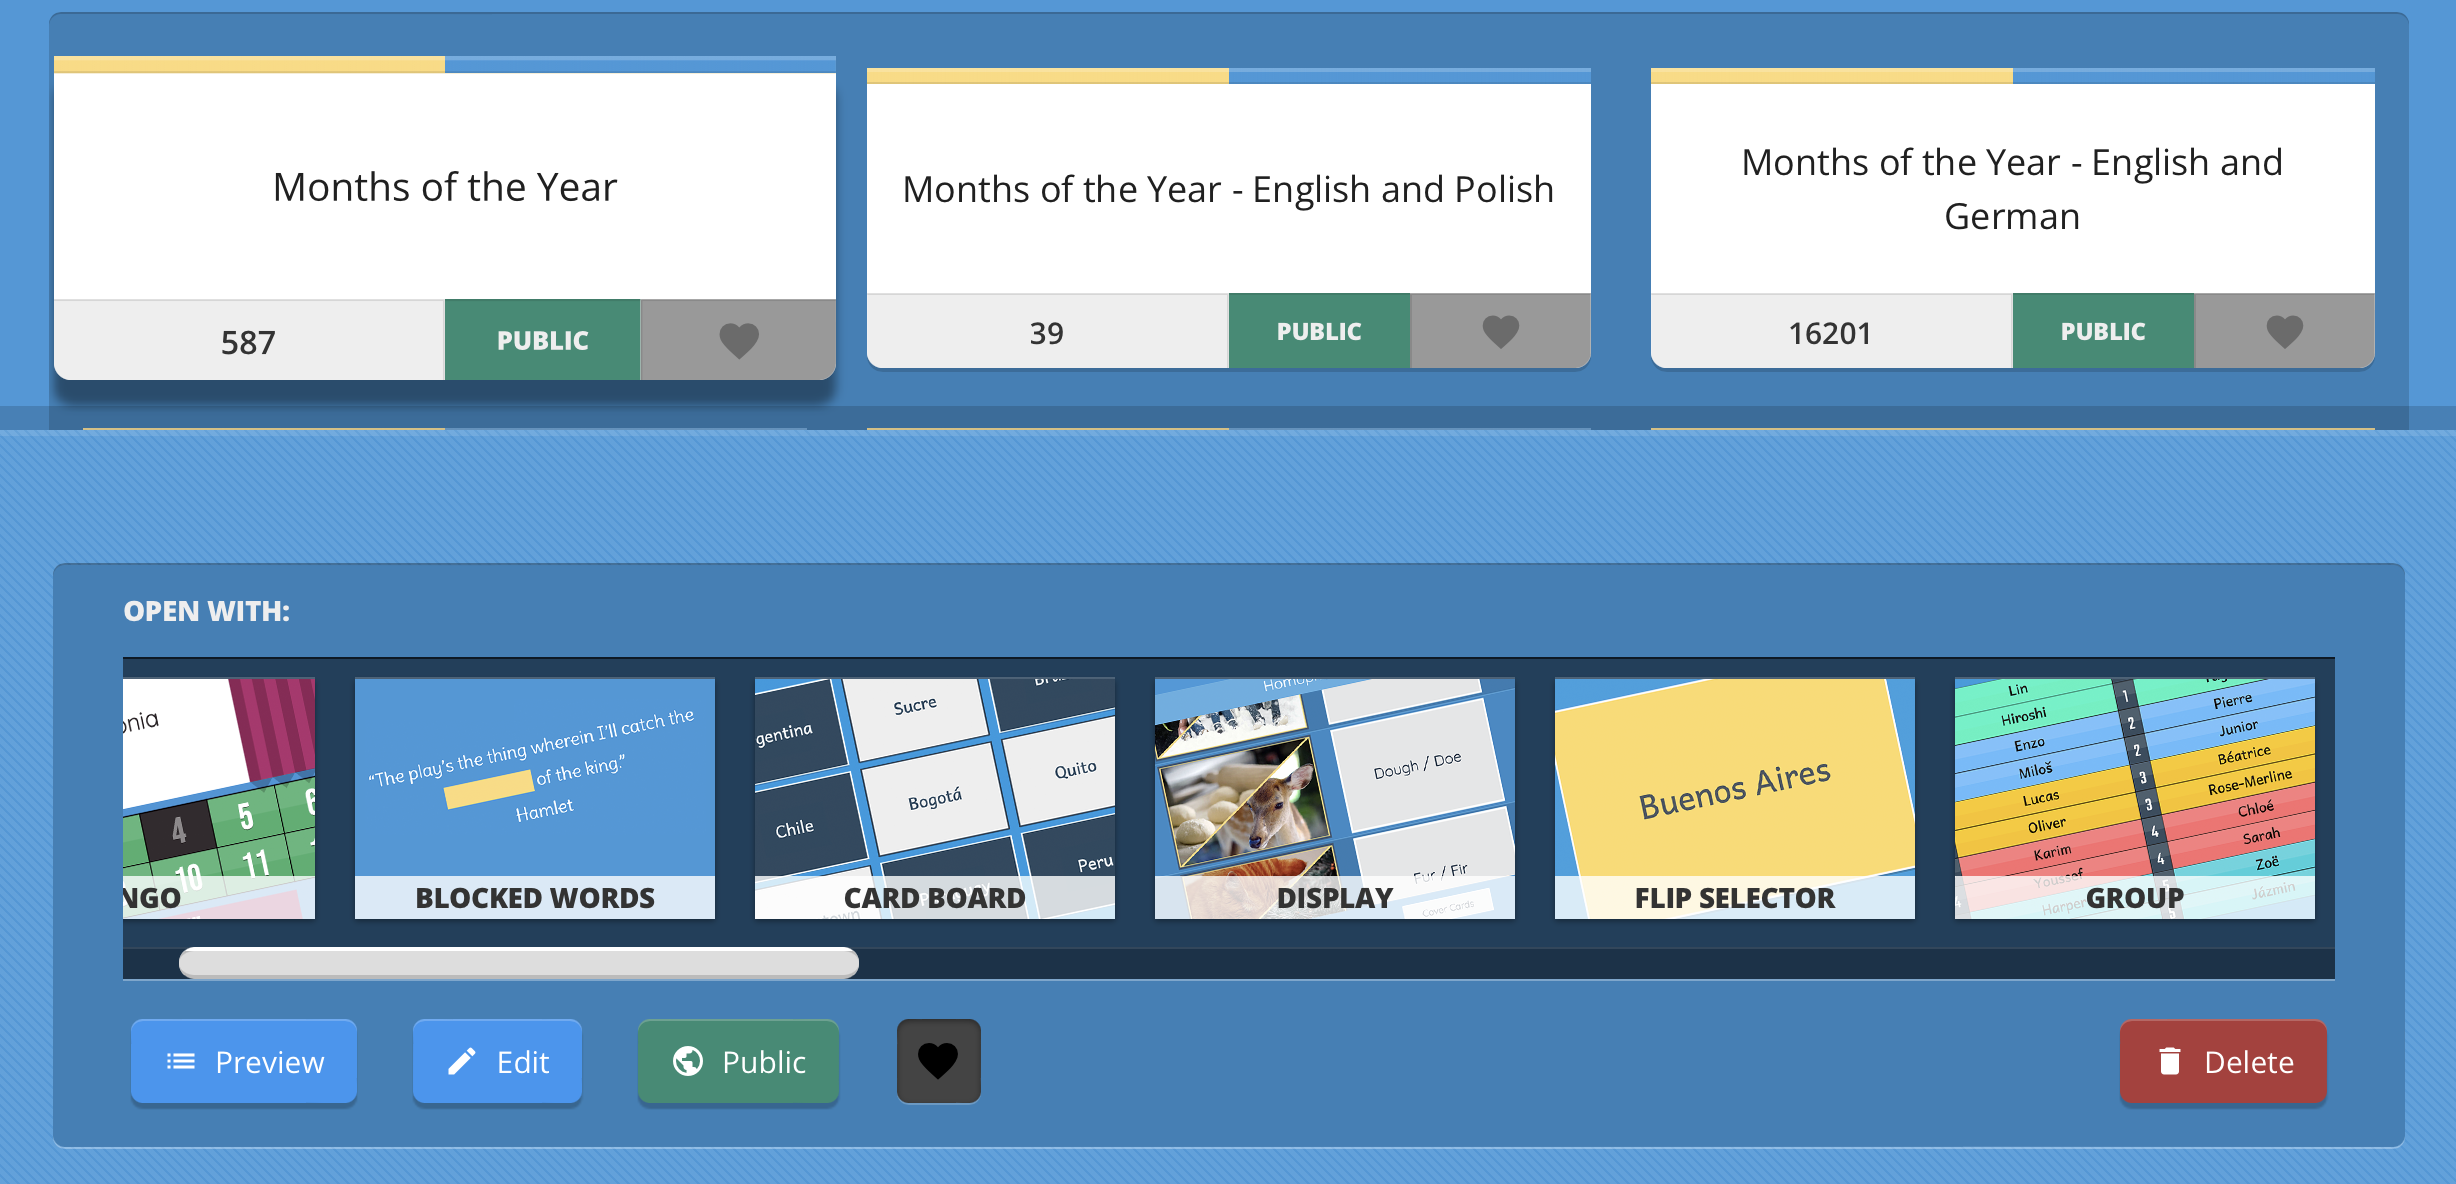
Simply select a resource to open the saved file with!
You could open a saved file with one resource at the start of a lesson and a different resource at the end. You could then share the file with your students for them to revise the content in their own time.
Why are some resources available for some saved files, but not others?
Answer!
The resource panel also contains buttons that can be used to:
- Preview the saved file.
- Edit the saved file.
- Mark the saved file as public or not.
- Set the saved file as a favourite.
- Delete the saved file.
Each of these options is explained in more detail later in this guide.
Share a Saved File
There are two simple ways to share lessons and activities that you have created with Triptico.
Students do not need to create an account to access saved files that you share with them.
Method 1: Share the Unique Code of the Saved File
Each saved file has a unique code. For example, the unique code of this saved file is 587:
You can give this code to your students for them to type directly into the Triptico website.
They do this via the 'I am a Student with a Code - Click Here' button on the home page:

Students will find this button on the Triptico home page
Students will find this button on the Triptico home page
Pressing this button will take students to this page, where they can type the code that you have given them.
When they type a code, students will see a list of all of the resources that they can use to open the file (unless it is a lesson, of course).
Tip!
If you would like a code to open instantly with a specific resource then you can prefix it with the first two letters of the resource's name. For example...
WO587 would open the saved file immediately with Word Magnets. The students would not be given a choice.
SP587 would open the saved file immediately with the Spinner resource.
BI587 with Bingo - and so on.
Method 2: Share the Direct Link
When you open a lesson or a saved file you can copy the link from the address bar of your browser and share this.
For example, here is a direct link to the 'Months of the Year' saved file opened with the Spinner:
https://www.tripticoplus.com/media/resources/spinner.html?save=587
You can use whichever method works best for you and your students!
Manage Your Account
When you are signed in to the Triptico website, you will see a 'My Account' button in the top right of the page:

Pressing this button enables you to manage your account. You can:
- Edit your name, username and email address.
- Change your password.
- Cancel your subscription.
- Choose your preferred font.
- Choose your preferred background colour.
Cancelling a Subscription
You can cancel your subscription at any time. There is no contract and no cancellation fee.
When a subscription is cancelled and expires, the account becomes dormant. The saved files that you have created will not be automatically deleted.
Tip!
An account can be reactivated at any time by signing in to the website and restarting the subscription.
Please contact us if you would like any help with this.
If you cancel your subscription and would like your details and saved files to be permanently deleted from our database then let us know via the contact form on the Triptico home page.
We can also copy saved files from an old account (if you had a Triptico account in a previous school or place of work which has now expired, for example) to a new account.
Again, get in touch via the contact form on the Triptico home page and we can help!
Searching the Database
On the 'Saved Files' page of the Triptico website you will see a search bar:
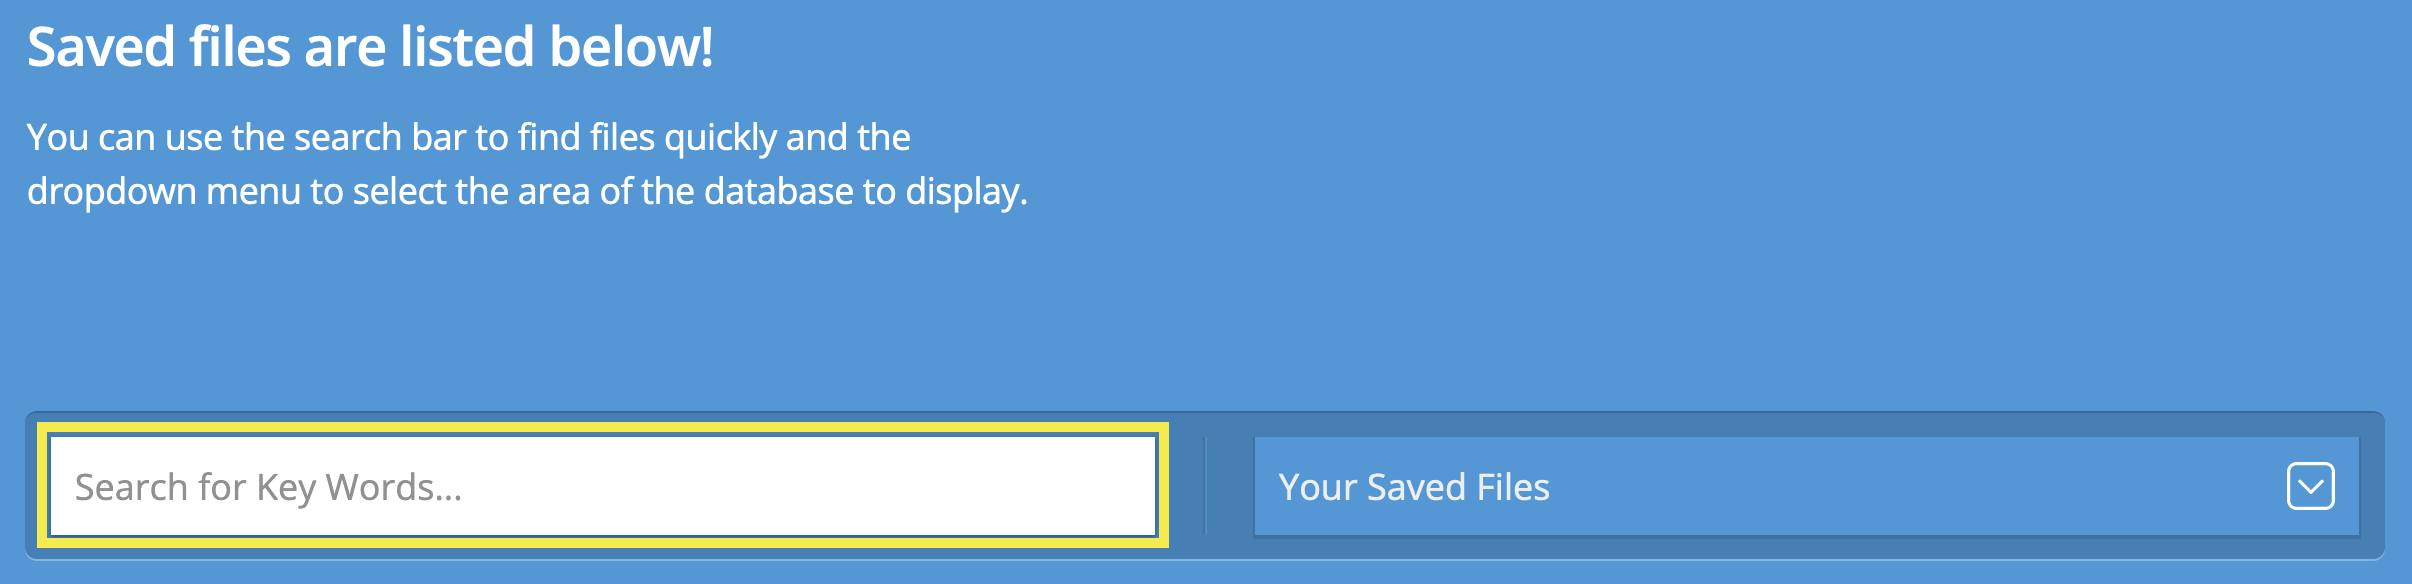
You can type key words into this search bar to find saved files quickly.
If you have know the unique code of a saved file then you can type this in the search bar to find the file too.
You can also change the 'Database Filter' (to the right of the search bar) to search for files that other Triptico users have created and marked as public.
Again, you can search for key words or, if you know it, the unique code of the saved file.
There is more information about the 'Database Filter' in the next section of this guide.
Tip!
You can add a number of tags to a file when you save it.
In addition to matching key words in the name of a saved file, the search bar will look for matching tags and add these to your results.
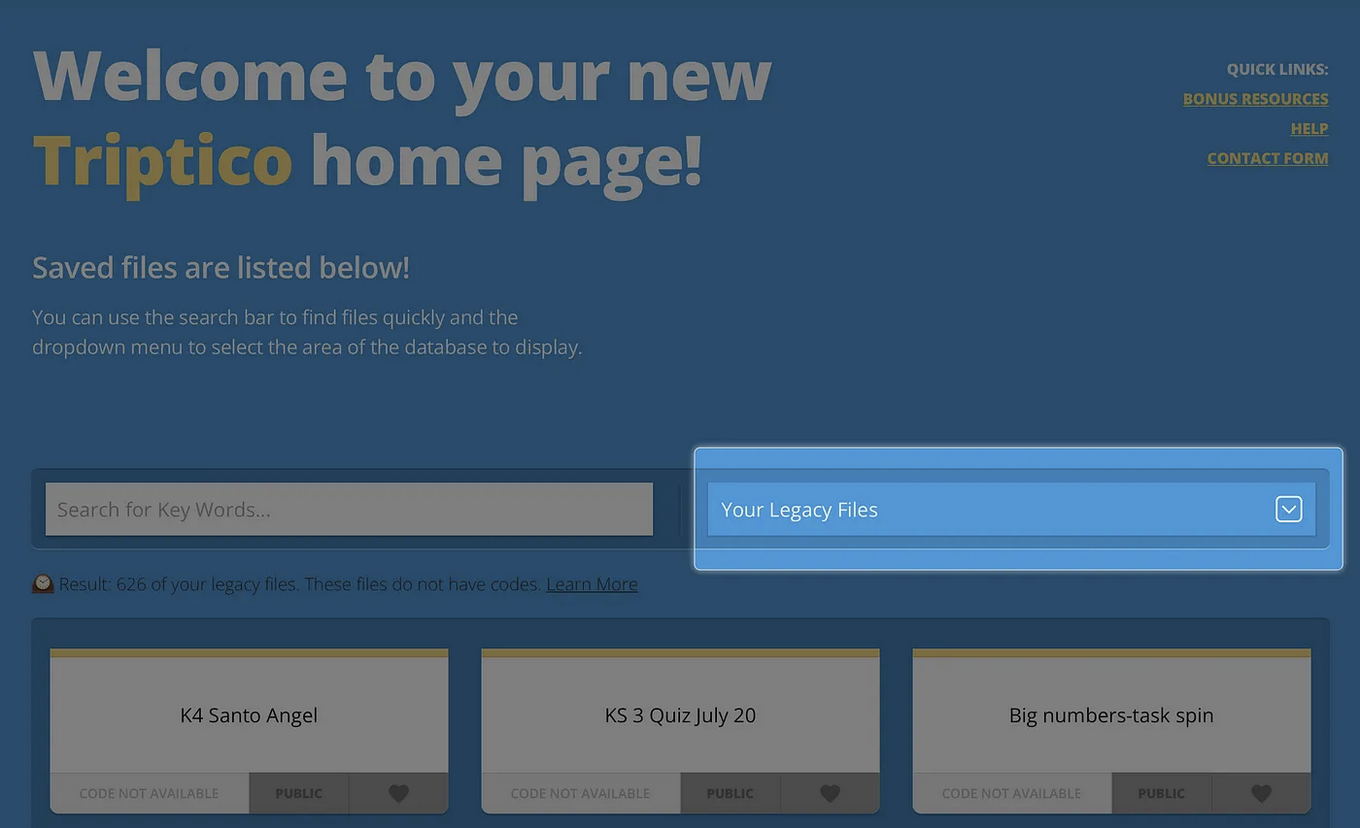
The Database Filter
The 'Database Filter' is located to the right of the search bar. It is used to select the area of the database to display:

The database will initially display 'Your Saved Files' but you can change it to view:
- Your Favourite Files.
- Public Files (files that other Triptico users have created and set as public).
- Your Deleted Files.
- Your Legacy Files.
Public Files
Changing the database filter to 'Public files' will enable you to search the many thousands of saved files that other Triptico users have created and set as public.
A saved file which is not set as public will not be visible to other users.
Non-public files can only be viewed by the person who created them.
If you find a public file that could be helpful to you then you can click the heart in the 'Resource Panel' to mark it as a favourite. This will make it easy to find again in the future.
Can I edit a public file that somebody else created?
Answer!
Legacy Files
If you used Triptico before January 2022 then you may have created files which are saved to an older version of the database.
You can change the database filter to 'Legacy Saves' in order to use these old files with the new version of Triptico.
You can open these files directly from the old database or you can click to edit them, check the content and then save a new copy to the new database.
The benefit of saving a new copy of the file to the new database is that it will be shareable and will be given a unique code.
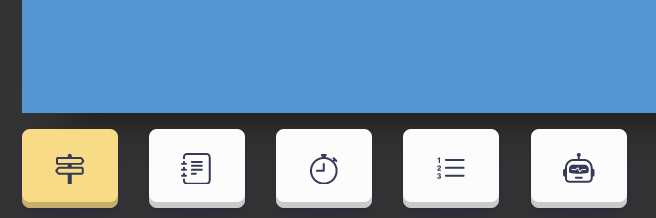
The File Panel
Whenever you click on a saved file, a new panel will appear at the bottom of the screen.
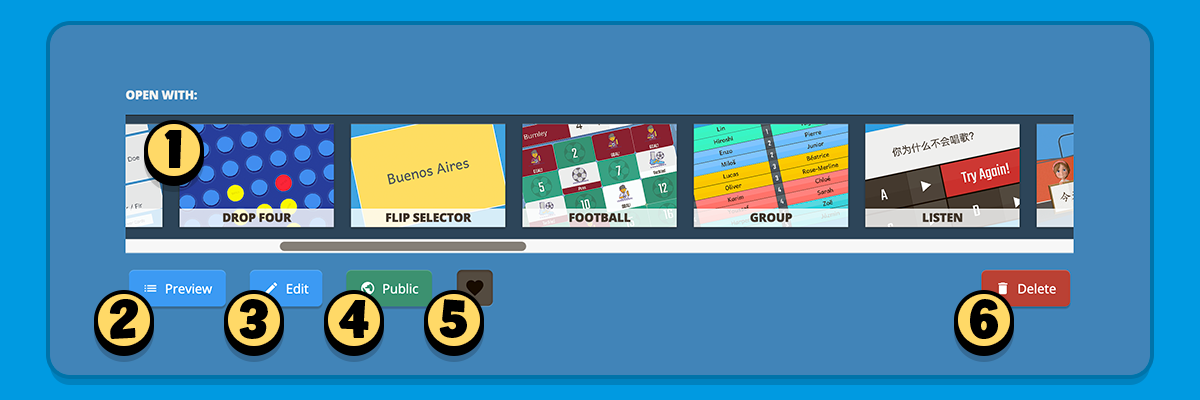
1: Resource Bar
These are all of the resources that can be used to open the selected file.
Use the scrollbar to move horizontally through the different resources.
2: Preview Button
Press this button to quickly view the contents of the saved file.
It can be used to temporarily remove items from a saved file (an absent student from a class list, for example) and to temporarily switch the sides of the cards in the saved file.
3: Edit Button
Press this button to edit the contents of a saved file.
You can overwrite the existing saved file or give the edited version a new filename to create a new file.
4: Public Button
Press this button to toggle whether or not a file is public (visible to other users).
Files that you wish to share with students must also be marked as public.
5: Favourite Button
Press this button to add / remove a file from your list of favourites.
You can view all of your favourite files at once by clicking the database filter and selecting the 'Your Favourite Files' option.
6: Delete Button
Press this button to delete the selected file.
Note that, if you delete a file in error, you can restore it by clicking the database filter and selecting the 'Your Deleted Files' option.
Overview
Creating a Triptico activity is a little like creating a set of cards.
You can add content to the front of cards or to the front and back of cards.
Cards can contain text, images or both.
Saved files can be opened with lots of different resources. For example, click to open the file in the image above with the Spinner, with Word Magnets or Bingo.
The 'Try Triptico' page is the perfect place to learn more about how saved files look and work. Click here to view it.
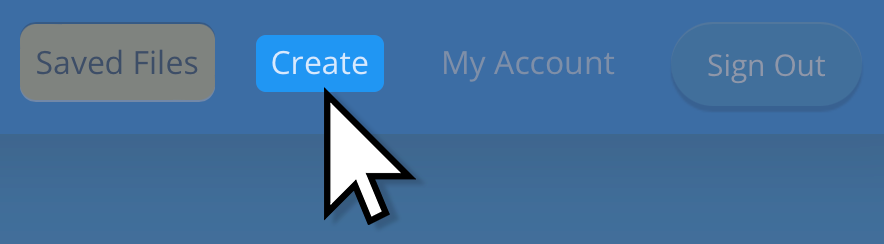
Creating a New Activity
To create a new activity you need to click the 'Create' button at the top of the page:
You begin with three 'one-sided' cards. Click on a card to add some text.
The image below shows how you could add a name to each card to create a simple class list:
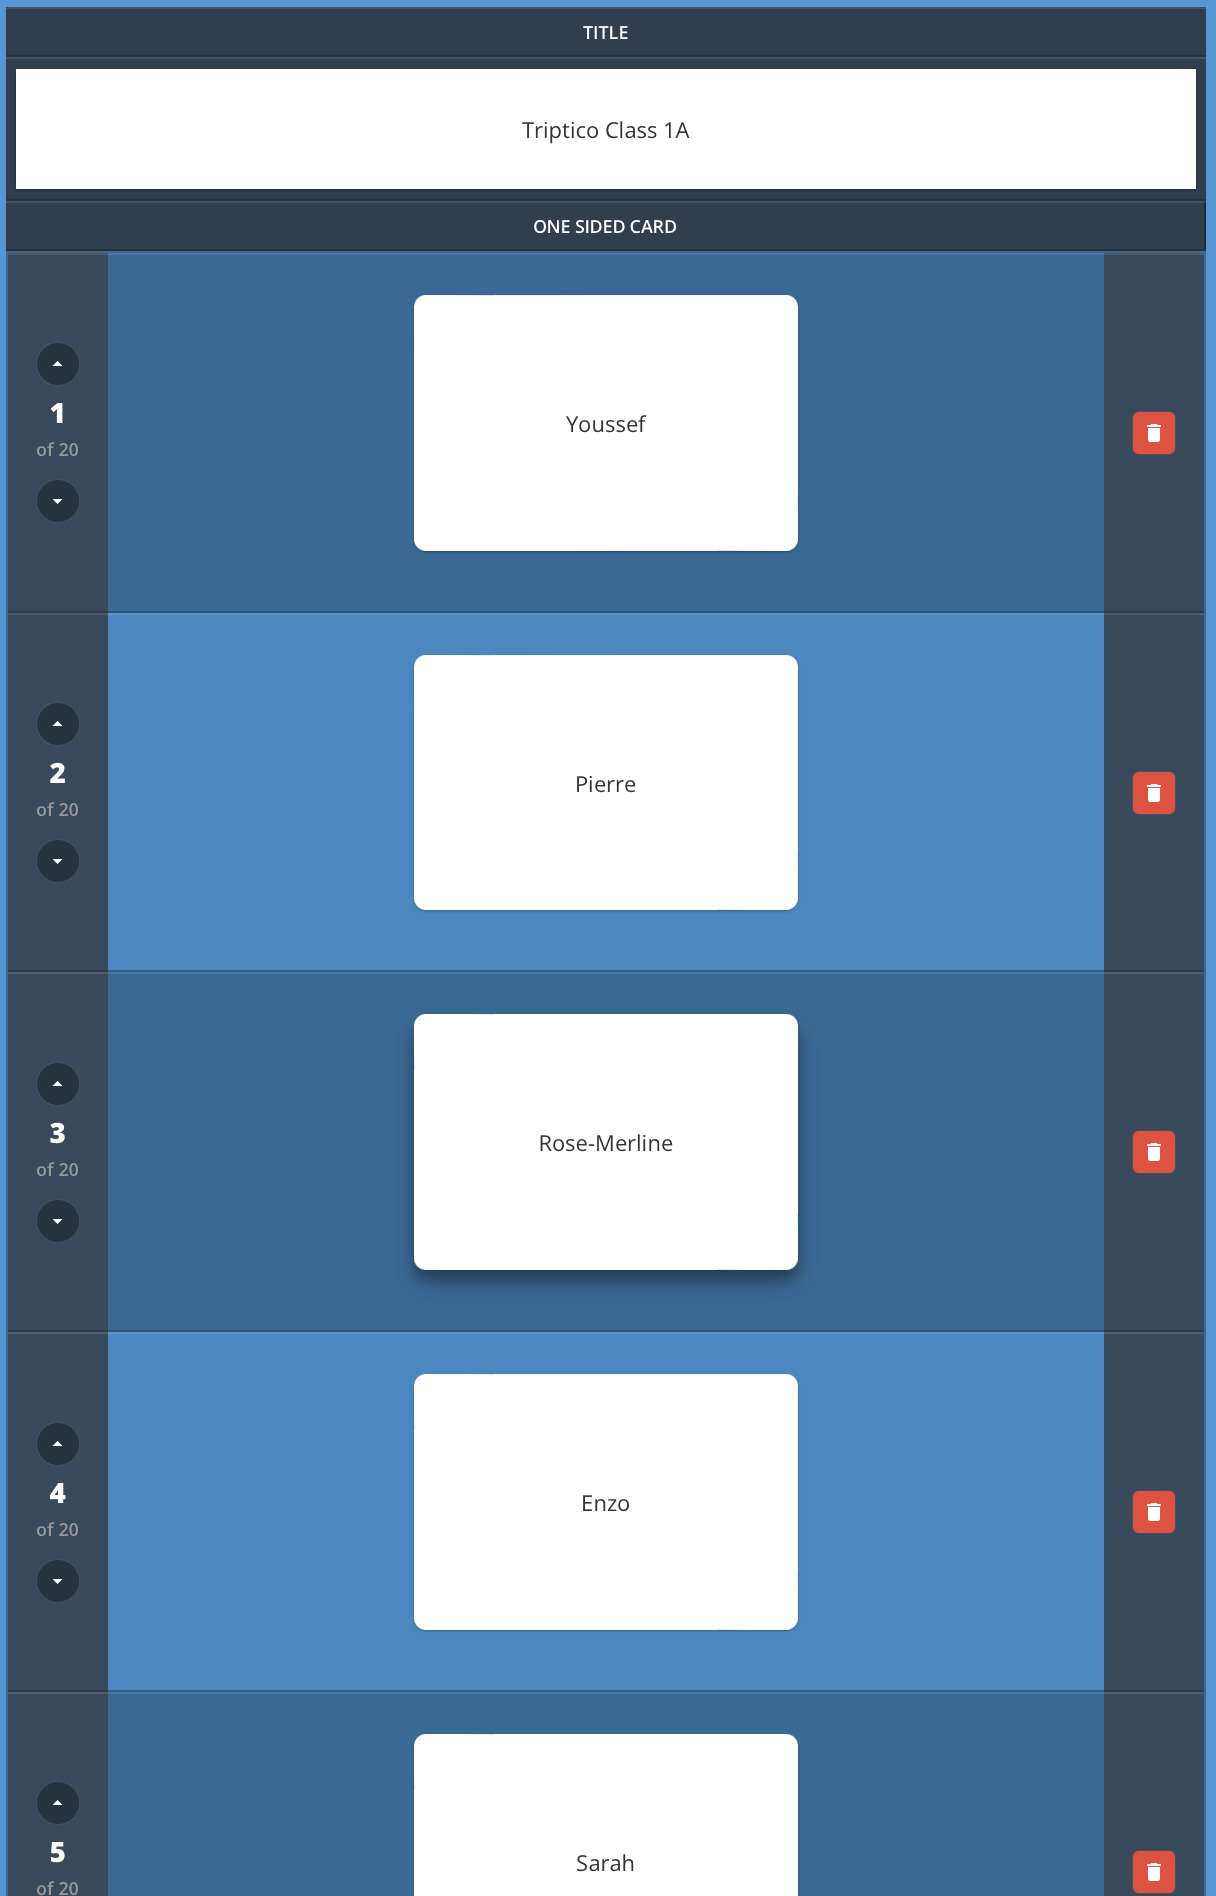
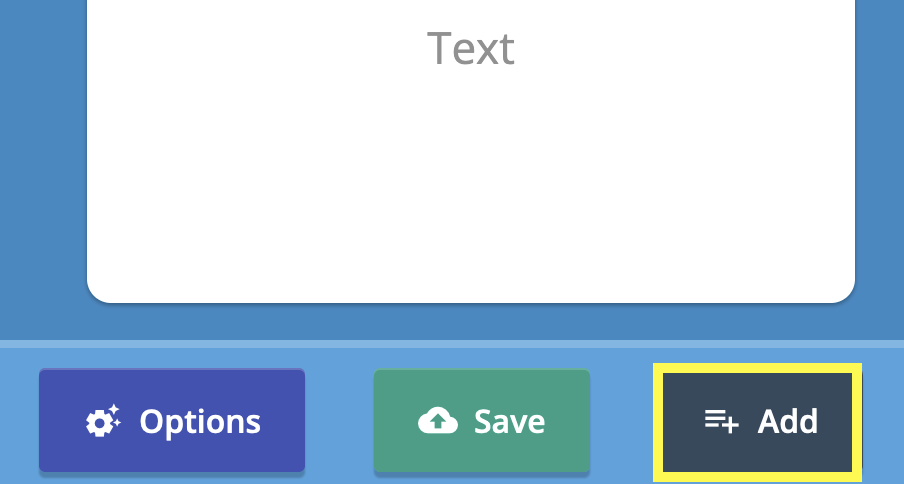
To add more cards, simply press the 'Add' button:
There is no limit to the number of cards that you can add.
You can also give your new activity a title. In the example above, the title is: Triptico Class 1A.
Tip!
You can watch a Triptico activity being created in this video.
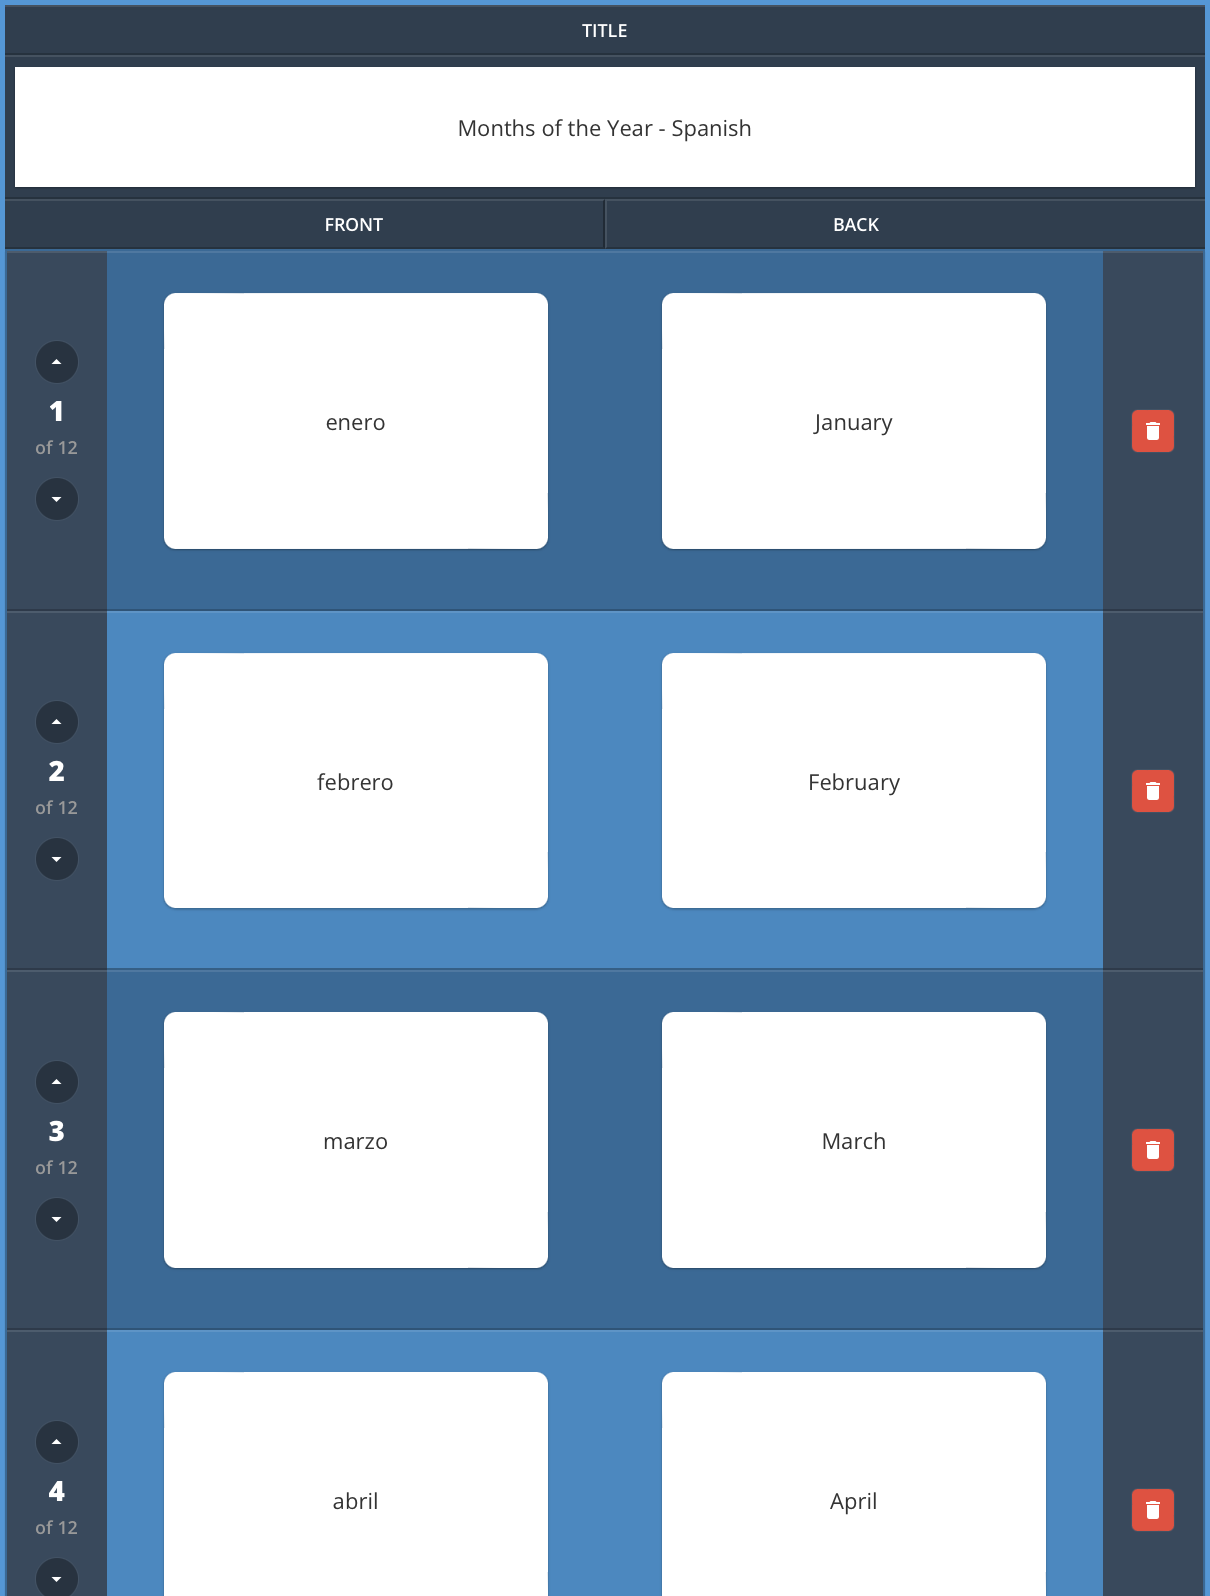
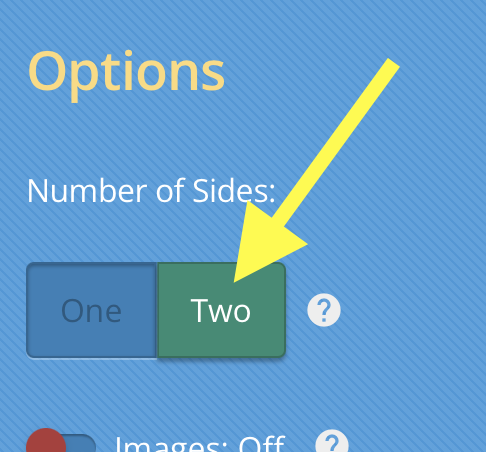
Cards with Two Sides
You can create cards with content on just one side (the front of each card - as shown in this example) or with content on both sides (the front and back of each card - as shown in this example).
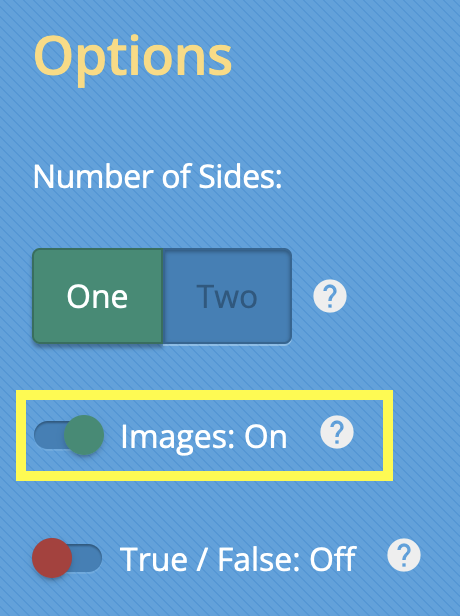
You can choose the number of sides to use by clicking the 'Options' button:
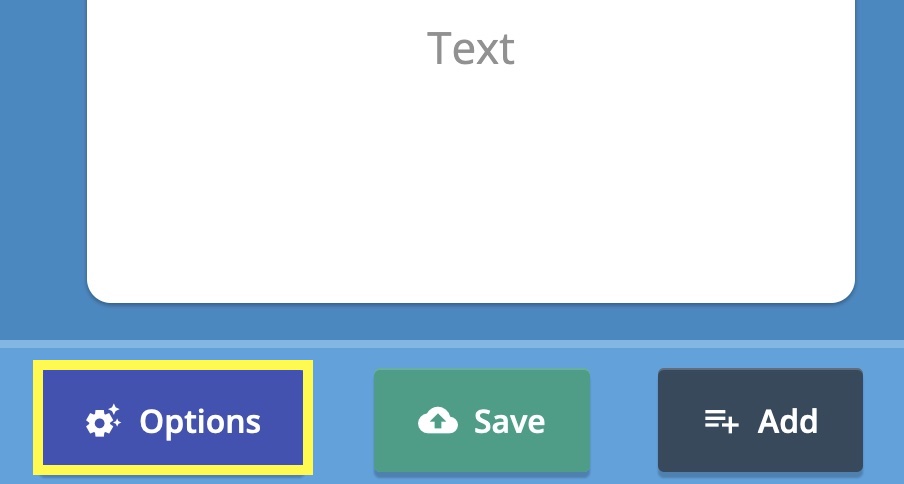
An 'options' panel will appear on the right of the screen.
To use both sides, press the 'Two' button:
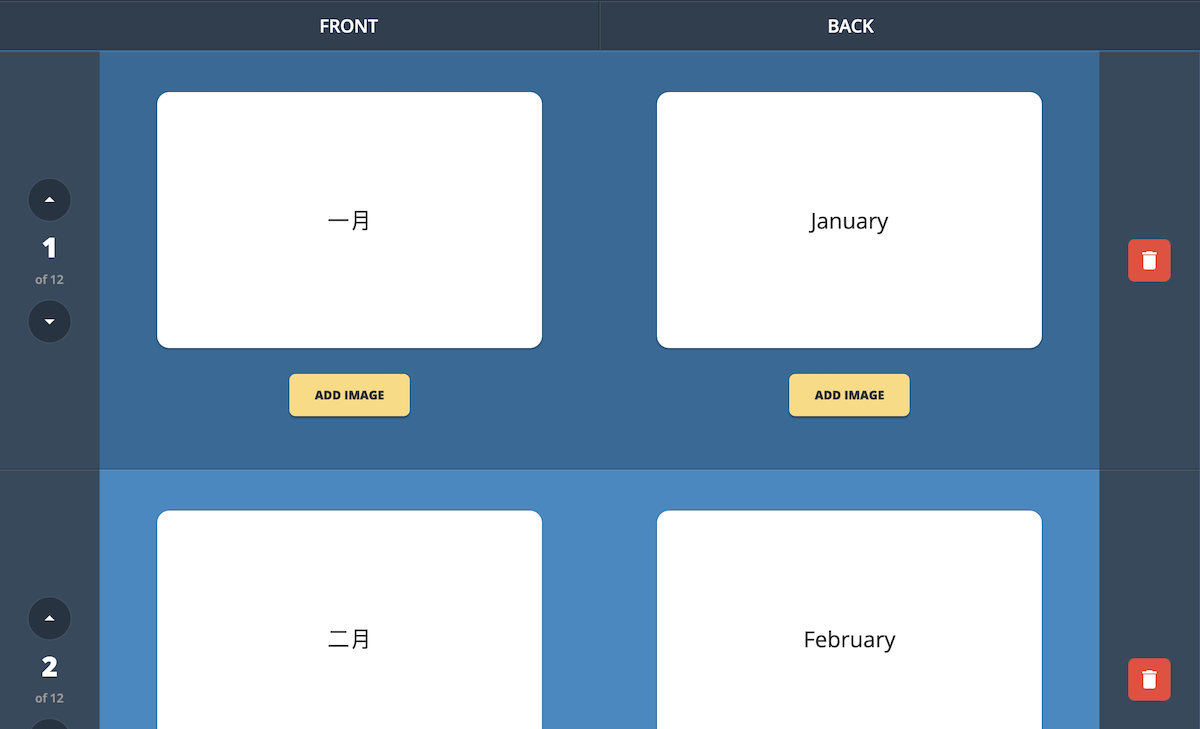
Adding Images
To add images to your cards, press the 'Options' button and move the 'Images' switch to the 'On' position:
You will see that an 'Add Image' button has been added beneath each card:
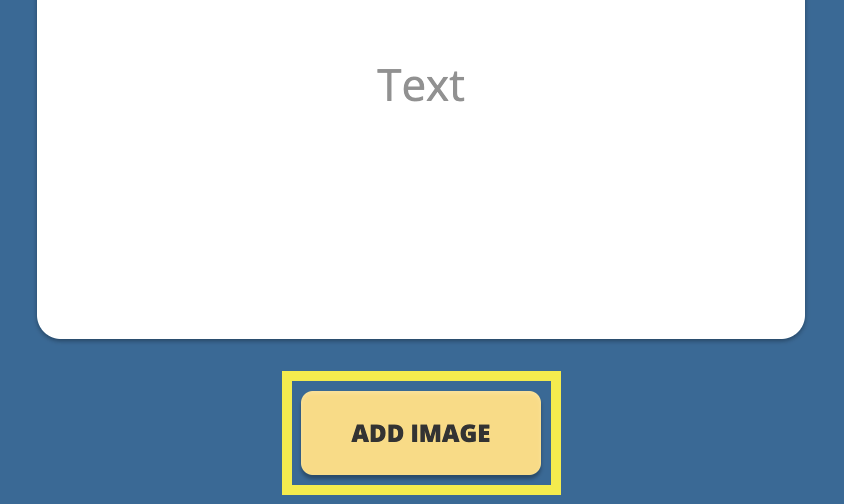
There are four ways to add images to your cards:
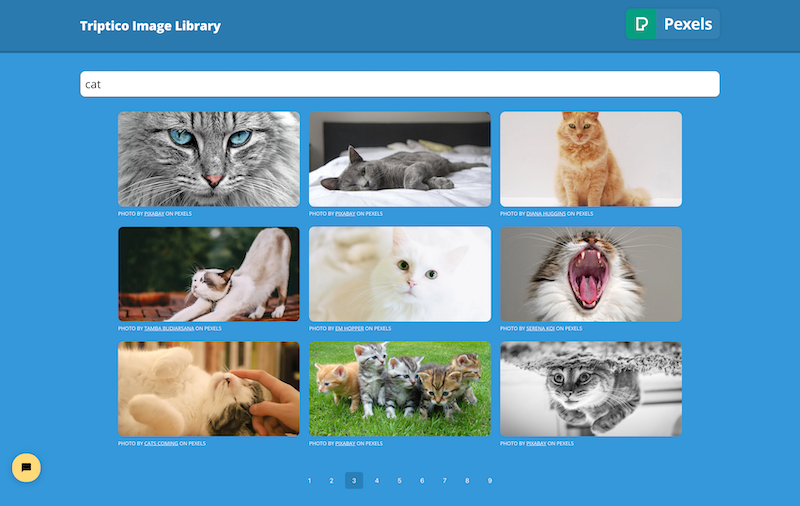
1: Image Library
Search the Triptico Image Library and select from thousands of images.
2: Browse
You can click the 'Add Image' button and select an image to add to the card.
3: Drag and Drop
You can drag and drop an image from your computer directly on to a card.
4: Paste
You can copy an image and then paste it to the text box of a card.
Tip!
The ways to add images to cards are demonstrated in this video.
Images that you add will be sized to best fit the card. Images will look the same with whichever resource you use to open the saved file with.
Can I edit the images that I add?
Answer!
True / False Content
Some resources - such as the Find Them resource - need to know whether the content of each card is true or false.
To enable true / false content, press the 'Options' button and move the 'True / False' switch to the 'On' position:

You will see that a new switch has appeared beneath each card. Use this switch to indicate whether the content of the card is true or false.
The activity below is about multiples of three:
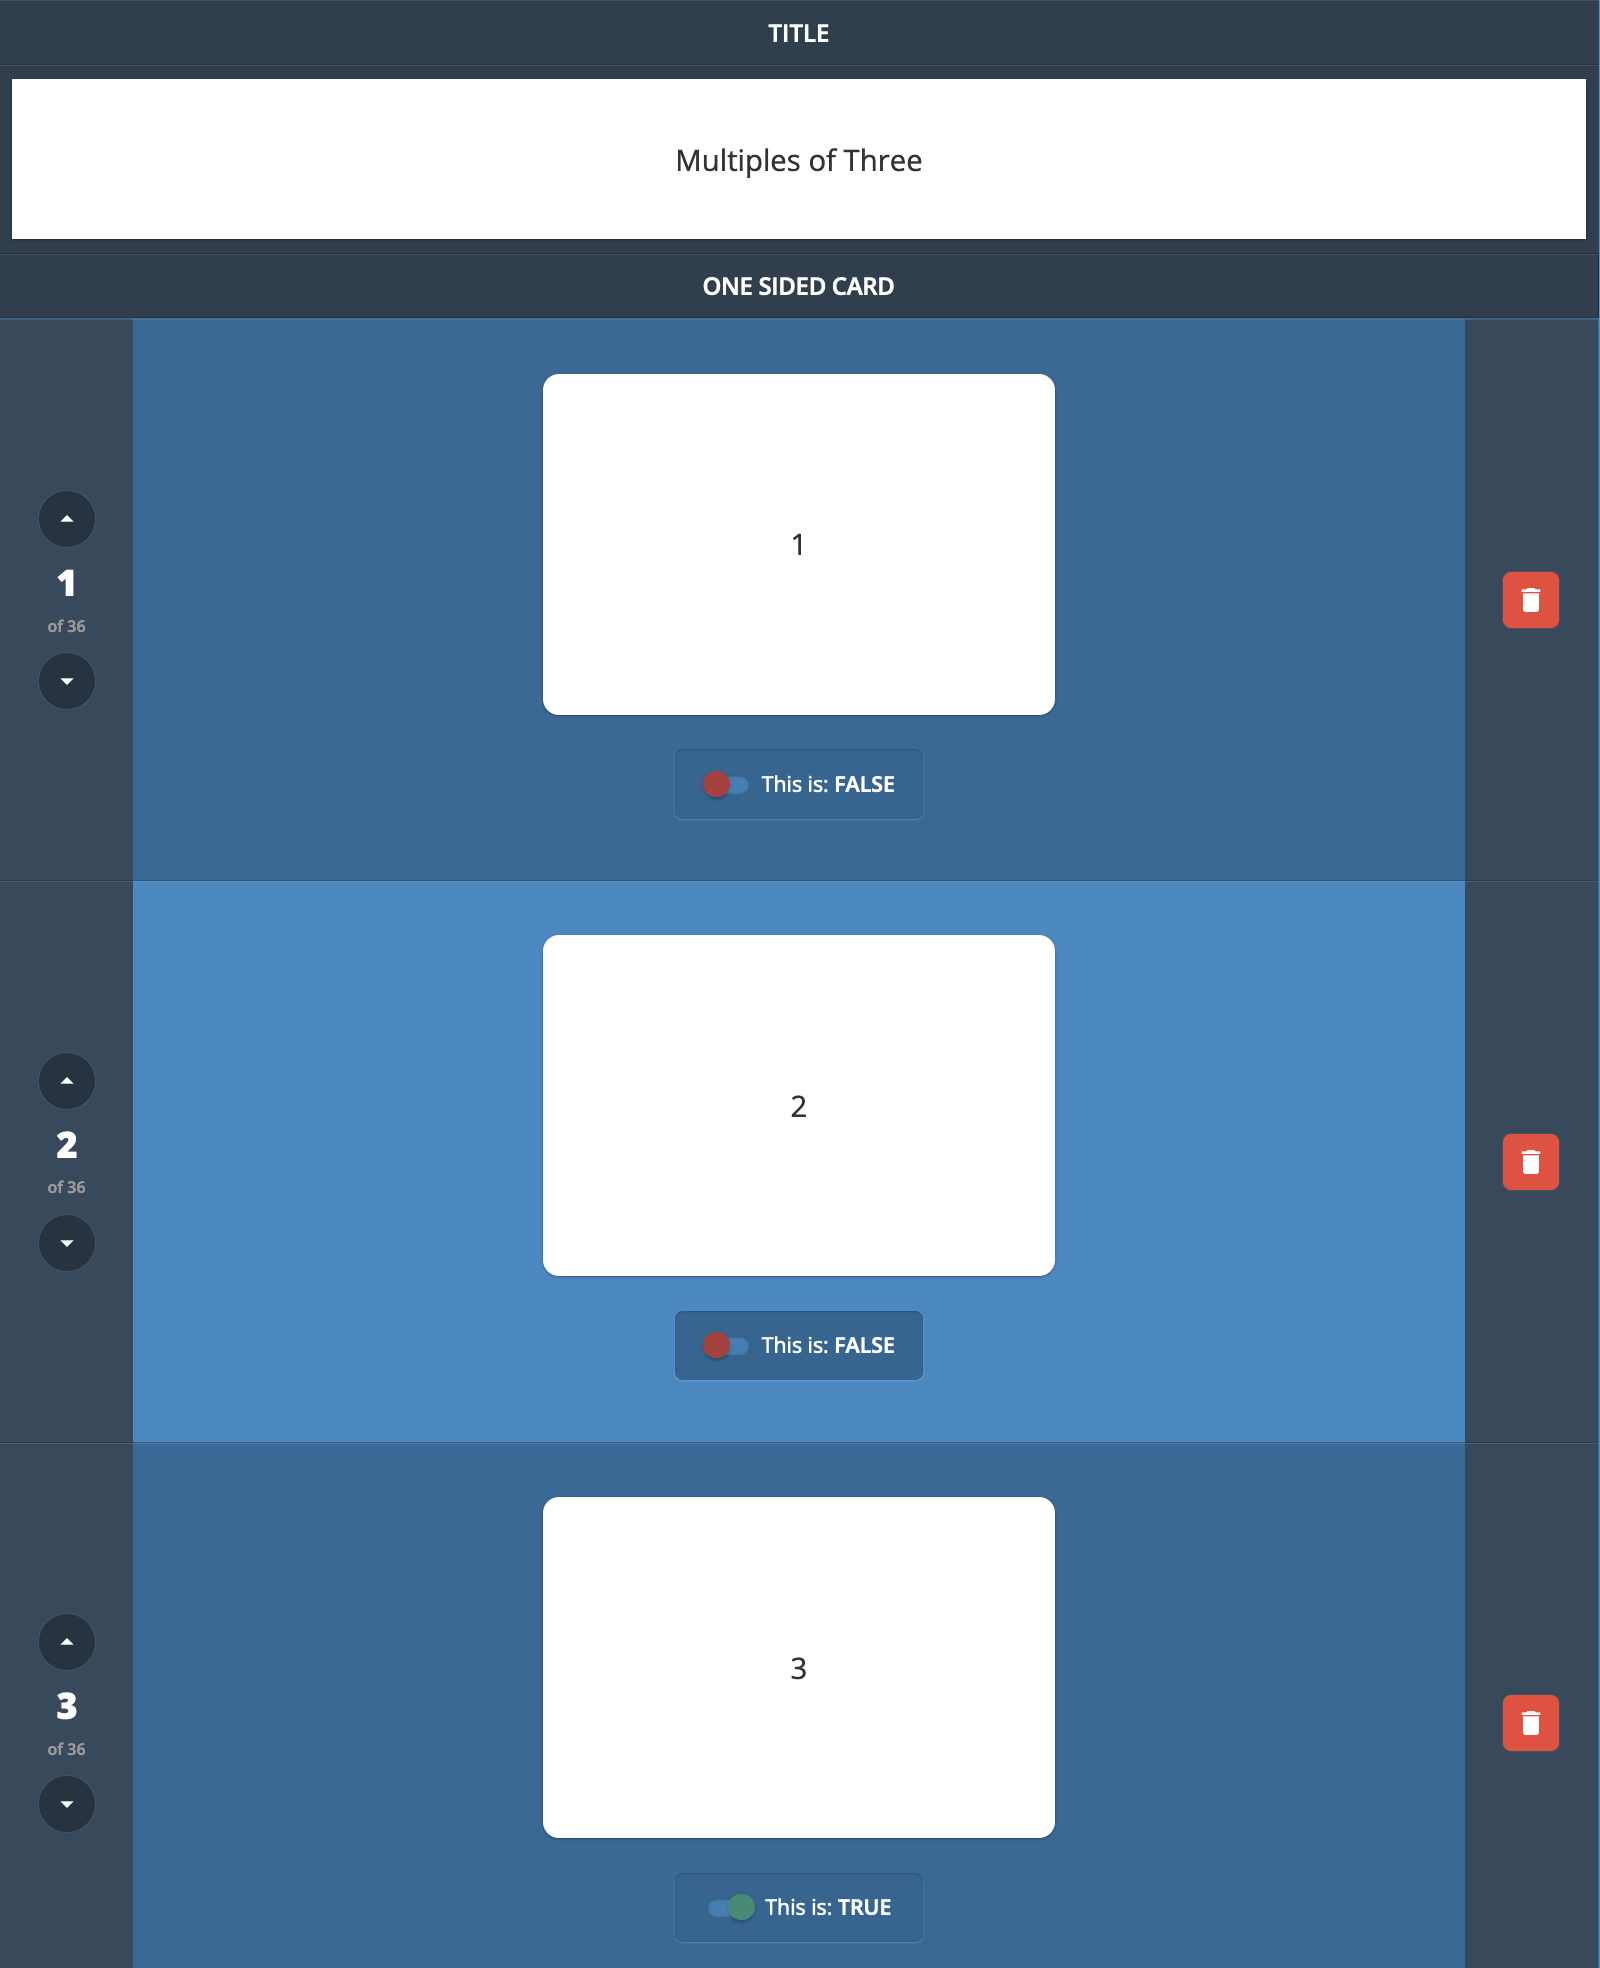
As you can see, the card containing the number '1' has been marked as false (because 1 is not a multiple of 3).
The card containing the number '3' has been marked as true.
If you are signed-in to the Triptico website then you can view the 36 cards in this saved file - and see which cards are marked as true and which are marked as false - by clicking here.
Can I open cards marked as true / false with other resources?
Answer!
Importing Content
If you already have the content that you would like to add to Triptico - a list of names, for example - then you can copy and paste them directly into Triptico.
Press the 'Options' button and then press the 'Import Data' button:
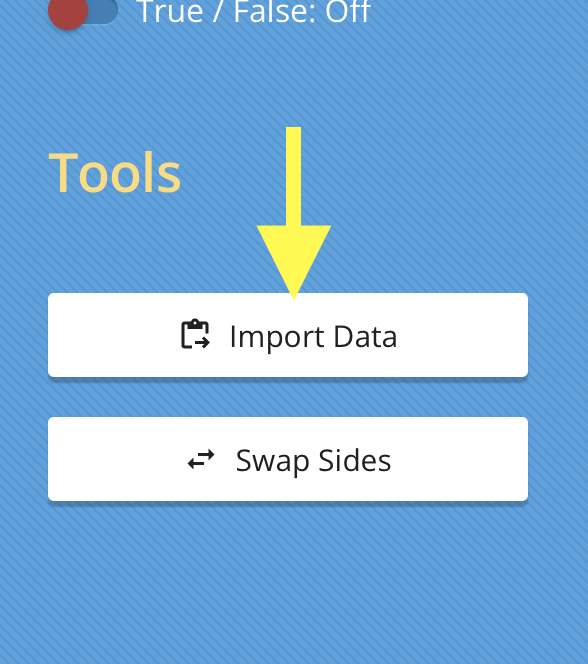
You can see how easy it is to import content in this video.
Important: Start a new line for each new card.
Tip!
You can use the 'Import Data' panel to type content to add to Triptico cards.
Again, the key is to remember to start a new line (press 'Enter') for each new card.
This can be a really quick way to create cards!
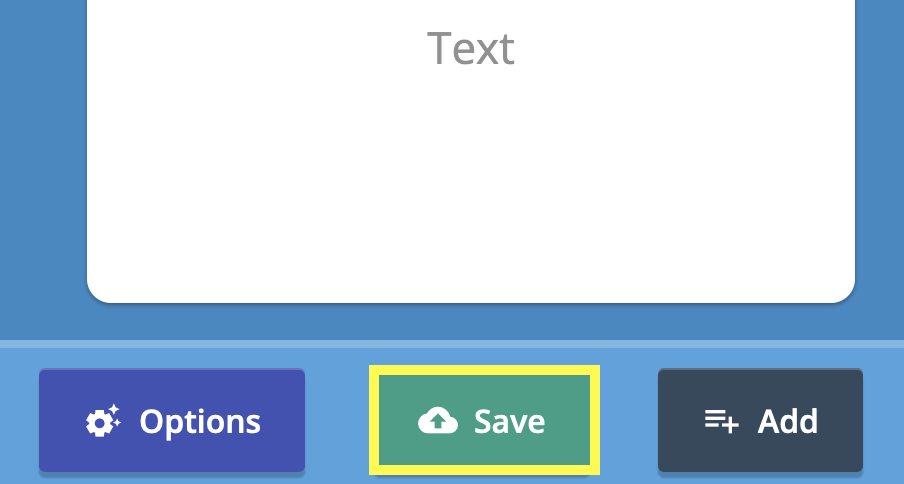
Saving an Activity
Press the 'Save' button to save your activity:
You will then see the following panel:
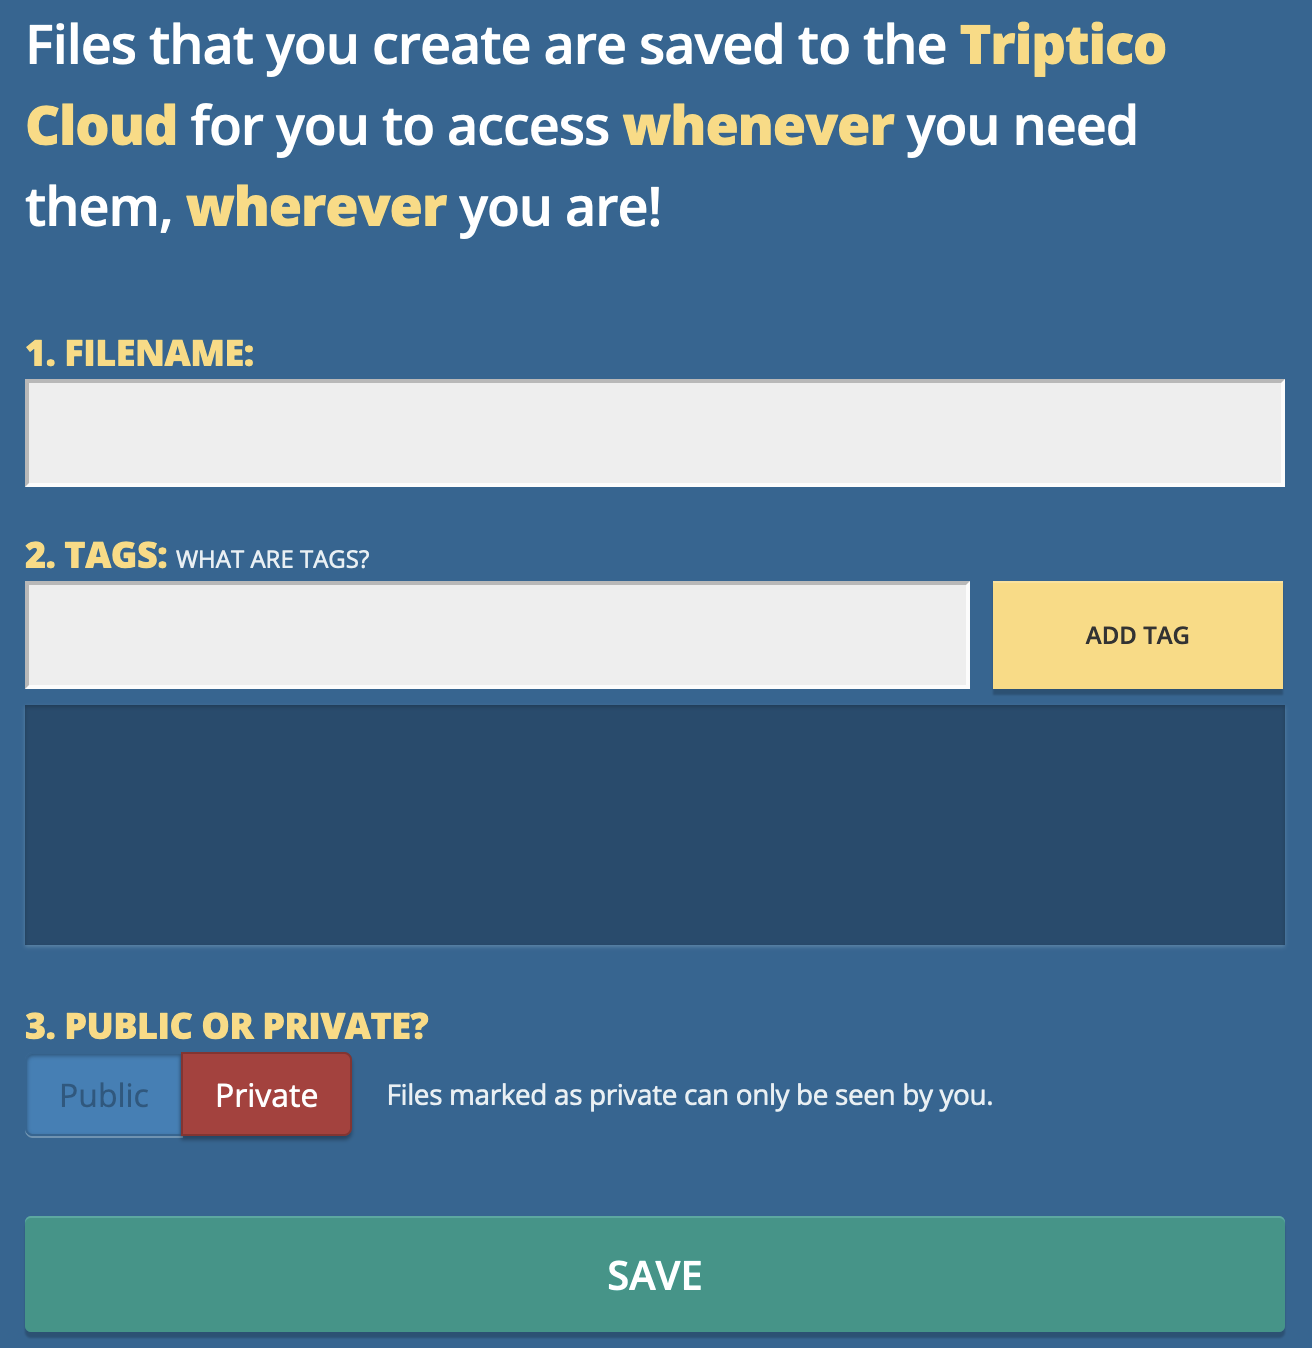
1: Filename
Give the file a name.
2: Add Tags
Tags are key words which will help you to find activities when searching the database.
You could add tags for the topic, the unit of work, year group and so on - anything that will help you when searching the database in the future.
3: Public or Private?
Choose whether to mark the saved file as public (visible to other users) or private (visible only to you).
You can change this at any time by clicking the 'Public' button in the file panel (number 4 in this image).
What are Lessons?
Think of lessons as interactive slideshows that can be saved and shared with colleagues and students in exactly the same way as a Triptico activity.
It is easy to create interactive lessons and presentations with Triptico!
It is easy to create interactive lessons and presentations with Triptico!
They can used on a big screen for whole-class teaching, on smaller devices for group work or independent study, and shared for students to access at home to revise a topic or in preparation for a future lesson.
They are easy to create - with a library of templates to choose from! - interactive and engaging!
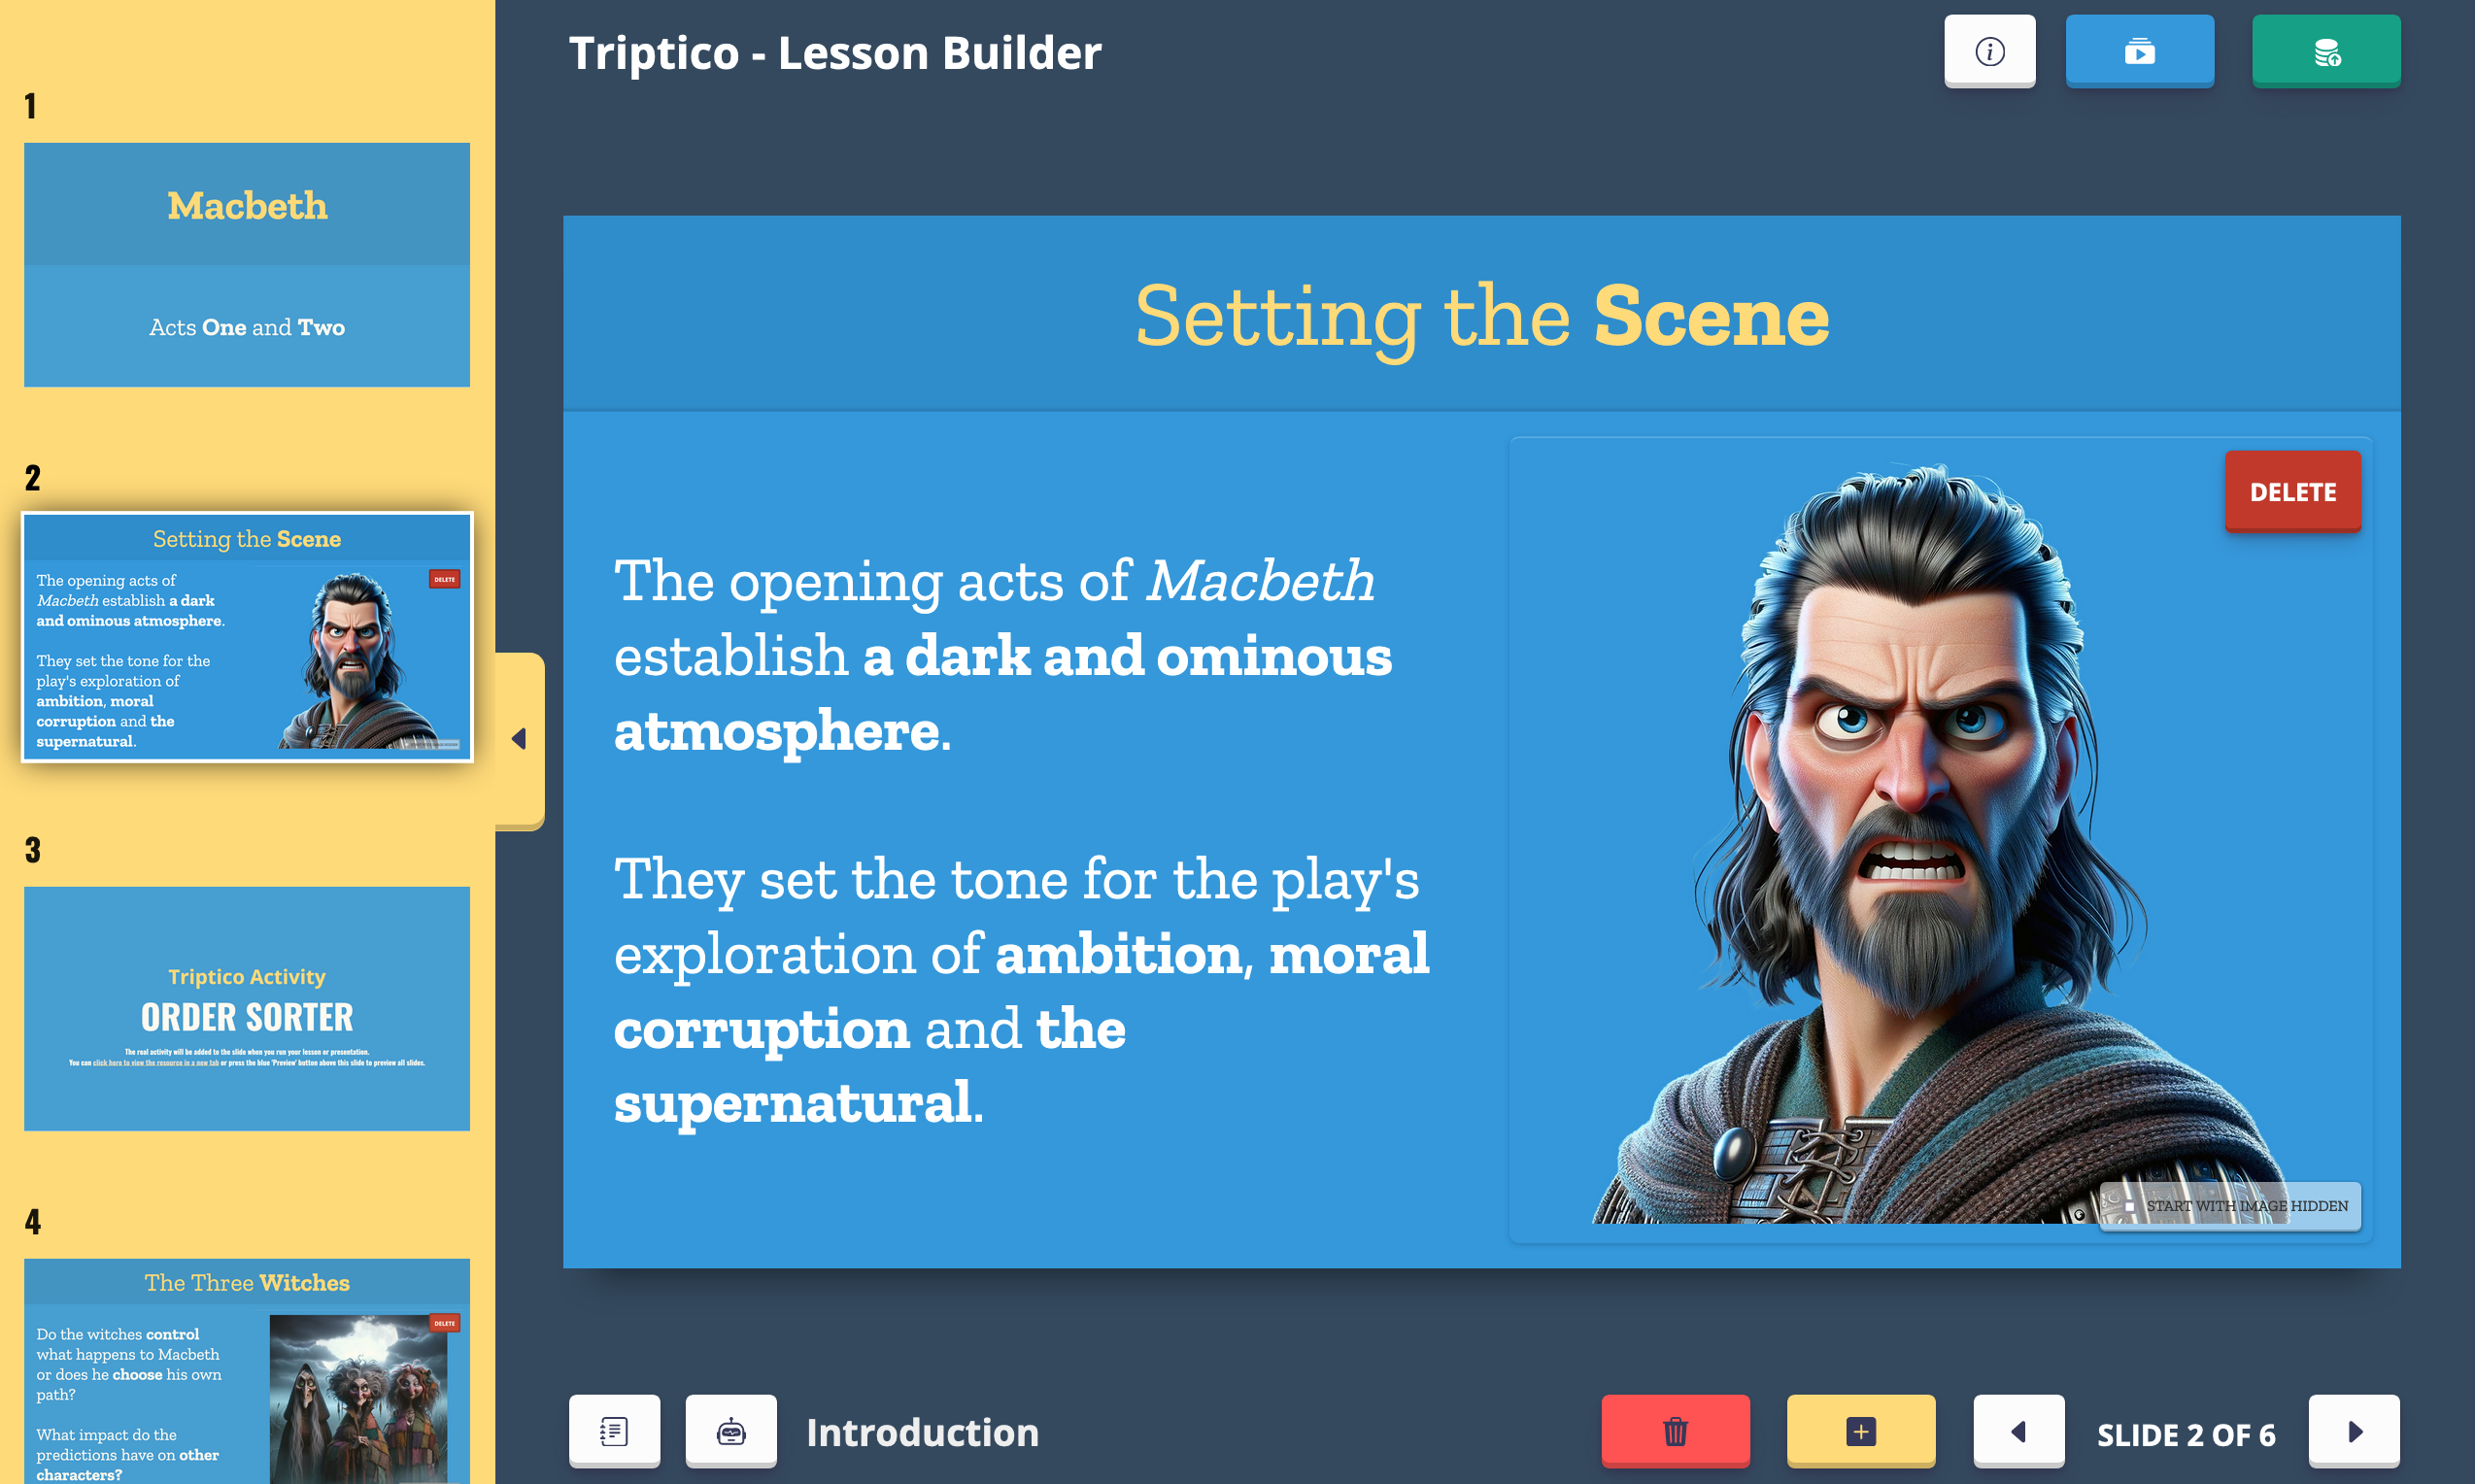
Creating a Lesson
When you create a new lesson with Triptico's Lesson Builder, you will see the following screen:
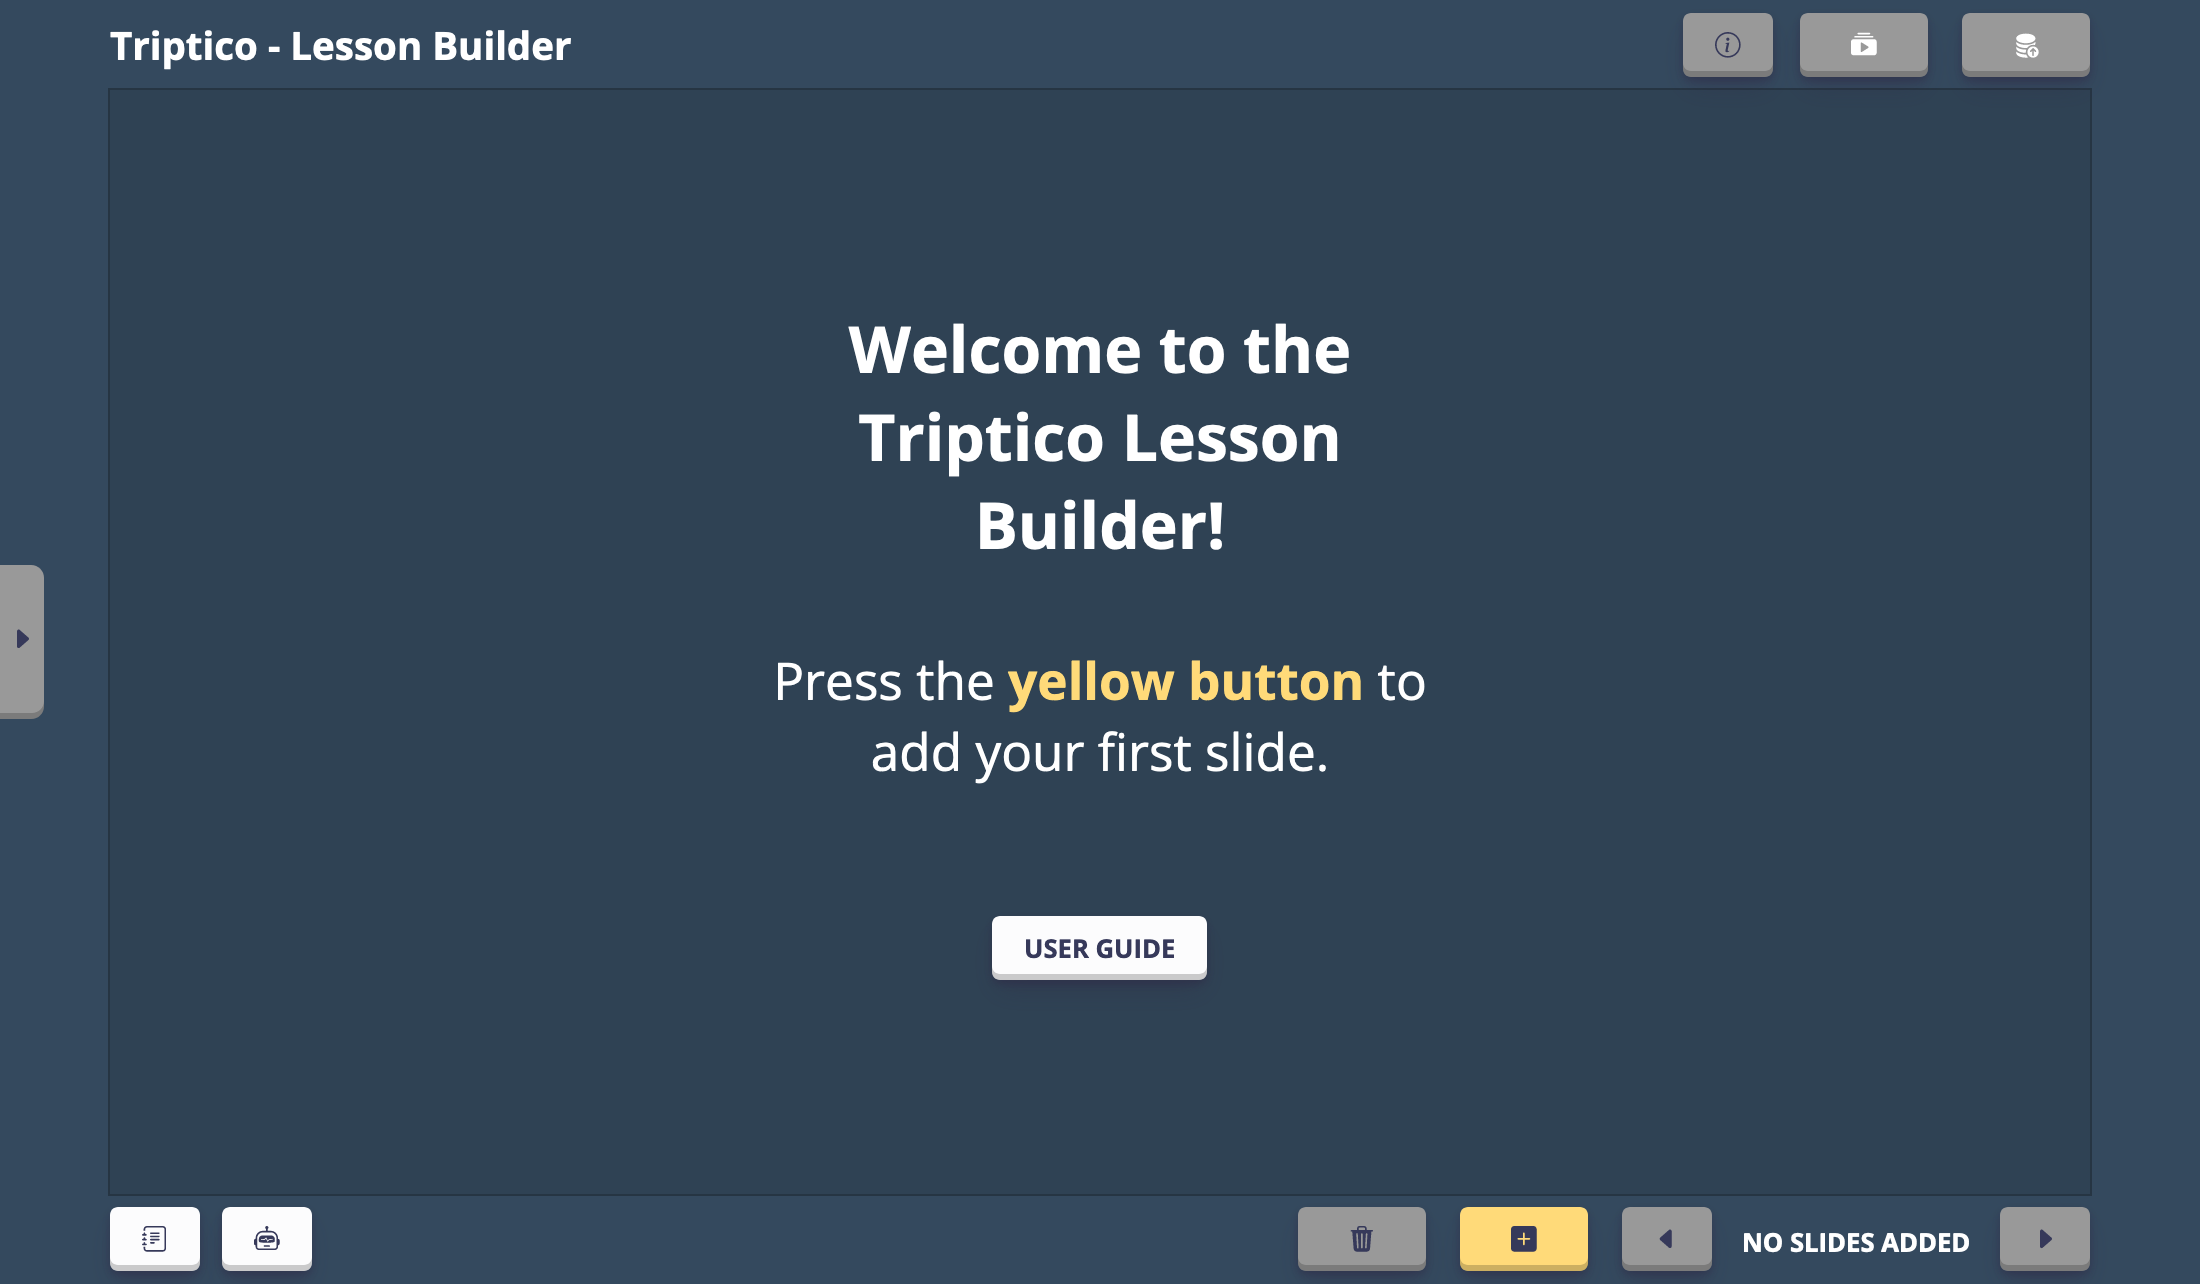
To add your first slide, simply press the yellow 'Add Slide' button.
Lesson Builder Templates
You have many different templates to choose from when you add a new slide:
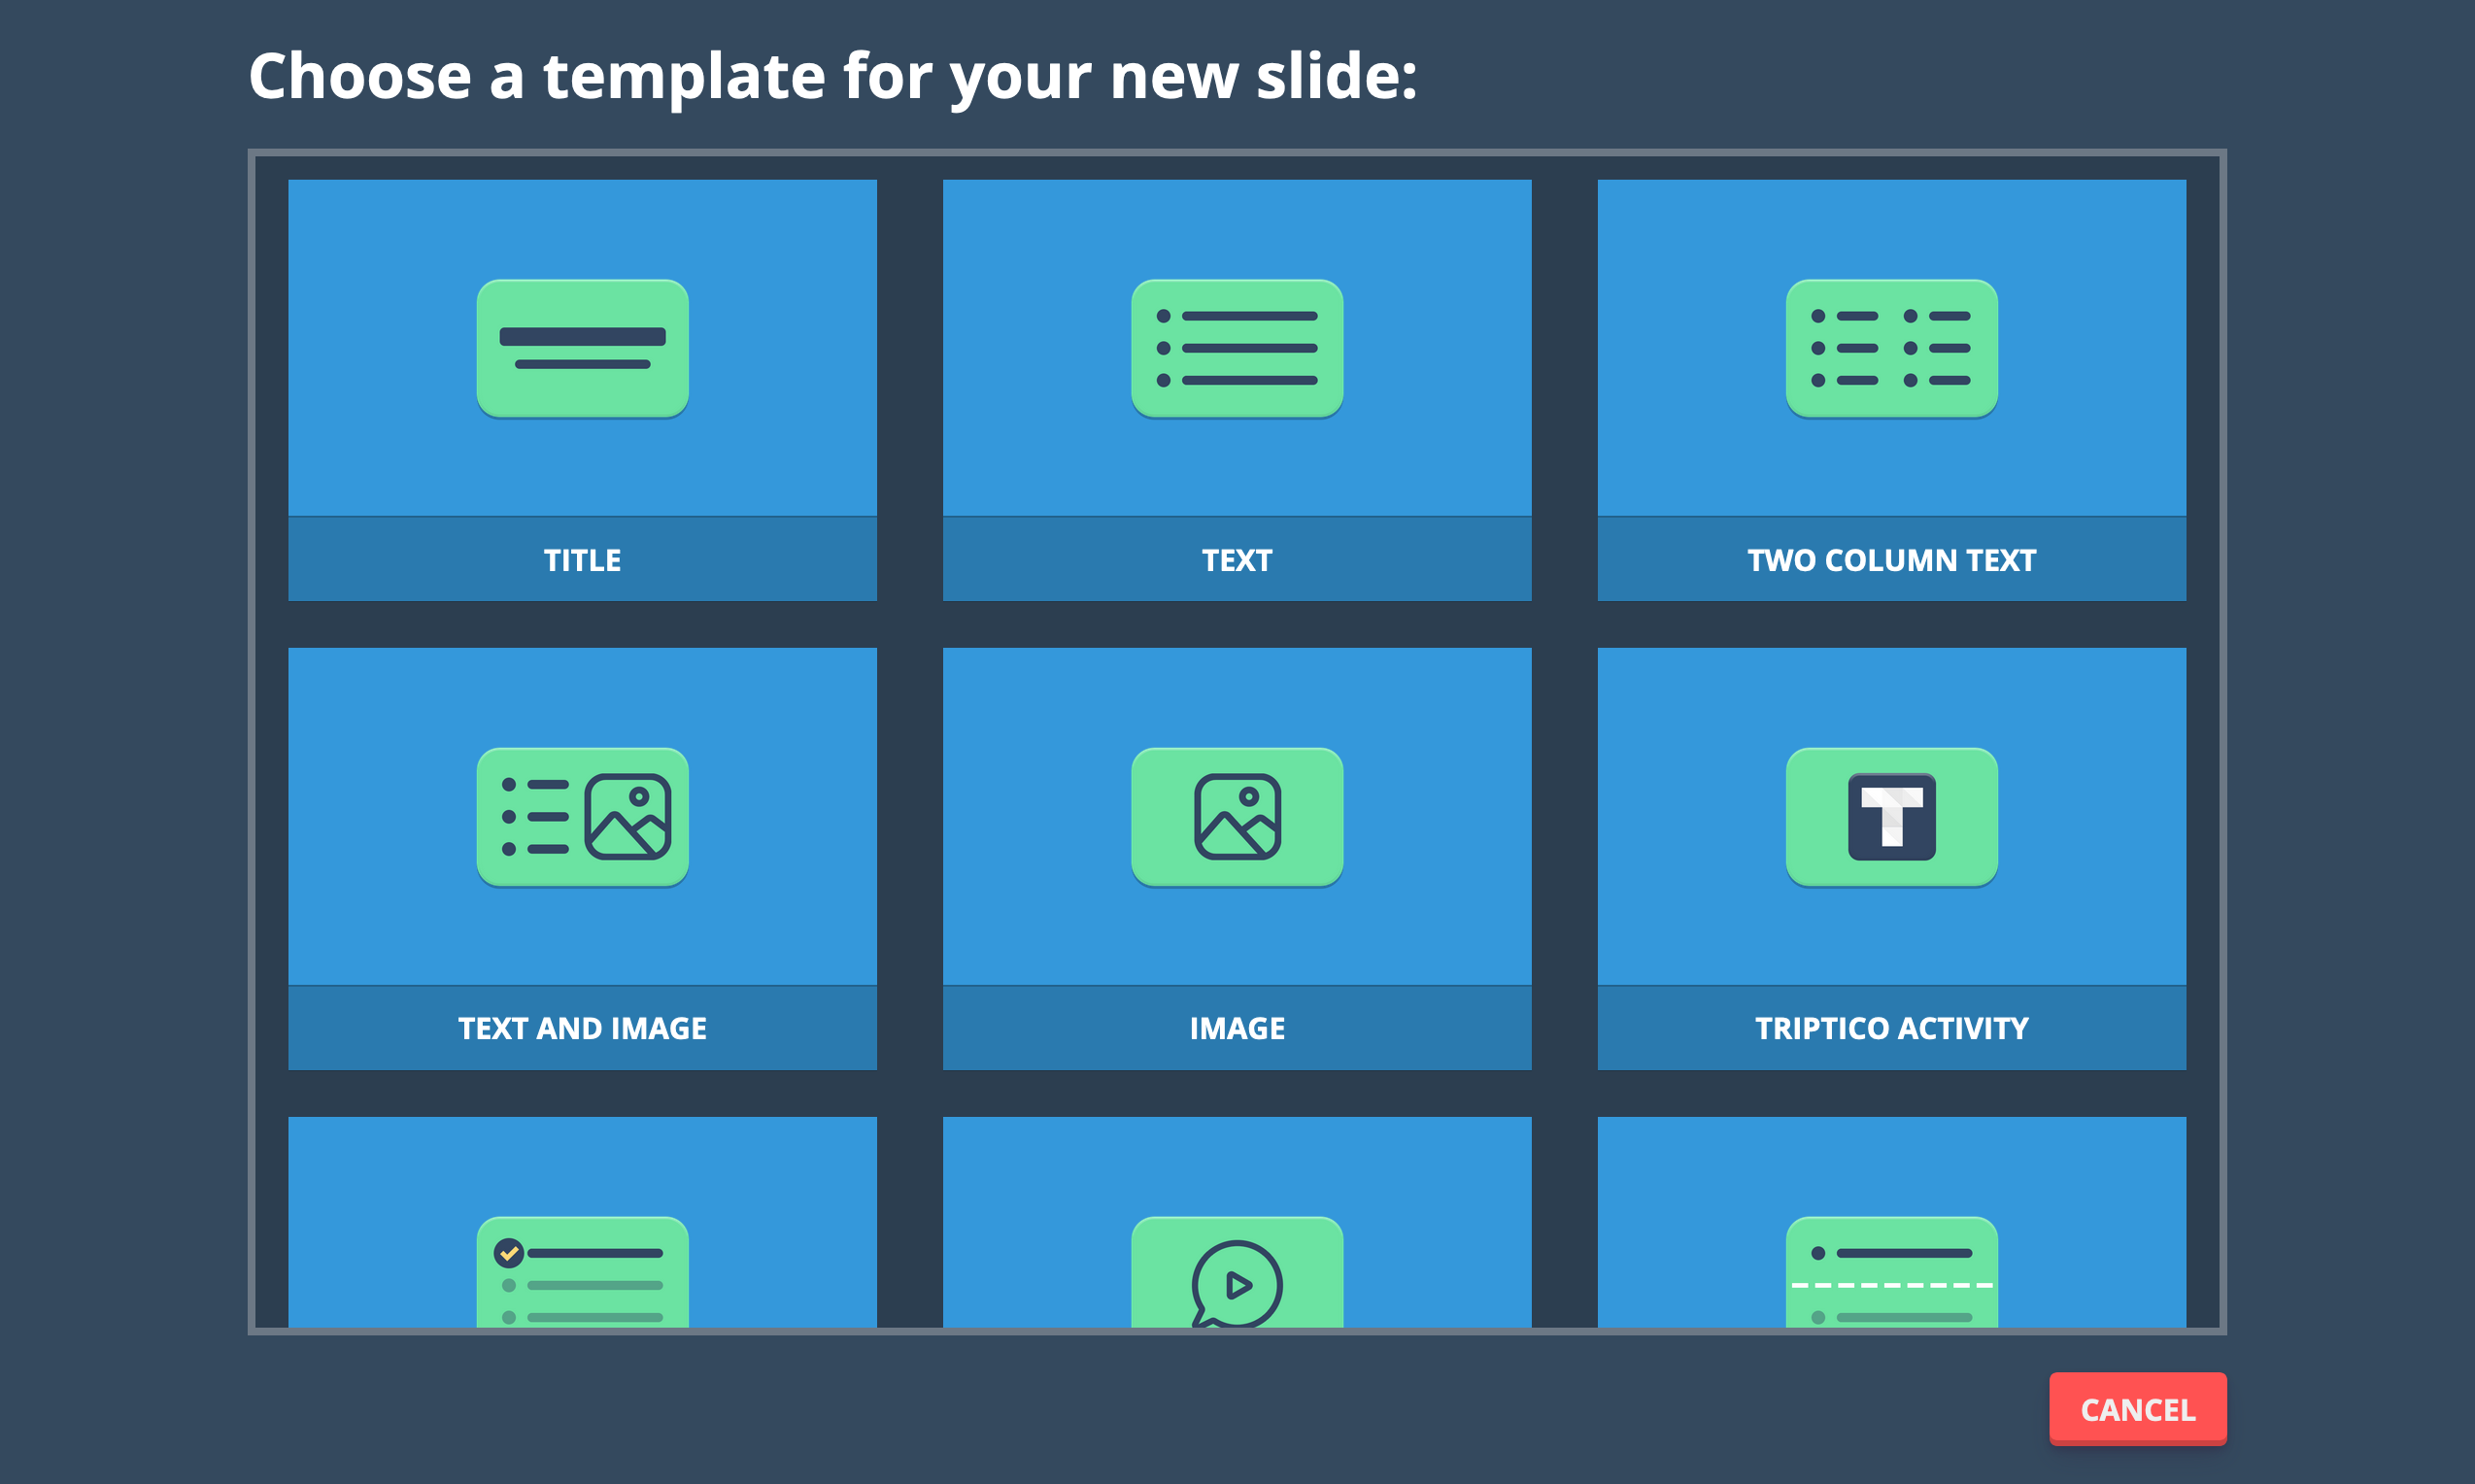
Simply click on the template that you would like to use for your new slide.
Tip!
Click here and select the 'Lessons' tab to view all of the available templates.
Adding Text:
If the template that you choose has a text area then you can click on it to edit the text.
When editing text, you can highlight words to add formatting (bold, underline and so on) and also to hide words, to add a link and so on:
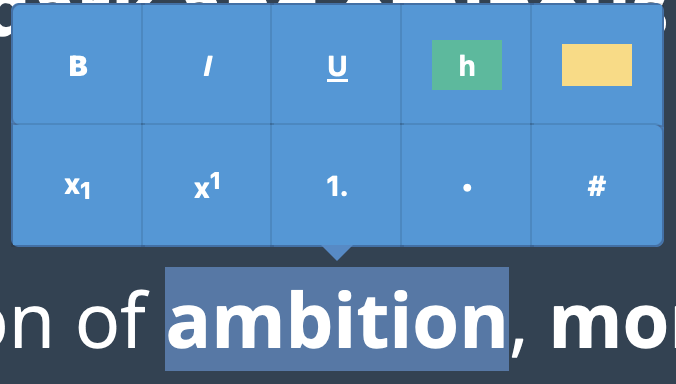
Highlight text to add formatting, links and so on.
Highlight text to add formatting, links and so on.
From left to right, the buttons above are: (Top Row) Bold; Italics; Underline; Highlight; Hide; (Bottom Row) Subscript; Superscript; Numbered List; Bullet List; Link.
Adding an Image:
If the template has a place for an image then you can click to browse for an image to add, drop an image on the slide or paste a copied image into the text box.
Tip!
You have the option to hide images that you add.
In the Lesson Player, you can also click on images to view them full screen.
Embedding Triptico Resources
It is very easy to embed Triptico resource directly into your lessons.
This is done by selecting the 'Triptico Activity' template.
This template contains a text area. Open the activity that you would like to embed, with whichever resource you would like to use, copy the URL and then paste it into the template:
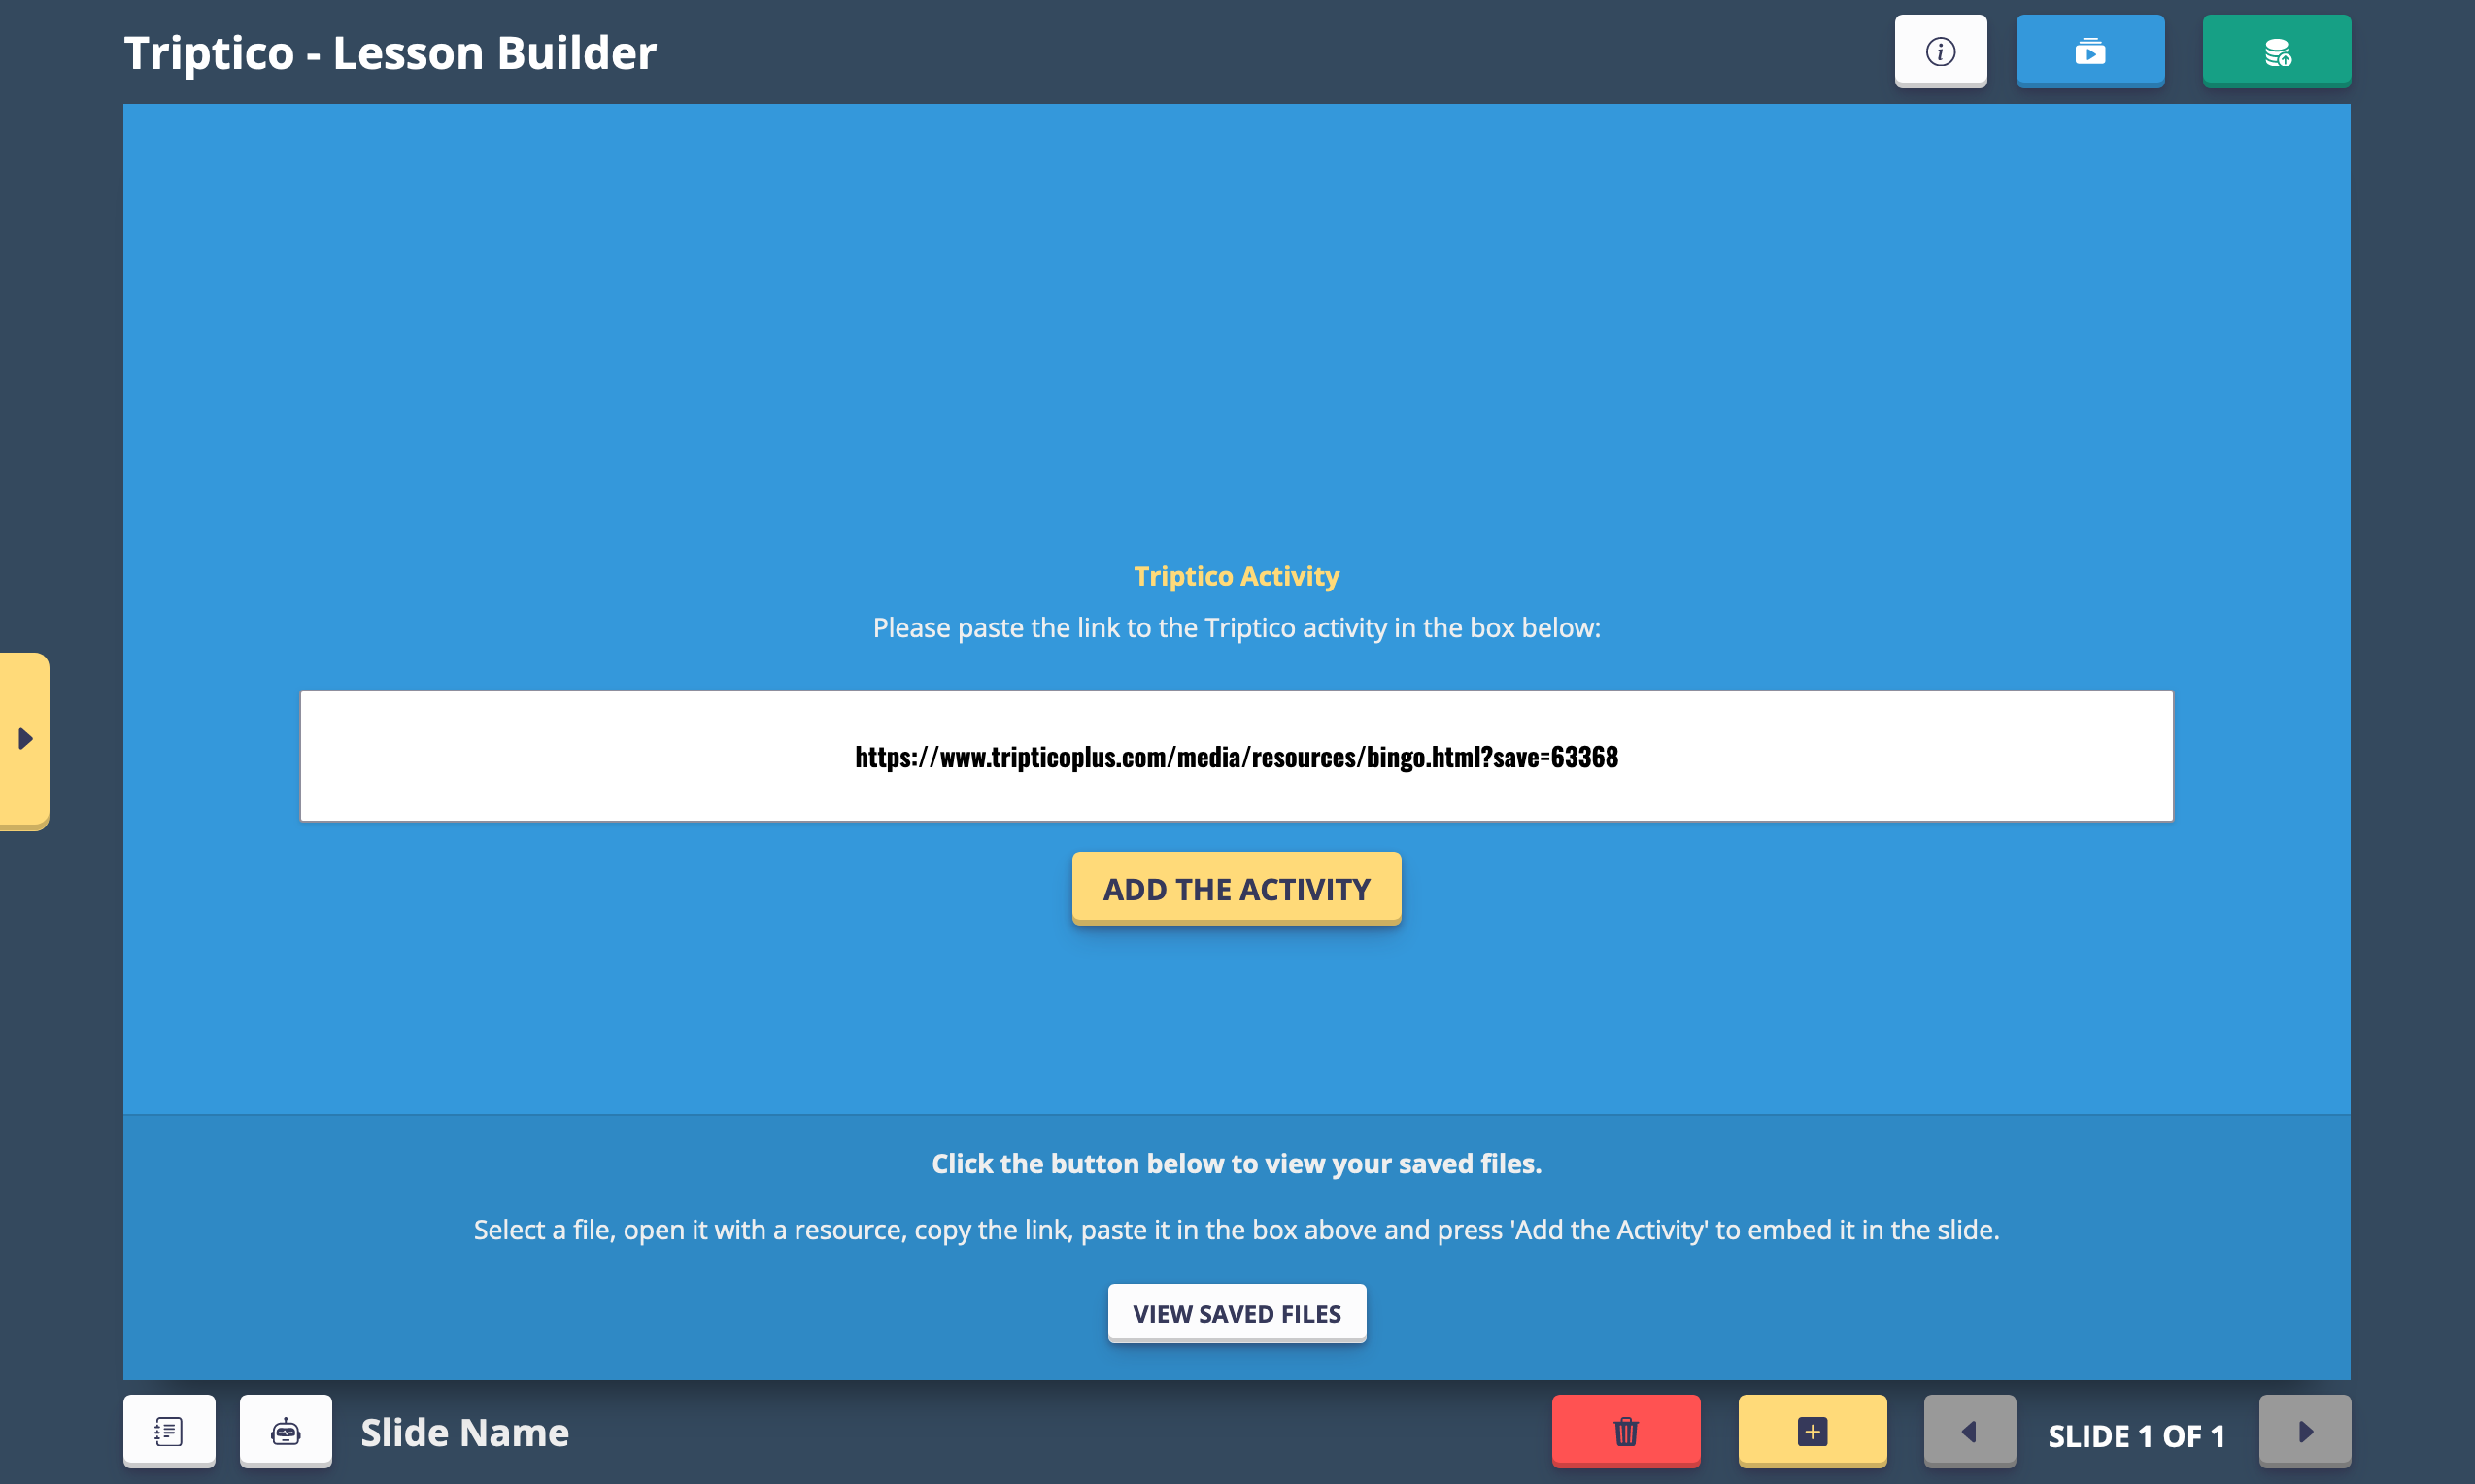
The URL will look something like this:
https://www.tripticoplus.com/media/resources/bingo.html?save=63368
You can then press the 'Add the Activity' button to embed the resource in your lesson.
Tip!
If you are going to be using multiple Triptico resources in a lesson, it can be helpful to embed them in a lesson in advance.
Opening many resources in a single lesson is much more convenient than having many tabs open in your browser.
It also makes sharing the resources easier!
Slide Sorter
Open the panel on the left of the screen to view the slide sorter:
Click on a thumbnail in the slide sorter to view the slide or drag a thumbnail up or down to reorder it.
Naming Slides
You can add a name to each of your slides (highlighted in the image below).
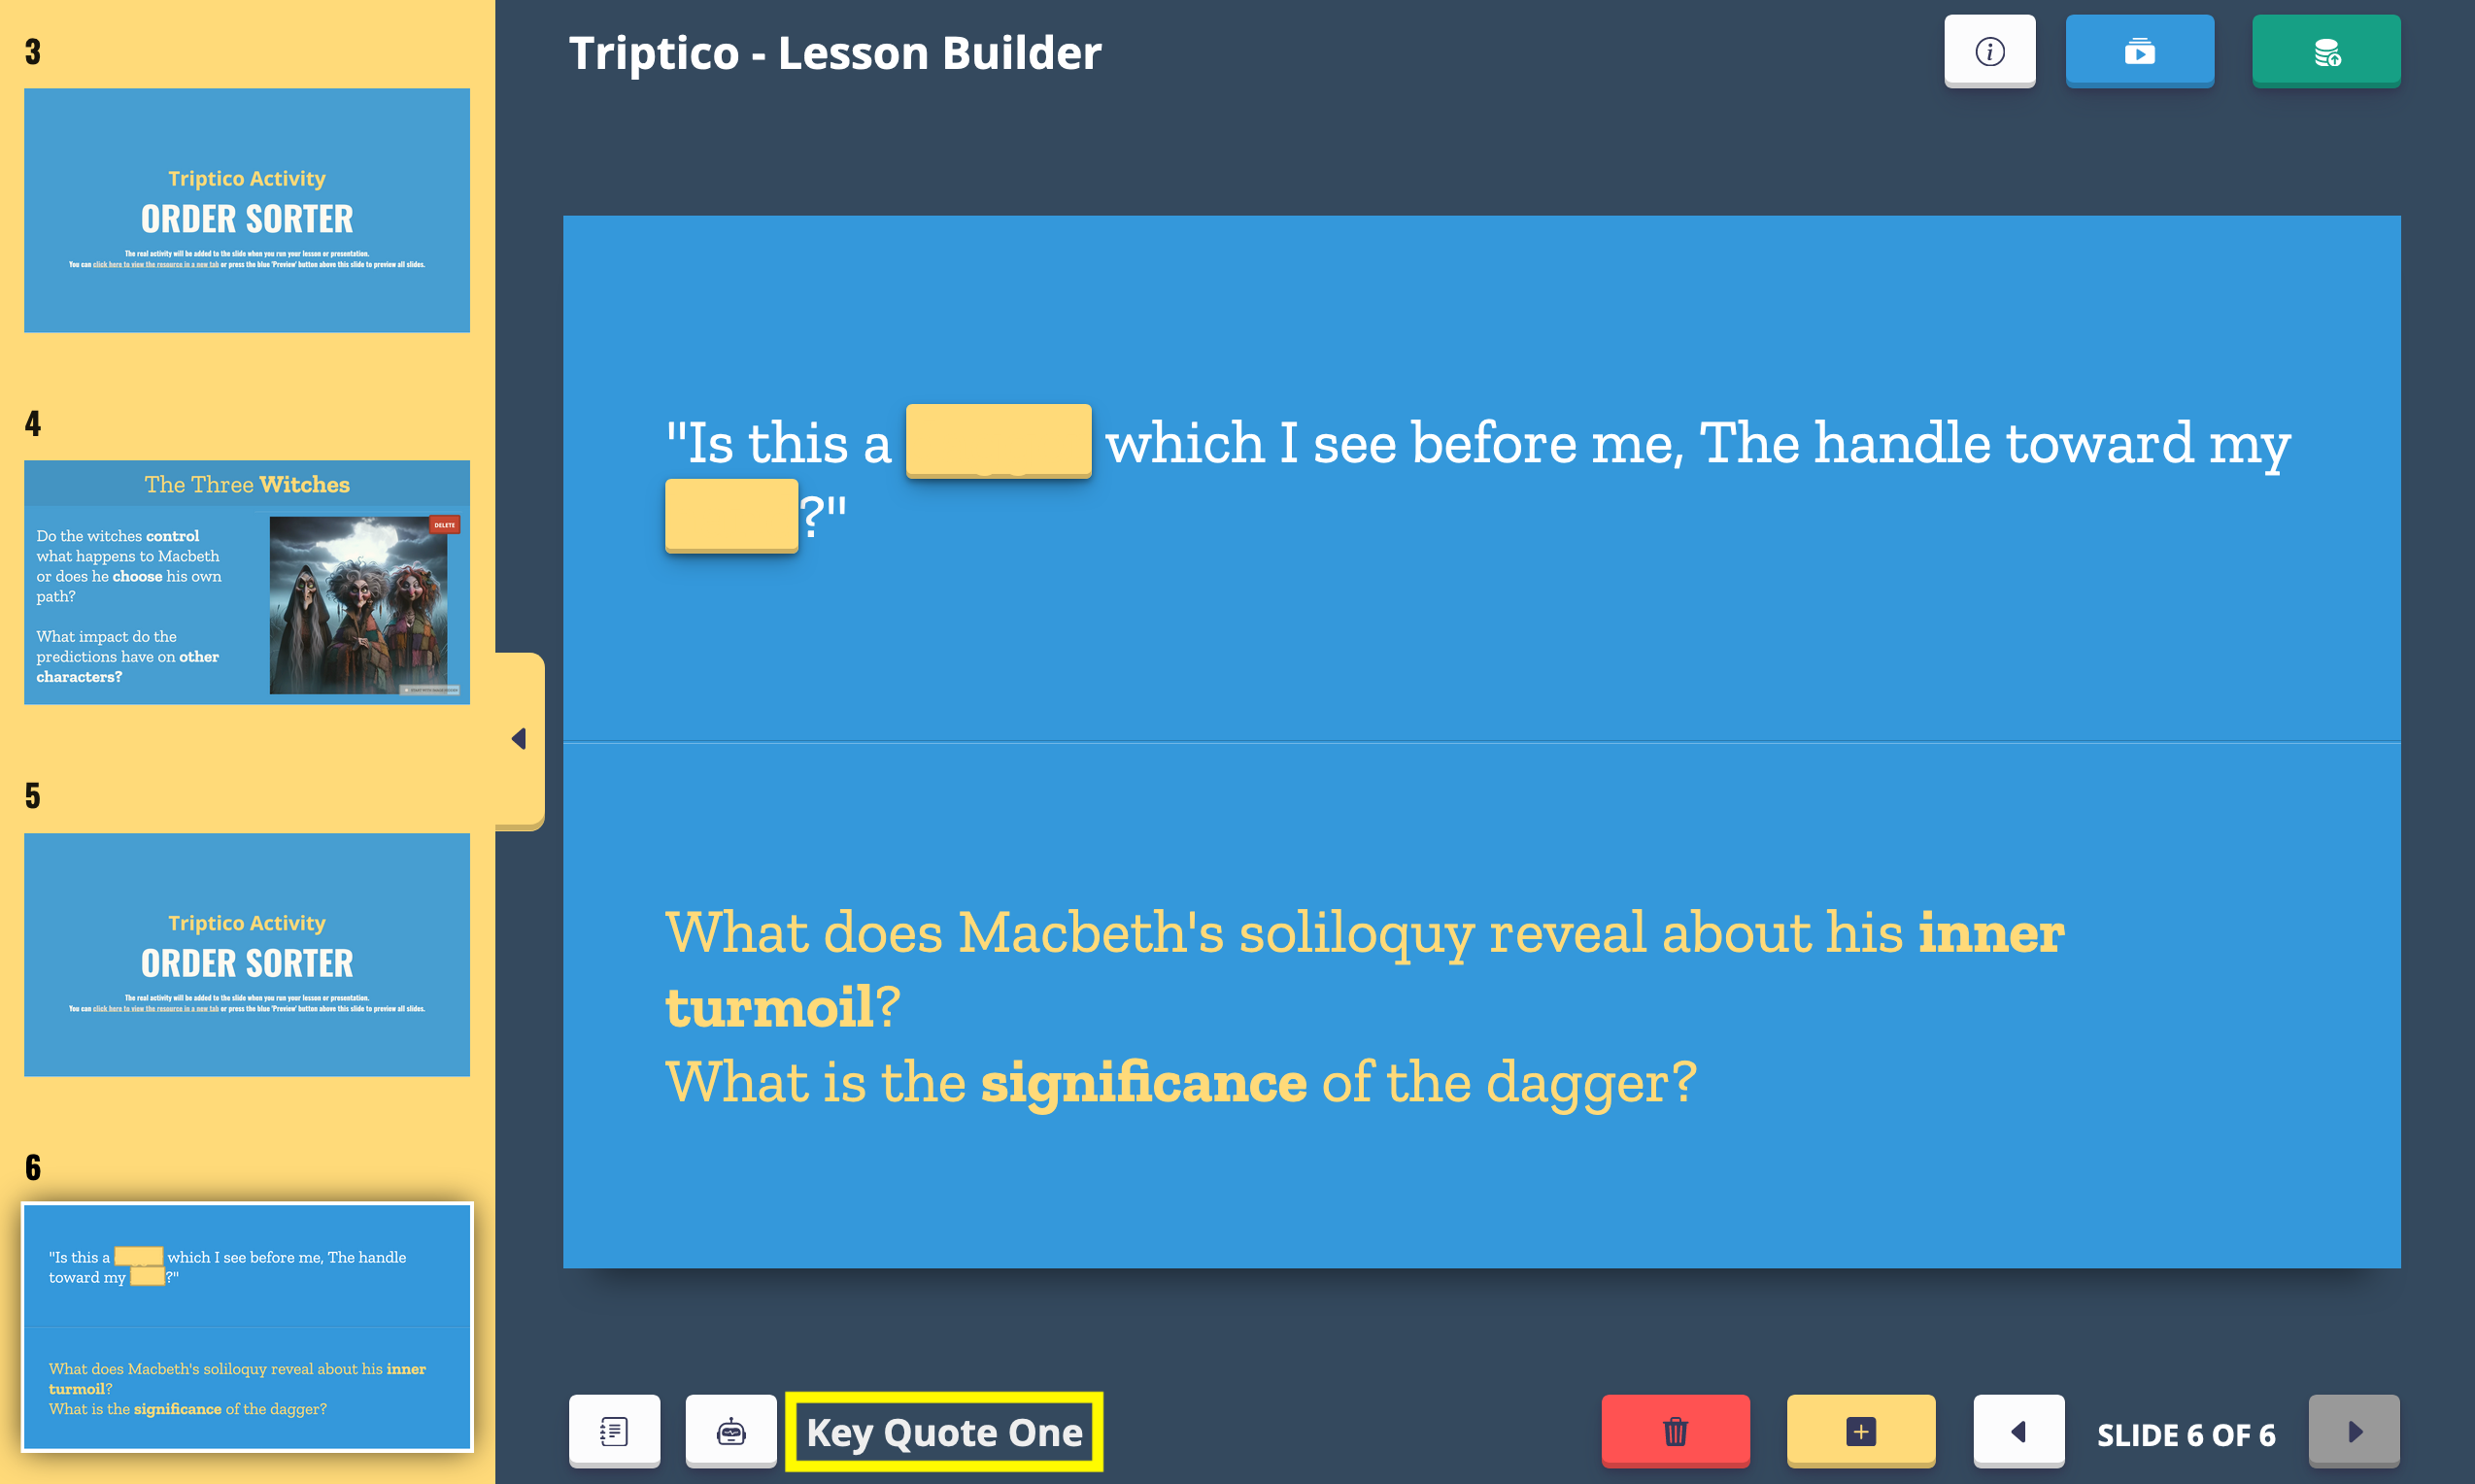
You can give a name to each slide that you create.
You can give a name to each slide that you create.
Adding a name to each slide will make it easier to navigate in the Lesson Player.
Save the Lesson
You can save your lesson by clicking this button:
Saving a lesson is exactly the same as saving an activity.
Choose a filename, add some tags and then set your lesson as public or private.
It is a good idea to save your lesson regularly as you work on it!
Preview the Lesson
You can preview your lesson so far by clicking this button:
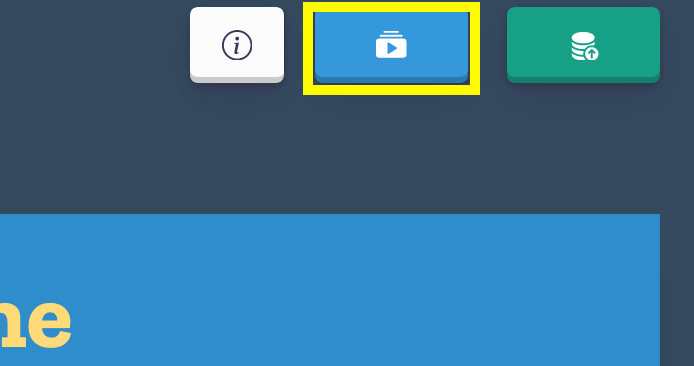
The lesson will open in a new tab for you to preview.
Close the preview when you are ready to return to the Lesson Builder.
Delete a Slide
Press the red button (highlighted in the image below) to delete the current slide:

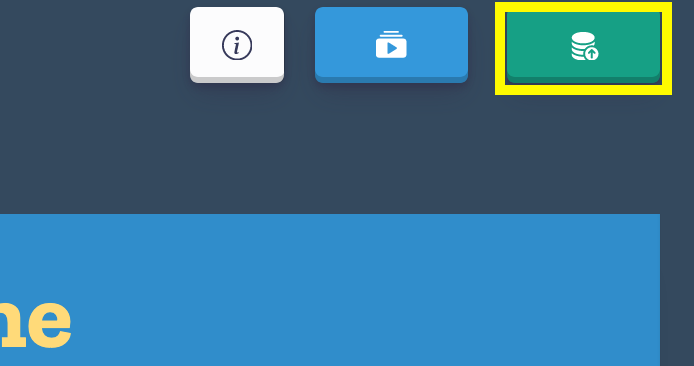
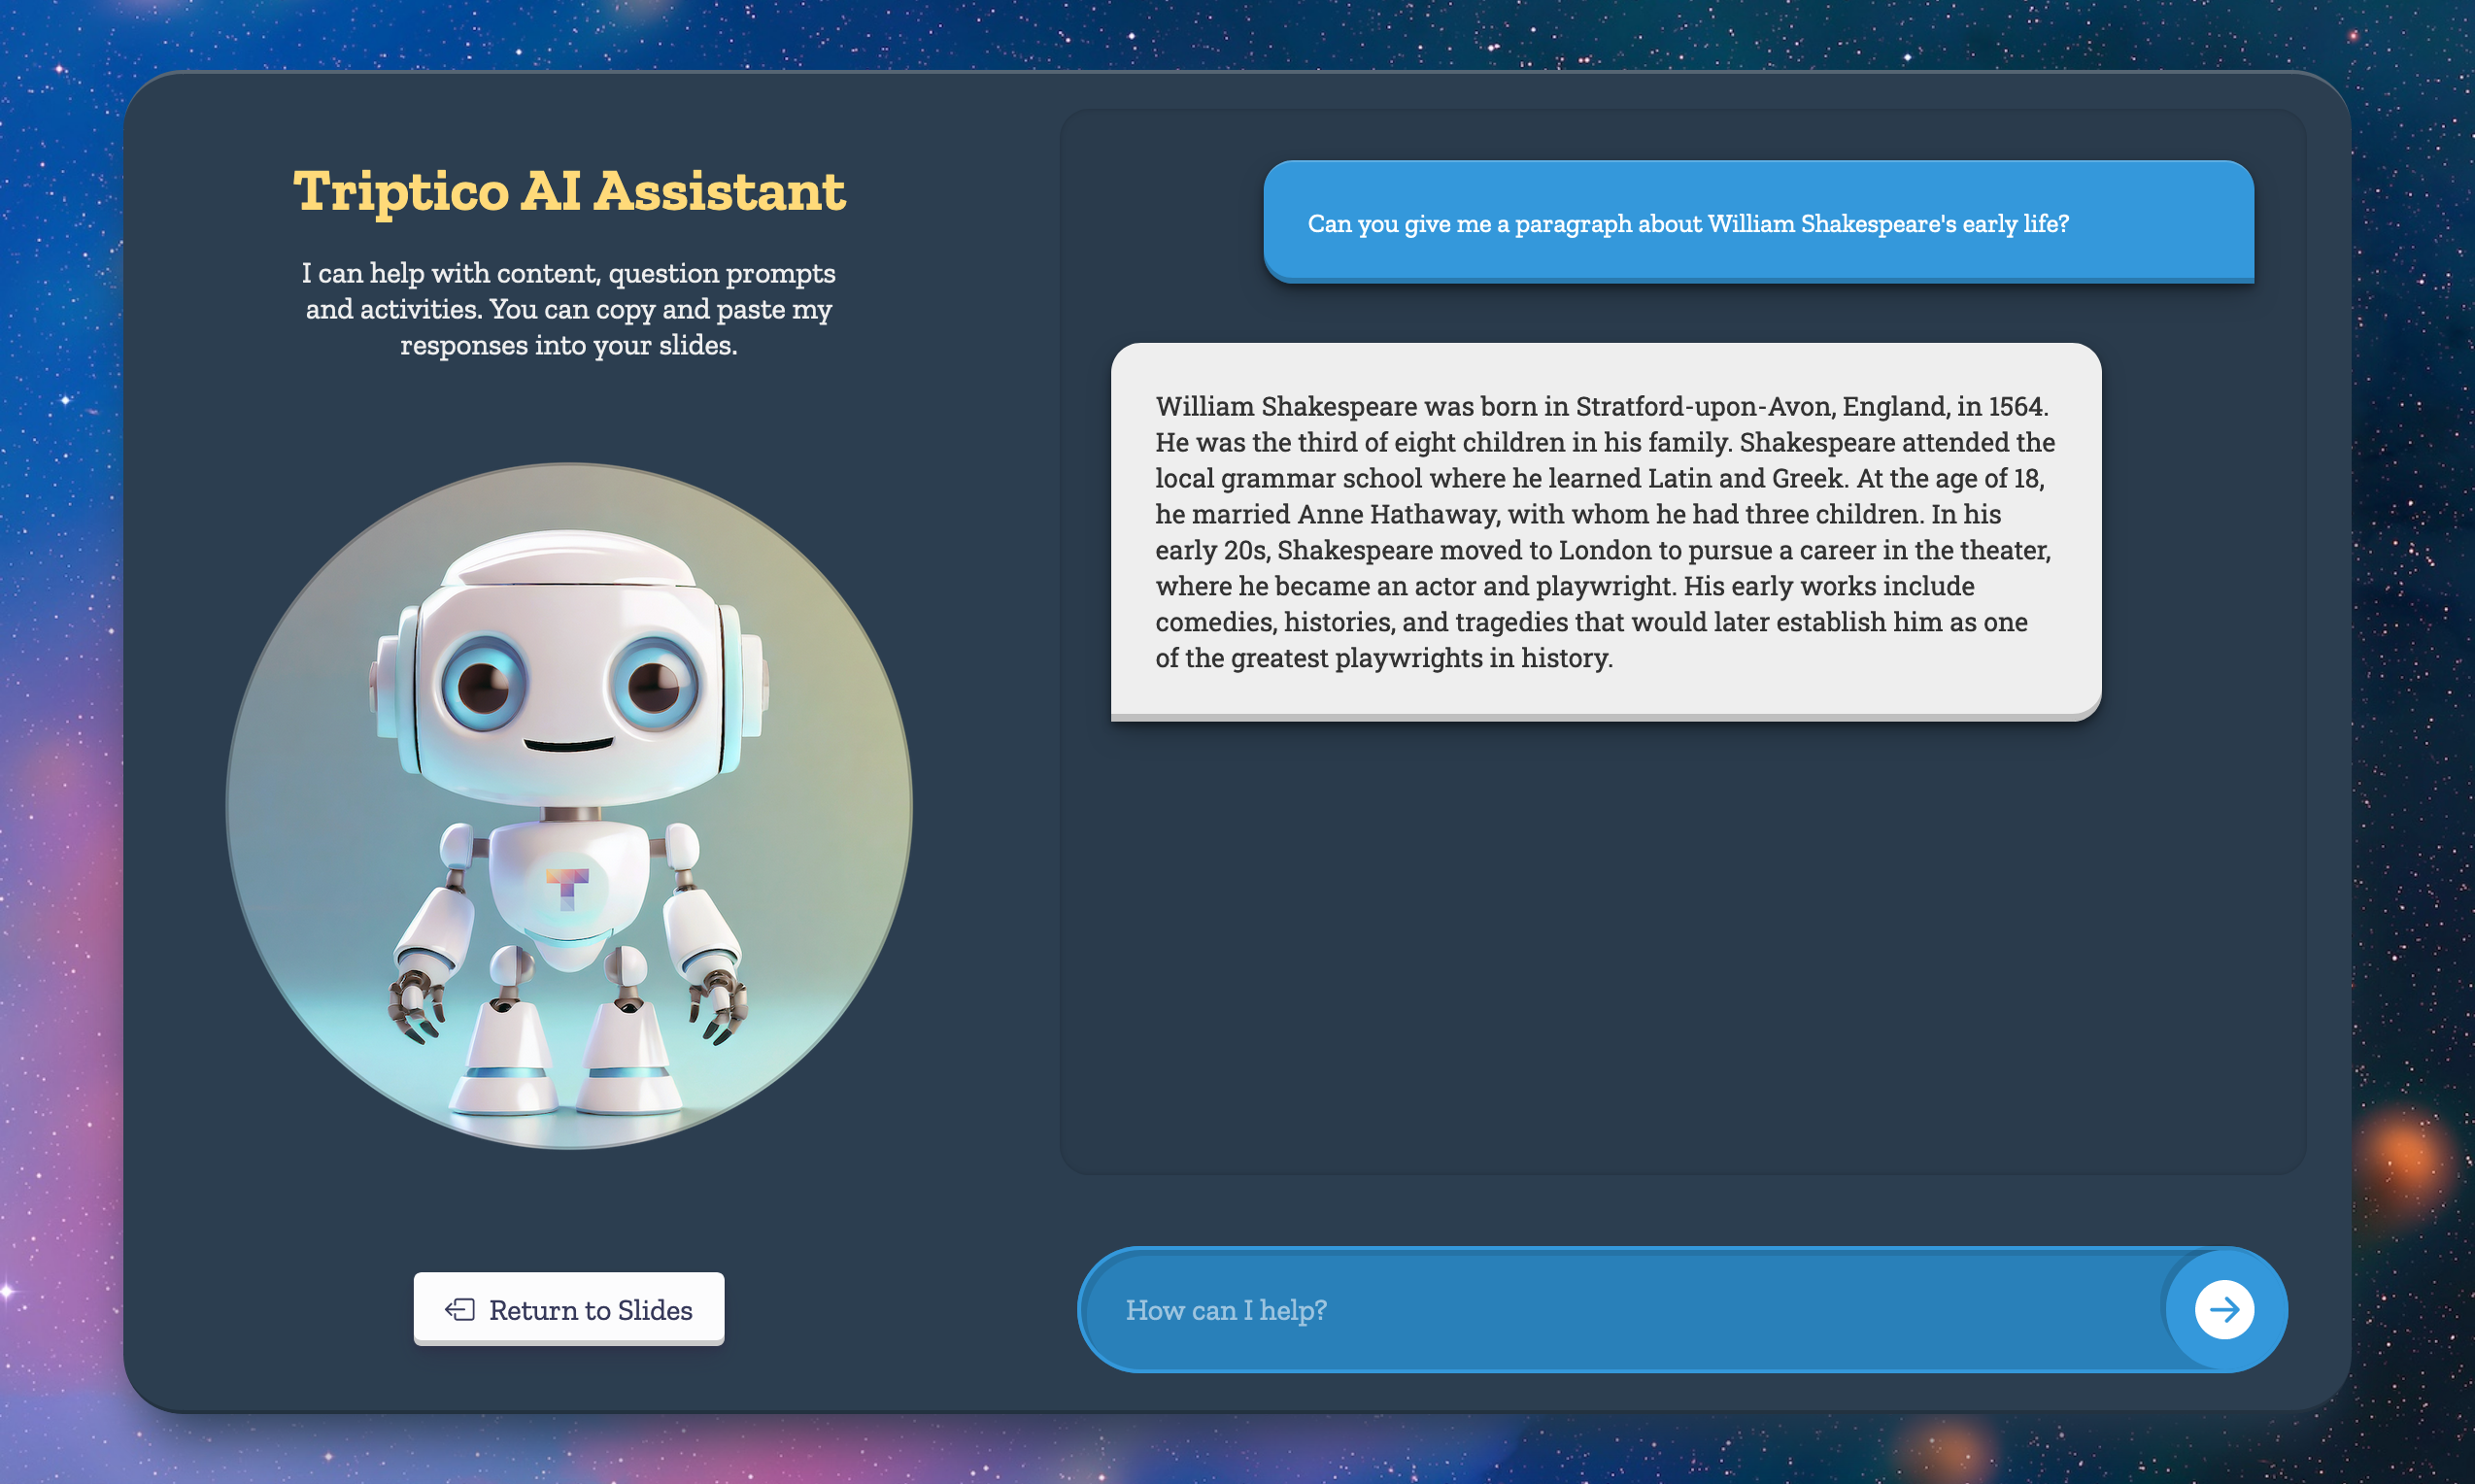
Notes and AI
You can add notes and also make use of Triptico's AI Assistant as you create your lesson:

You could ask the AI Assistant a question ('Can you give me a paragraph about William Shakespeare's early life?'), then copy and paste the answer into your lesson. A real time-saver!
You can also add notes to your lesson. These could be notes for yourself, for your colleagues or for your students.
Opening a Saved Lesson
When you save a lesson, it is added to your 'Saved Files' in exactly the same way as an activity is.
Simply click on the saved file and choose to open it with the Lesson Player or click the 'Edit' button to edit it:
The Lesson Player
Saved lessons open wih the Lesson Player.
You can navigate through the slides by using the arrow buttons or move to a specific slide by pressing the 'Jump' button:

You will see a number of buttons beneath each slide in the Lesson Player:
-
Jump - Press this button to see a list of all of the slides and click to jump directly to a specific one.
-
Notes - View any notes added when the lesson was created or add some new notes during the lesson.
-
Timer - Display a timer. Press the button again to hide the timer.
-
List - Create a list of names, for example, during a lesson and open the list with a Triptico resource. You could also create a list of key words during a lesson and open the list with a Spinner to reinforce learning.
-
AI Assistant - Open the AI Assistant to ask a question, suggest a task, provide a prompt, generate some ideas - whatever you need!
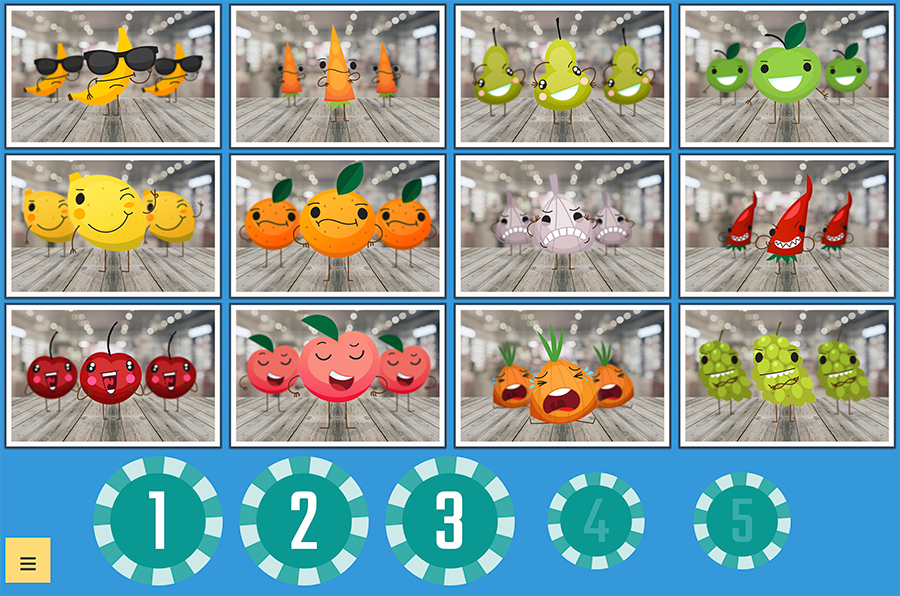
Bingo
Requirements:
- A saved file with at least 12 cards.
Examples:
Overview:
At the start of each game, 12 possible answers are displayed. Each player must choose six of these and write them on their Bingo card.
(Alternatively, you can press the 'Printer' icon and the resource will automatically generate random Bingo cards for you.)
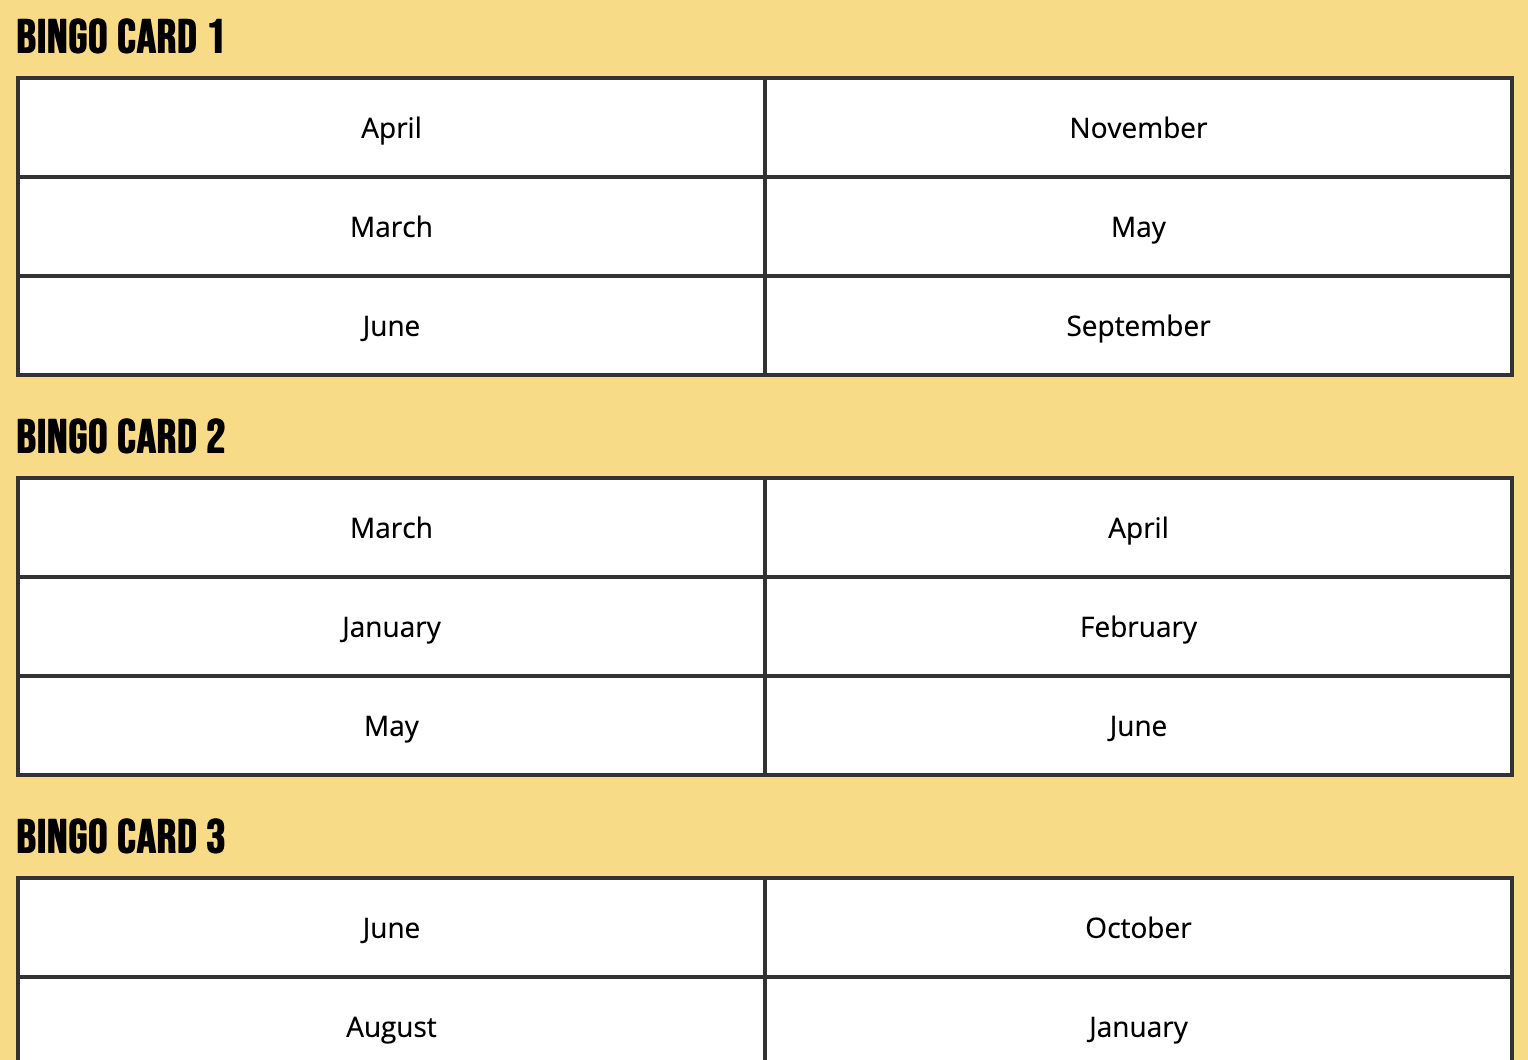
Clues are then displayed at random. If a player has the answer that matches the clue on their Bingo card then they can cross it out.
The winner is the first person to cross out all of the clues on their card and shout 'Bingo!'
Using the Resource:
When creating a Bingo activity, the text that you add to the back of each card will be used to create the Bingo cards.
The content on the front - which can be text, image or both - will be displayed as clues.
Files that you create can be opened with lots of different resources - including Bingo!
Files that you create can be opened with lots of different resources - including Bingo!
Of course, you can press to 'Preview' a saved file before opening it and switch the sides to add variety to your Bingo Games.
For example, click here to open the activity in the image above with the clues in English and click here to view the same saved file, with the sides switched, to display the clues in Japanese.
When a player shouts 'Bingo!' you can press the 'Bingo' button and check whether or not they have won. If they have not won, the game continues.
The Bingo resource requires a saved file with at least 12 cards to create a game.
The saved file can have more than 12 cards. The resource will choose 12 at random at the start of each new game.
Bingo will work with a saved file that only has content on one side of each card (as in this example), but the game is more challenging when two-sided cards are used.
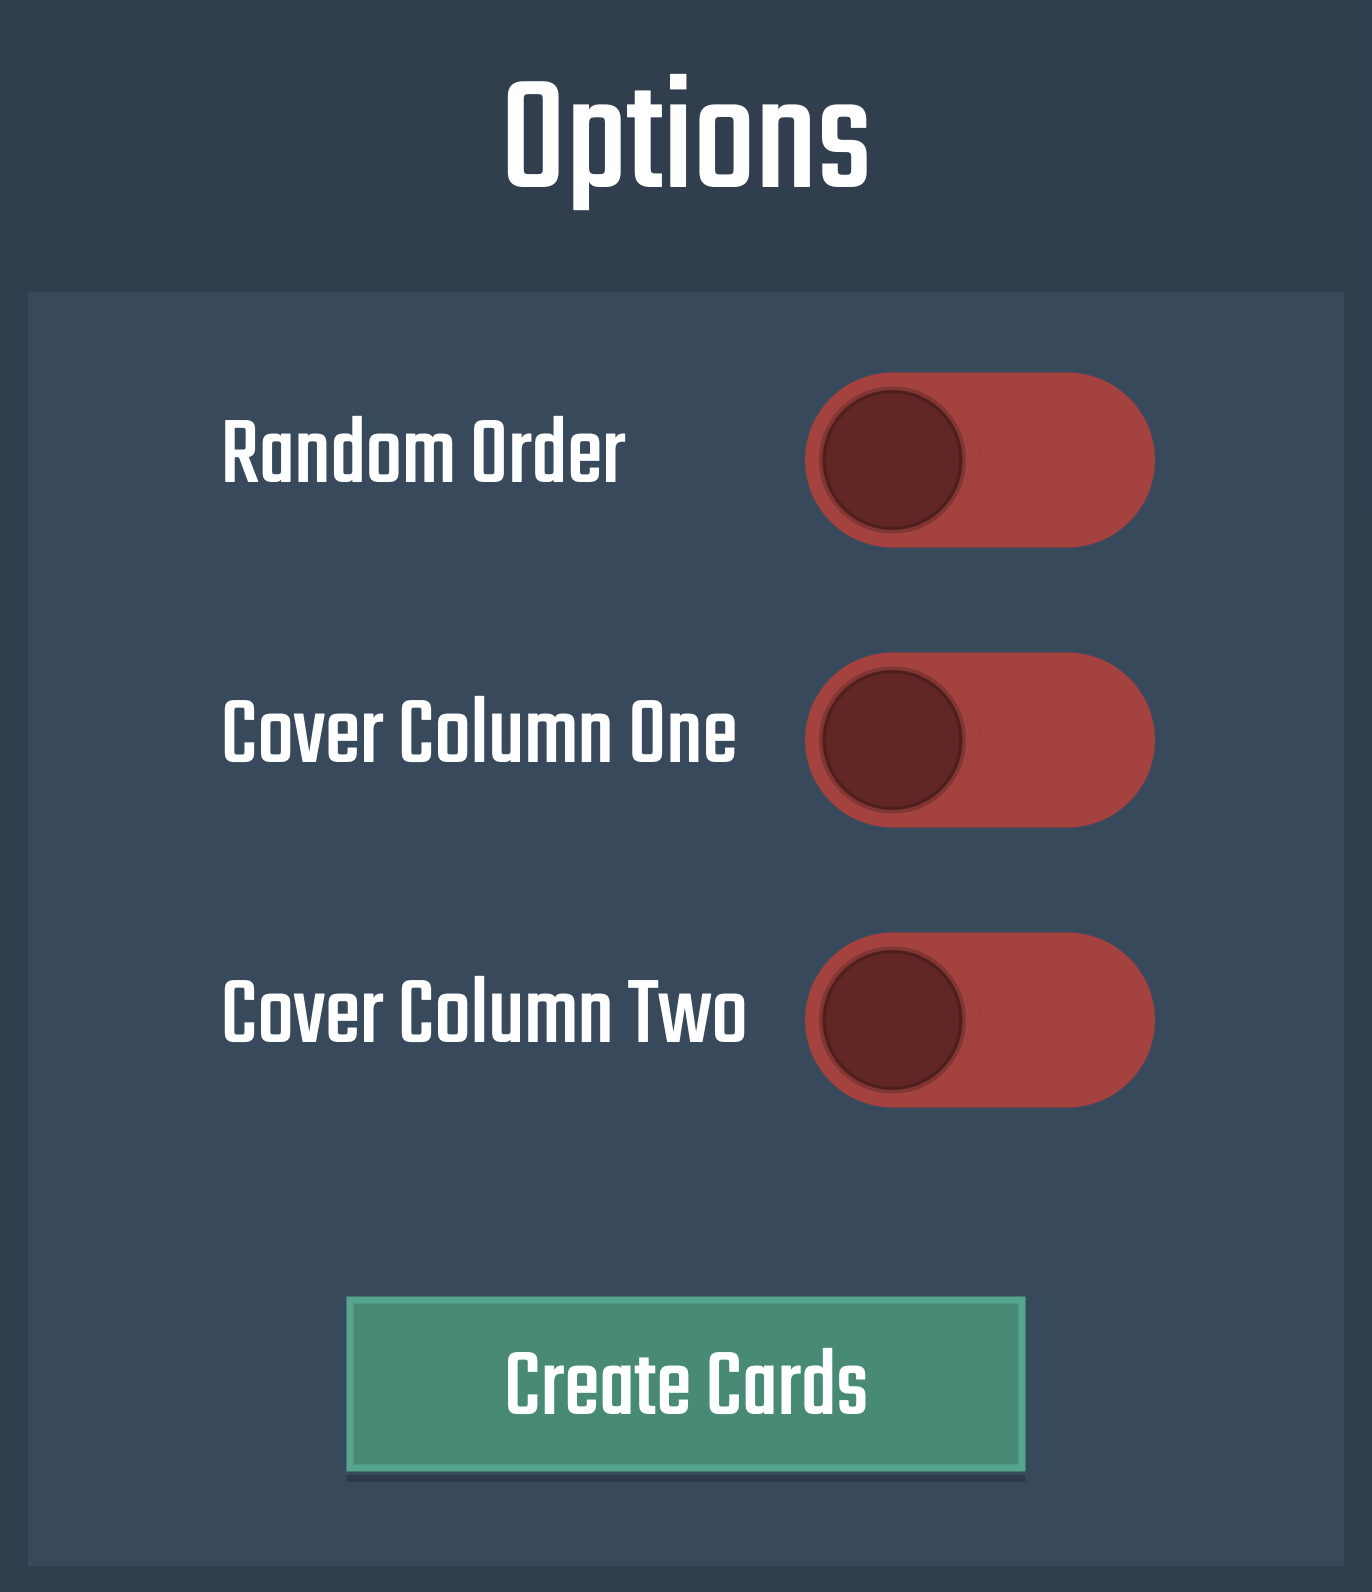
* NEW FEATURE! *
You can now press the 'Options' button and chose to have the resource 'speak' your clues!
Blocked Words
Requirements:
- None.
Examples:
Overview:
This very simple resource displays the text from a saved file and allows you to tap words to hide them.

An Example of a saved file opened with the Blocked Words resource
Tap hidden words to reveal them. The word will be highlighted to help with analysis. Tap again to remove the highlighting.
Swipe left or right (or click, hold and drag left or right with a mouse) to move to the next / previous piece of text.
NOTE: This resource requires a little bit of preparation in advance. Words are not hidden automatically.
Tip!
The Lesson Builder has a template which works like this resource and, unlike this resource, you can specify in advance the words that you would like to be hidden.
Card Board
Requirements:
- None.
Examples:
Overview:
The Card Board resource displays a saved file as a series of cards.
When you open a saved file with the Card Board resource you will see this screen:
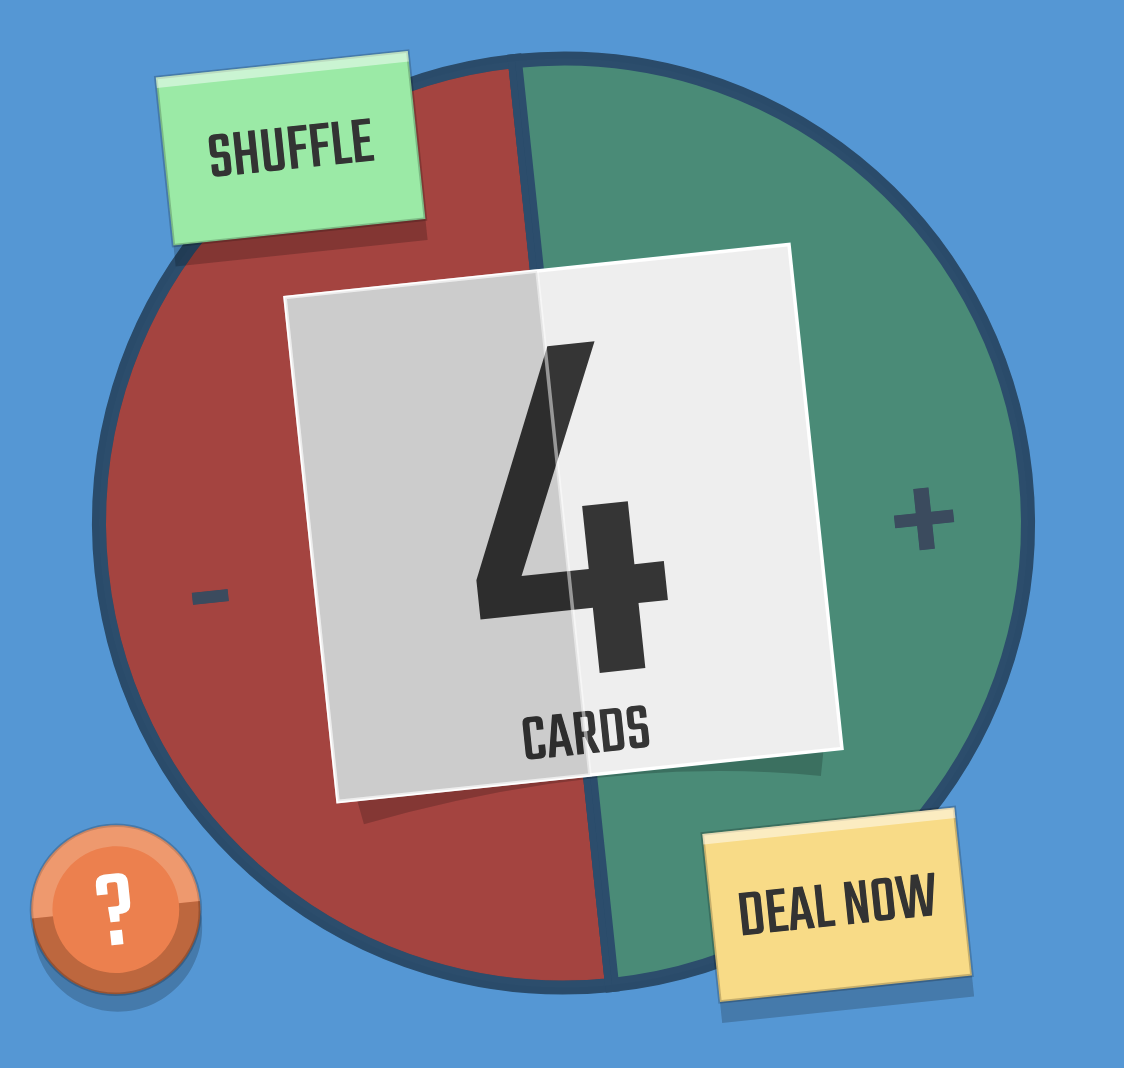
Press the plus and minus buttons to increase or decrease the number of cards that you would like to deal.
You can also press the 'Shuffle' button to shuffle the cards.
NOTE: If you do not shuffle the cards, they will be dealt in the order in which they were created. This can be helpful in some circumstances.
When you are ready to deal the cards, press the 'Deal Now' button.
When cards have been dealt, you can press them towards the centre (zone 1 in the image above) to zoom them in and out.
Pressing anywhere towards the edge of a card (zone 2 in the image above) will turn the card over.
Press the 'Clear' button to remove all of the dealt cards and return to the welcome screen OR press the 'Again' button to deal the same number of cards again.
Tip!
If the saved file you open with Card Board is made of single-sided cards - as in this example - then a number will be added automatically to the back of each card.
When the resource loads, you will be asked if you would like to deal the cards face up (with the content visible) or face down (with the numbered side visible and the content hidden).
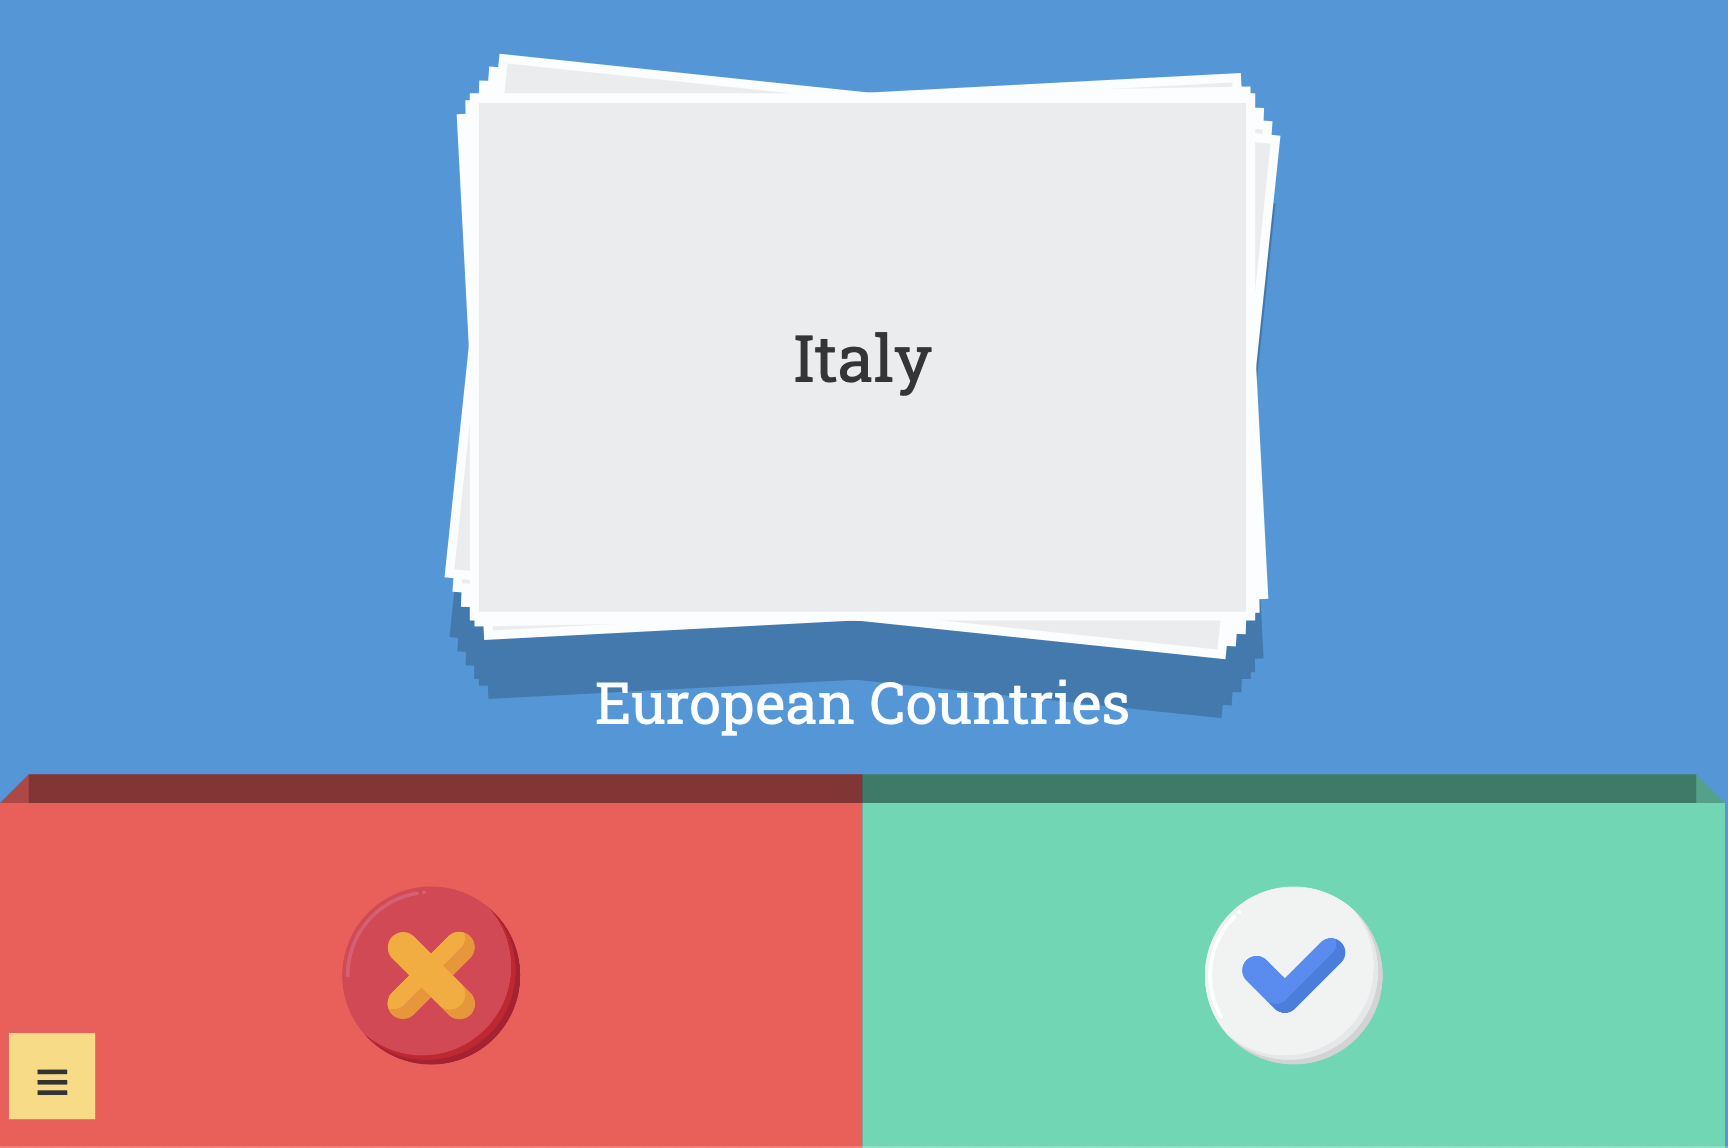
Connections
Requirements:
- A saved file with 20 cards.
- Cards must be in a specific order.
Examples:
Overview:
Each game begins with sixteen cards on display.
The challenge is to put the sixteen cards into four groups of four - and also to say what connects each group.
Cards are selected by tapping or clicking them.
When cards have been connected successfully, you can tap one of the cards to reveal the connection.
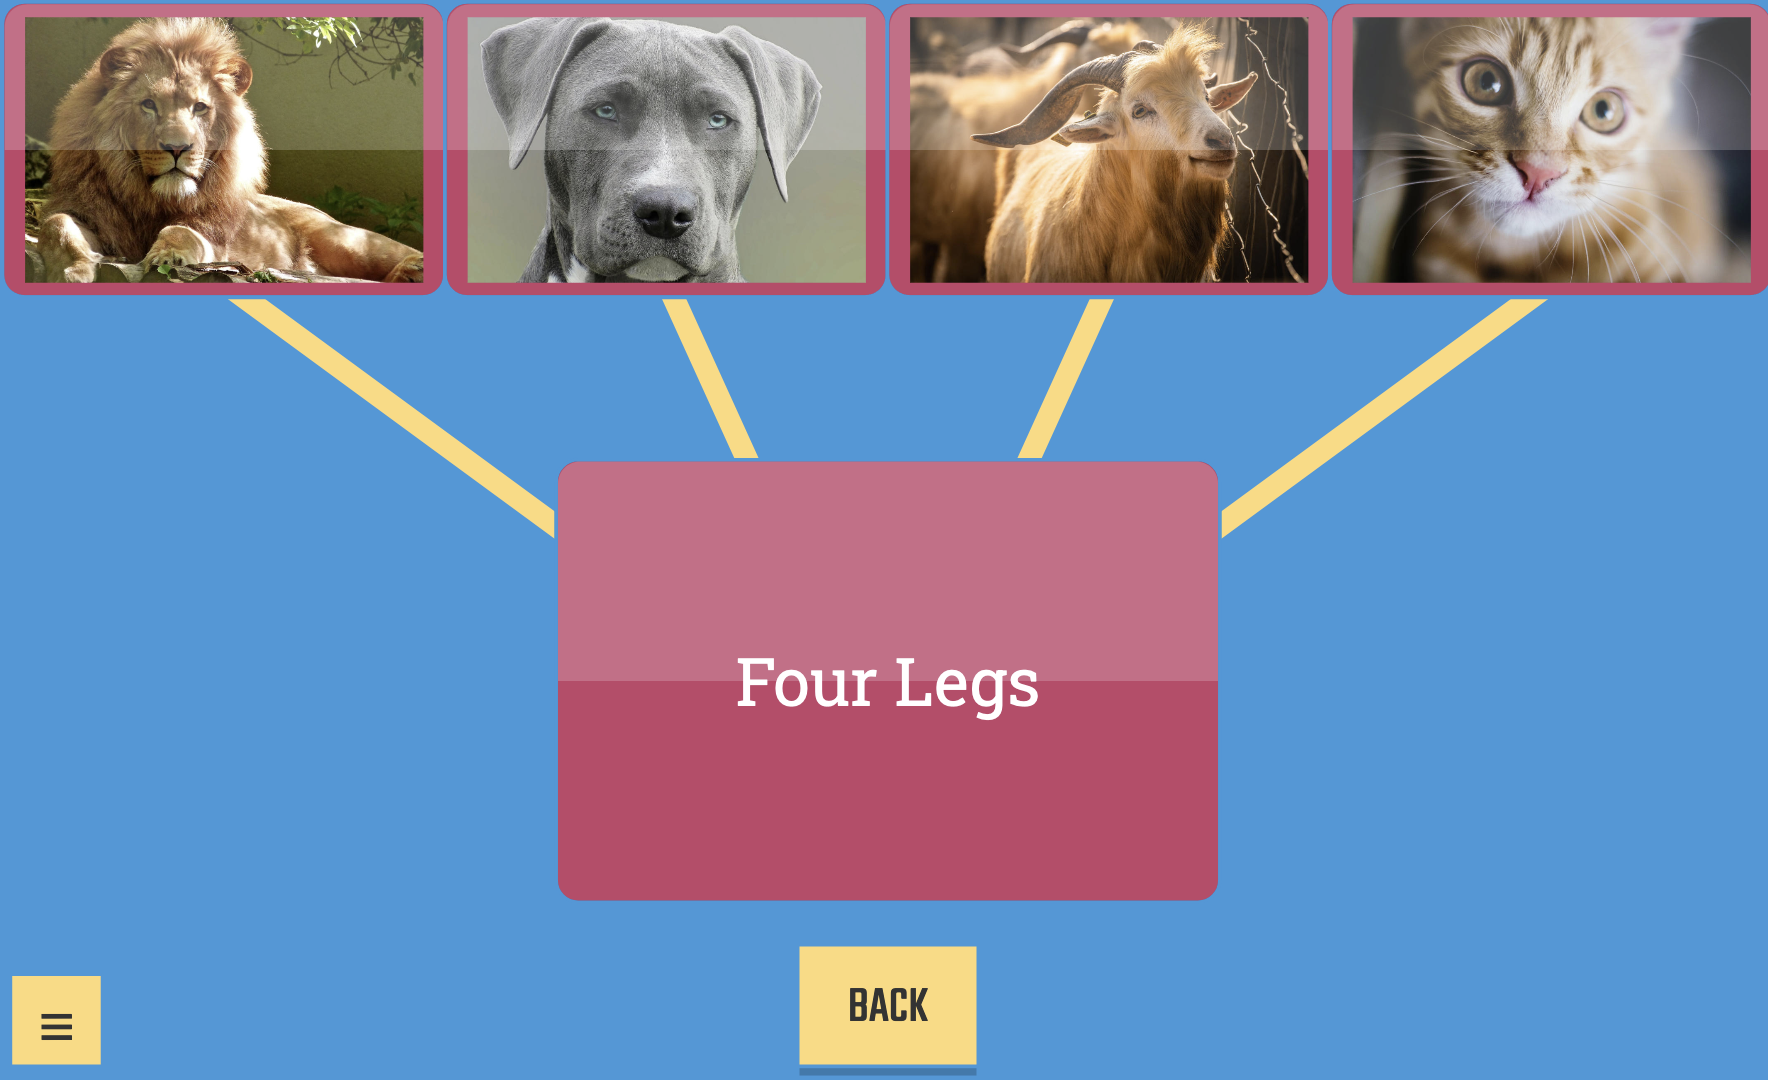
This is currently the only Triptico resource that requires a file to be created in a specific order:
Cards 1 to 4 should be the first category.
Cards 5 to 8 should be the second category.
Cards 9 to 12 should be the third category.
Cards 13 to 16 should be the fourth category.
Card 17 should be the explanation of the first category.
Card 18 should be the explanation of the second category.
Card 19 should be the explanation of the third category.
Card 20 should be the explanation of the fourth category.
That's it!
Here’s a very simple example:
- France
- Italy
- Germany
- Spain
- Trumpet
- Drum
- Guitar
- Violin
- Mars
- Jupiter
- Saturn
- Mercury
- Blue
- Red
- Yellow
- Green
- Countries in Europe
- Musical Instruments
- Planets
- Colours
You can click here to try this activity with the Connections resource.
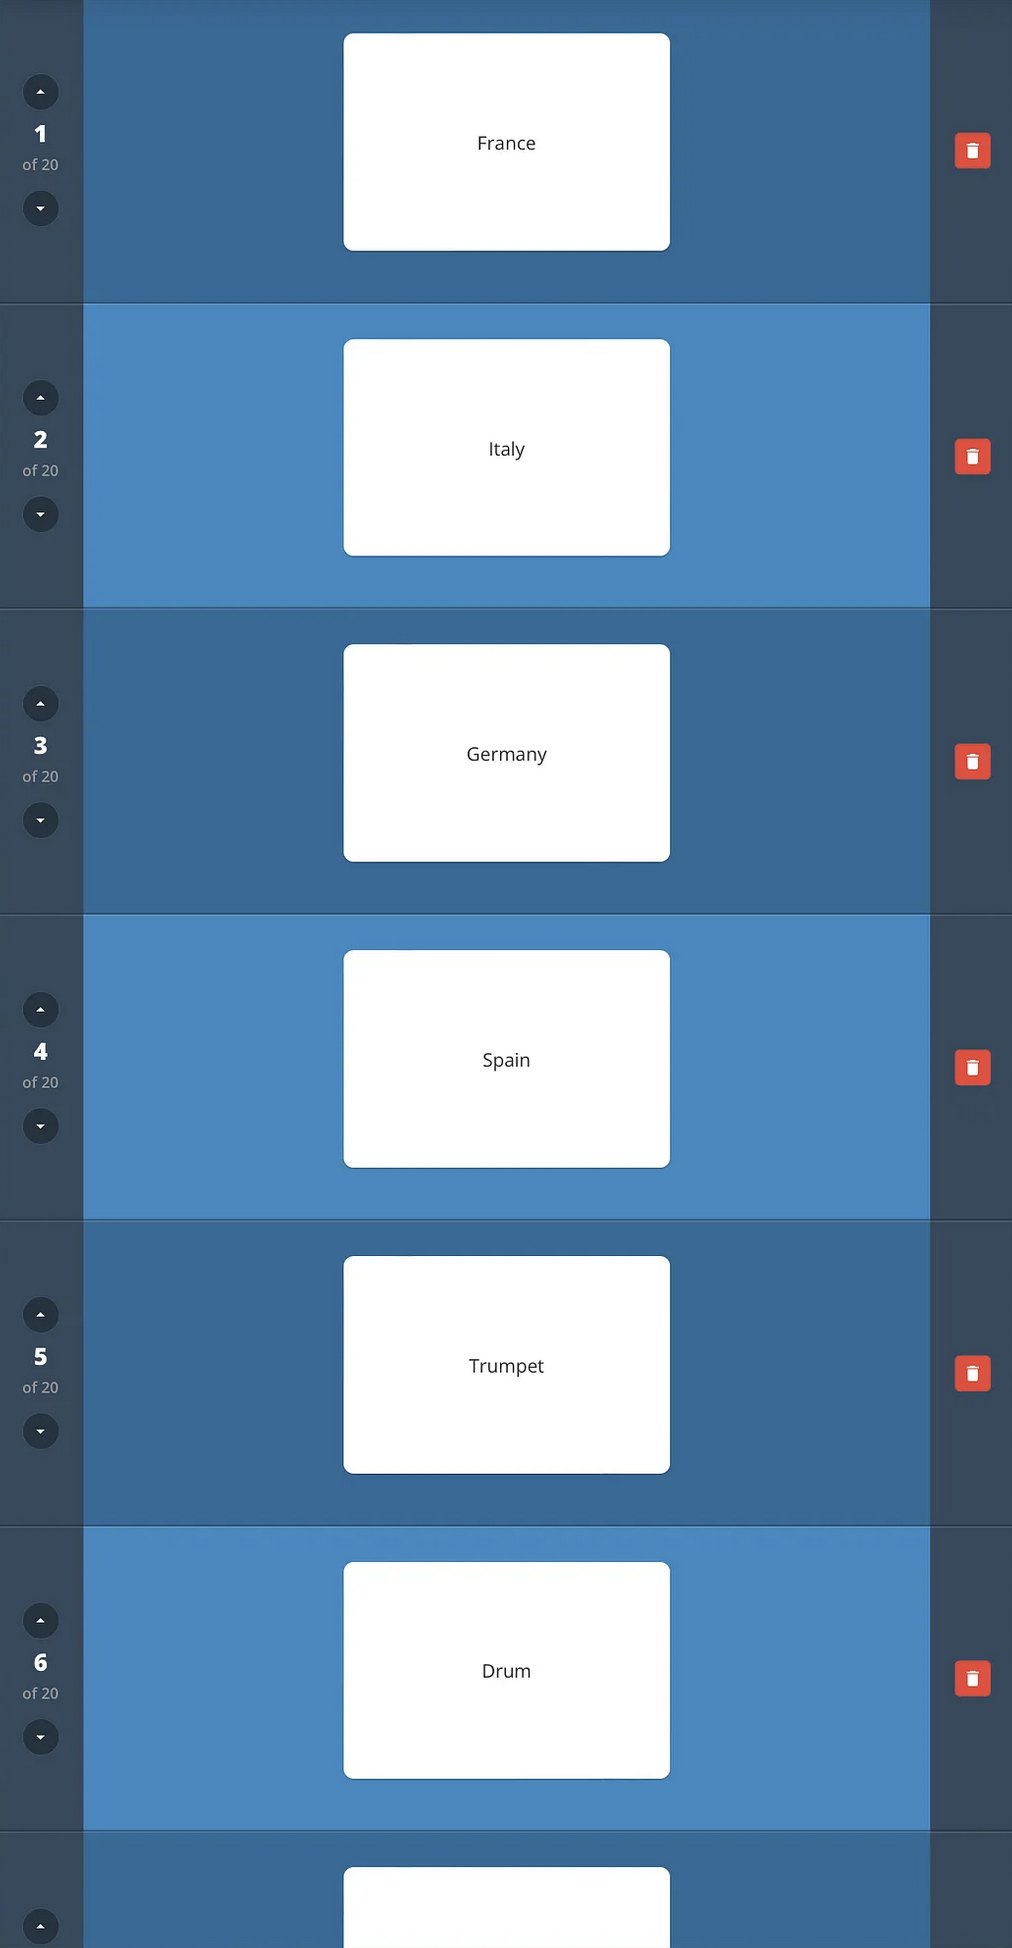
Cards 1 to 4 are the first category, cards 5 to 8 the second category and so on...
Cards 1 to 4 are the first category, cards 5 to 8 the second category and so on...
Display
Requirements:
- None.
Examples:
Overview:
A very simple resource - your saved file displayed as cards, with the initial option to hide one or both of the sides:
Options when opening a saved file with the Display resource
Options when opening a saved file with the Display resourcep>
Tap cards to reveal or hide the content.
Drop Four
Requirements:
- No minimum number of cards - although the more cards, the more varied the quiz!
- Two players or teams.
Examples:
Overview:
The aim of this game is to make a line of four of your counters before your opponent.
Answer questions correctly to drop a counter.
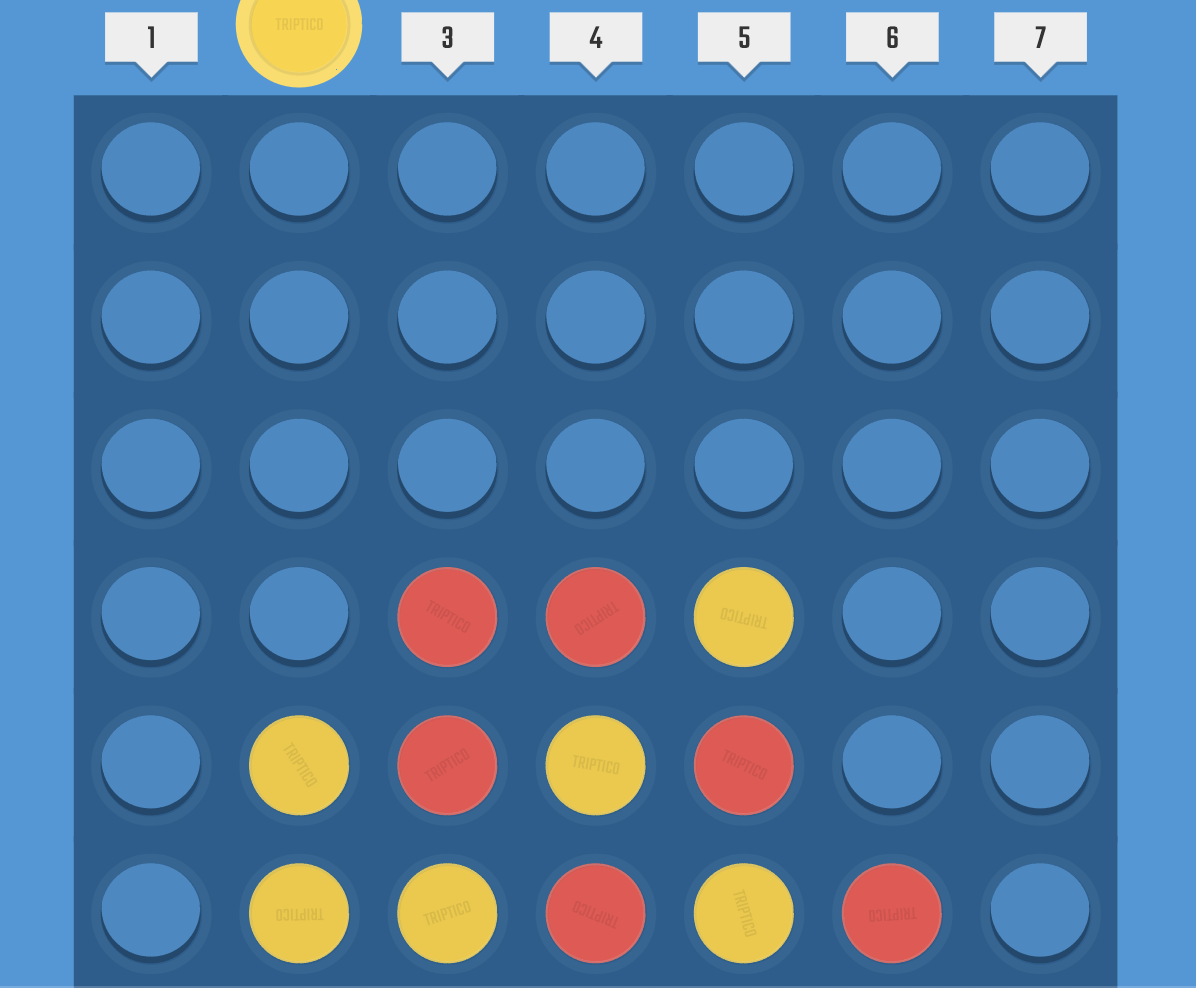
Make a line of four counters before your opponent!
Make a line of four counters before your opponent!
When dropping a counter, simply click on the column that you would like the counter to fall into.
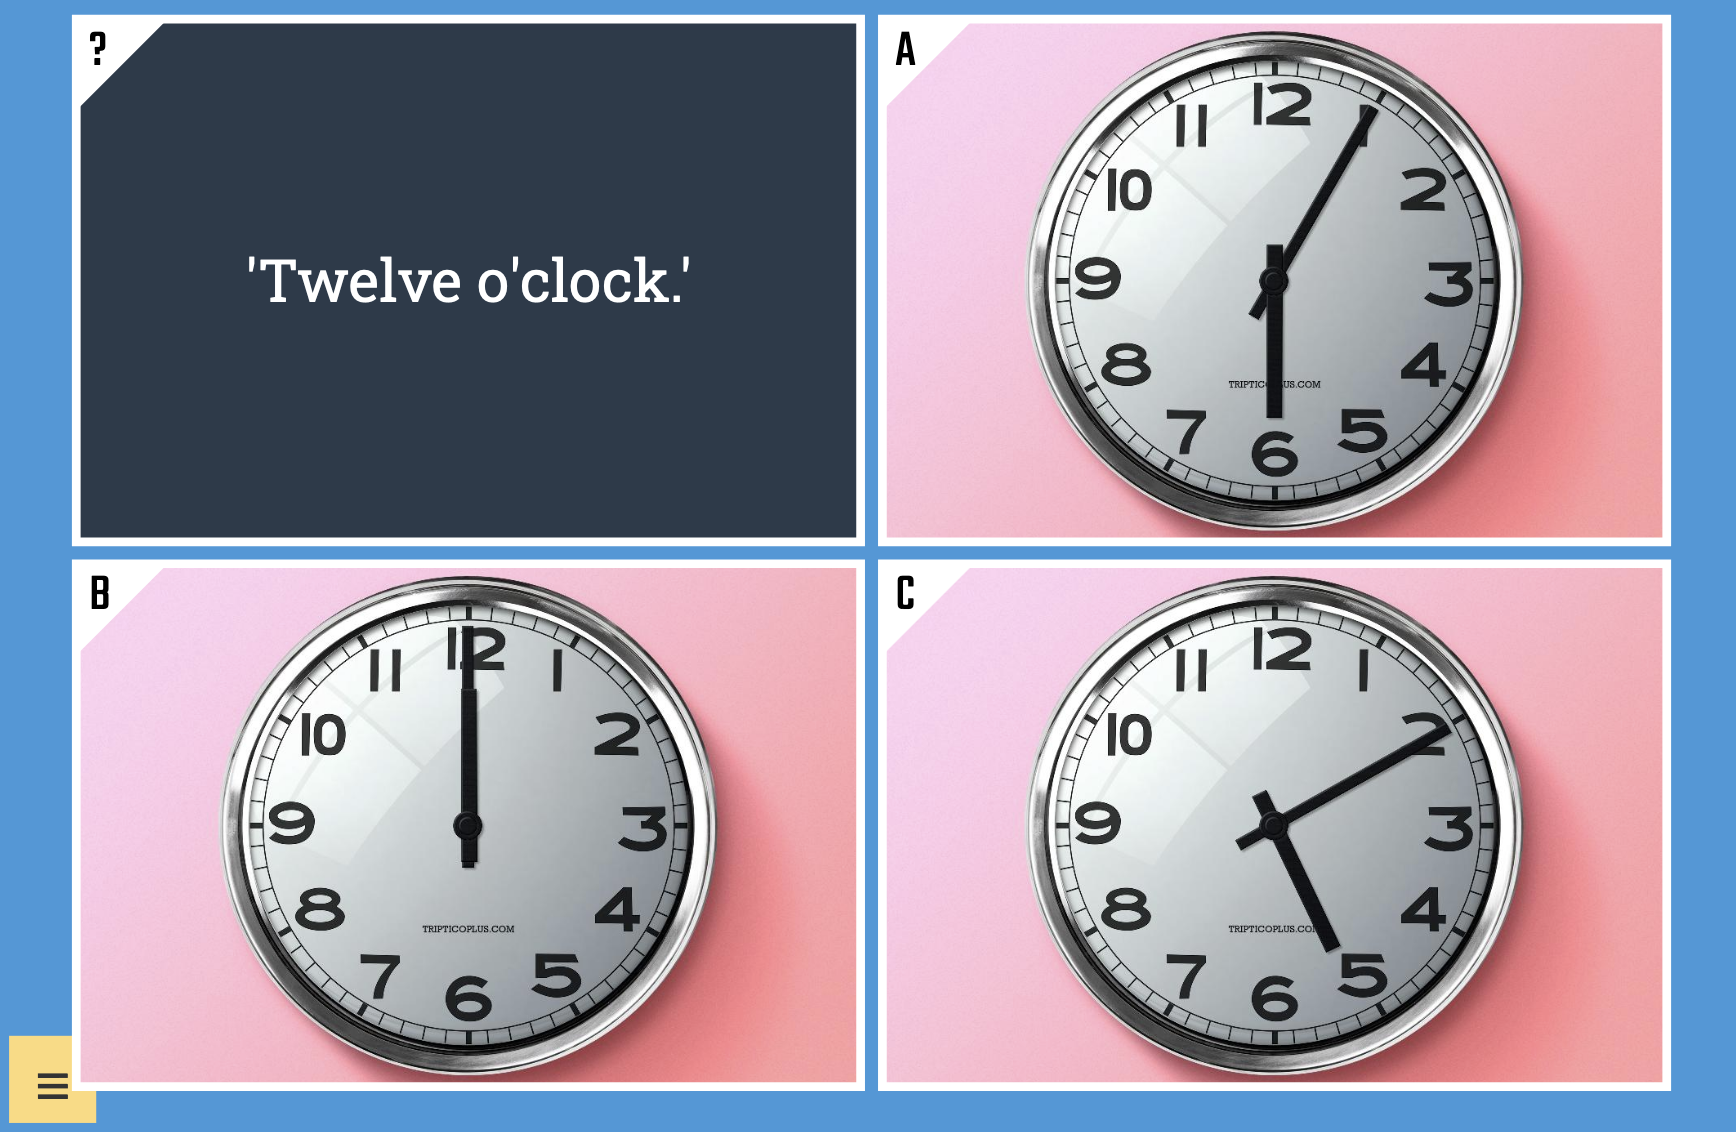
Find Them
Requirements:
- A saved file with at least 12 cards.
- Cards must be marked as either true or false (Learn More).
Examples:
Overview:
Twelve panels are displayed at the start of each game. Some are true - the challenge is to find them.
A counter at the bottom of the screen tells you how many true panels remain to be found.
True panels when turn green when pressed. False panels will turn red.

Find the Scientists - there are five more to find.
Find the Scientists - there are five more to find.
You can add feedback to the back of each card as you create your activity.
This could be an explanation as to why the panel is true or false, an extension activity, a related question and so on.
This feedback is revealed by pressing the magnifying glass icon on the panel.
Flip Selector
Requirements:
- None.
Examples:
Overview:
The Flip Selector resource displays you saved file a single card at a time.
If the cards in your saved file have two sides then you can swipe down (or click and drag down using a mouse) to turn the card over.
To view a new card, swipe to the left (click and drag left with a mouse).
To return to the previous card, swipe to the right (click and drag right with a mouse).
You can also use the arrow keys on your keyboard if you are using one.

You can open the menu and choose how you would like the cards to be selected:
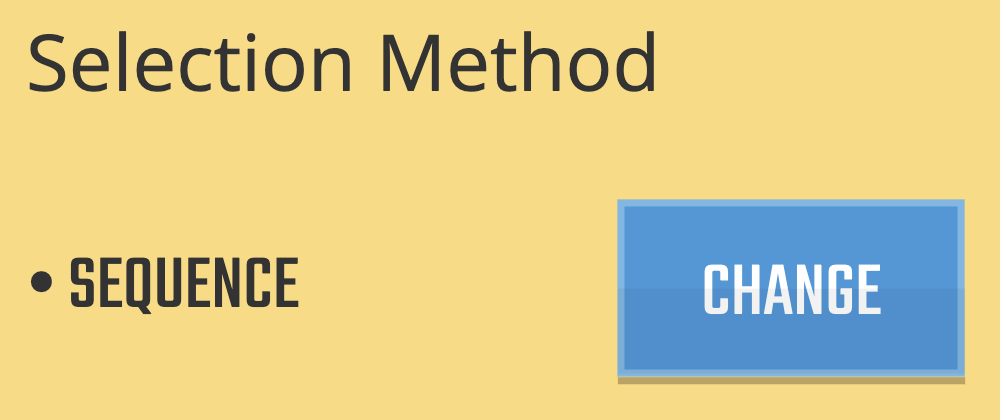
- In Order
The cards are displayed in the order in which they were created. (A B C D, A B C D, A B C D and so on.)
- Sequence
The cards are displayed in a random sequence. No cards will be duplicated until all of the cards have been displayed. (C A D B, B D A C, B A D C and so on.)
- Random
The cards are displayed in a completely random order. The same card may be selected several times in a row. (C C C A B C D A C B and so on.)
Tip!
You can also open the menu and decide if you would like to display the title of your saved file. By default, the title is hidden.
Football
Requirements:
- No minimum number of cards - although the more cards, the more varied the quiz!
- Two players or teams using different devices.
Examples:
Overview:
Triptico Football is a game for two people or teams on two different devices.
Open the same saved file on the two different devices. (You can click here to learn more about sharing saved files.)
On one device, click the 'Create New Match' button to generate a unique code.
On the other device, click the 'Join Match' button and type in the code.
The devices are now linked and you are ready to play - each player can give their team a name, choose their team colours and then head to the stadium!

Playing the Game:
The team with possession (indicated by the ball icon) chooses a card to turn over.
How the game proceeds will be determined by the content of the card:
-
Pass Card - The team passes the ball, retains possession and can turn over another card.
-
Tackled Card - The team lose possession and the opposing team can choose a card to turn over.
-
Half Time Card - The referee’s whistle signals the end of the first half!
-
Full Time Card - The end of the game!
-
Chance Card (Corner, Free Kick or Shot) - A chance to score a goal!
Both teams are asked a question:
-
If the attacking team answers correctly and the defender answers incorrectly then a goal is scored!
-
If both teams answer correctly then the attacking team chooses where to place their shot — hoping that the defending team does not position their goalkeeper in the same place!
-
If the attacking team answers incorrectly and the defending team answers correctly then there is a counter-attack! The defending team has a chance to break down the pitch quickly and score a goal!
-
-
Penalty Card - As above, but there is no opportunity for a counter-attack!
It is all very simple - a fun way to revise and reinforce learning!
The length of each game is completely random — all dependant on when the half time / full time cards are turned over!
Group
Requirements:
- None.
Examples:
Overview:
This resource works best with a class list.
With a class list, it displays the names and allows you to quickly put them into groups by dragging to the right (clicking and dragging with a mouse) and releasing when the indicator displays the number of groups that you would like to create:

Drag Right to Create Groups. Releasing now would create six groups.
Drag Right to Create Groups. Releasing now would create six groups.
When groups have been created, you can drag to the left (click and drag with a mouse) to make selections from within the groups.
Again, release when the indicator matches the type of selection you would like to make:
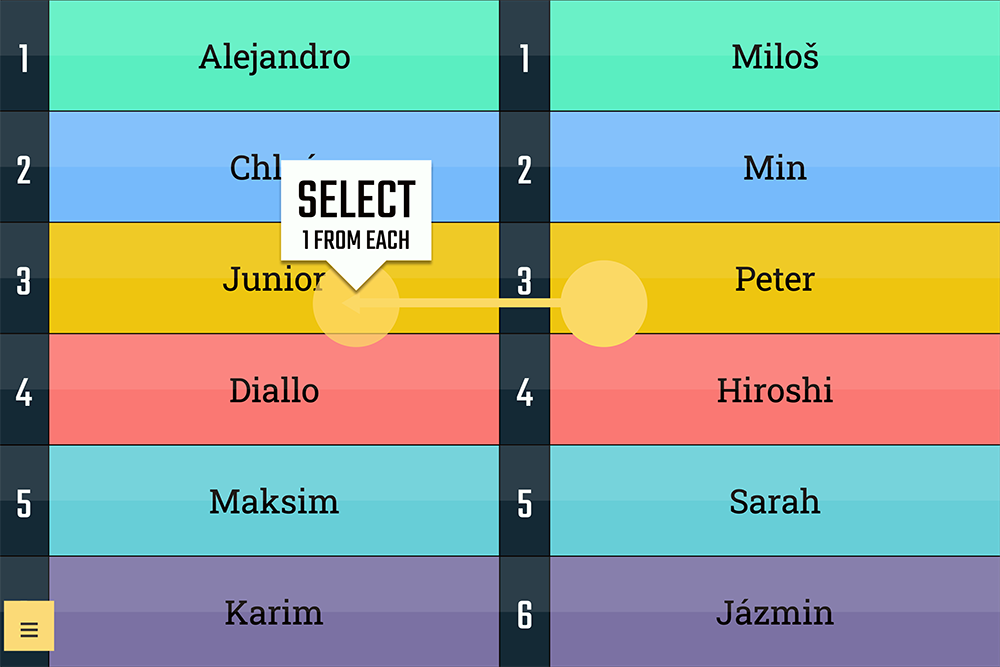
Drag Left to Make Selections. Releasing now would select one person from each group.
Drag Left to Make Selections. Releasing now would select one person from each group.
Tip!
If there are people that you would like to ensure are in different groups then you can tap their names before creating the groups.
Hexagons
Requirements:
- A saved file with at least 20 cards.
- Two players or teams.
Examples:
Overview:
The aim of this game is to be the first to make a connection across the board (blue team) or down the board (green team).
You can display clues on each hexagon or icons on each hexagon.
Displaying clues will add the first letter of each word of the answer to the hexagon.
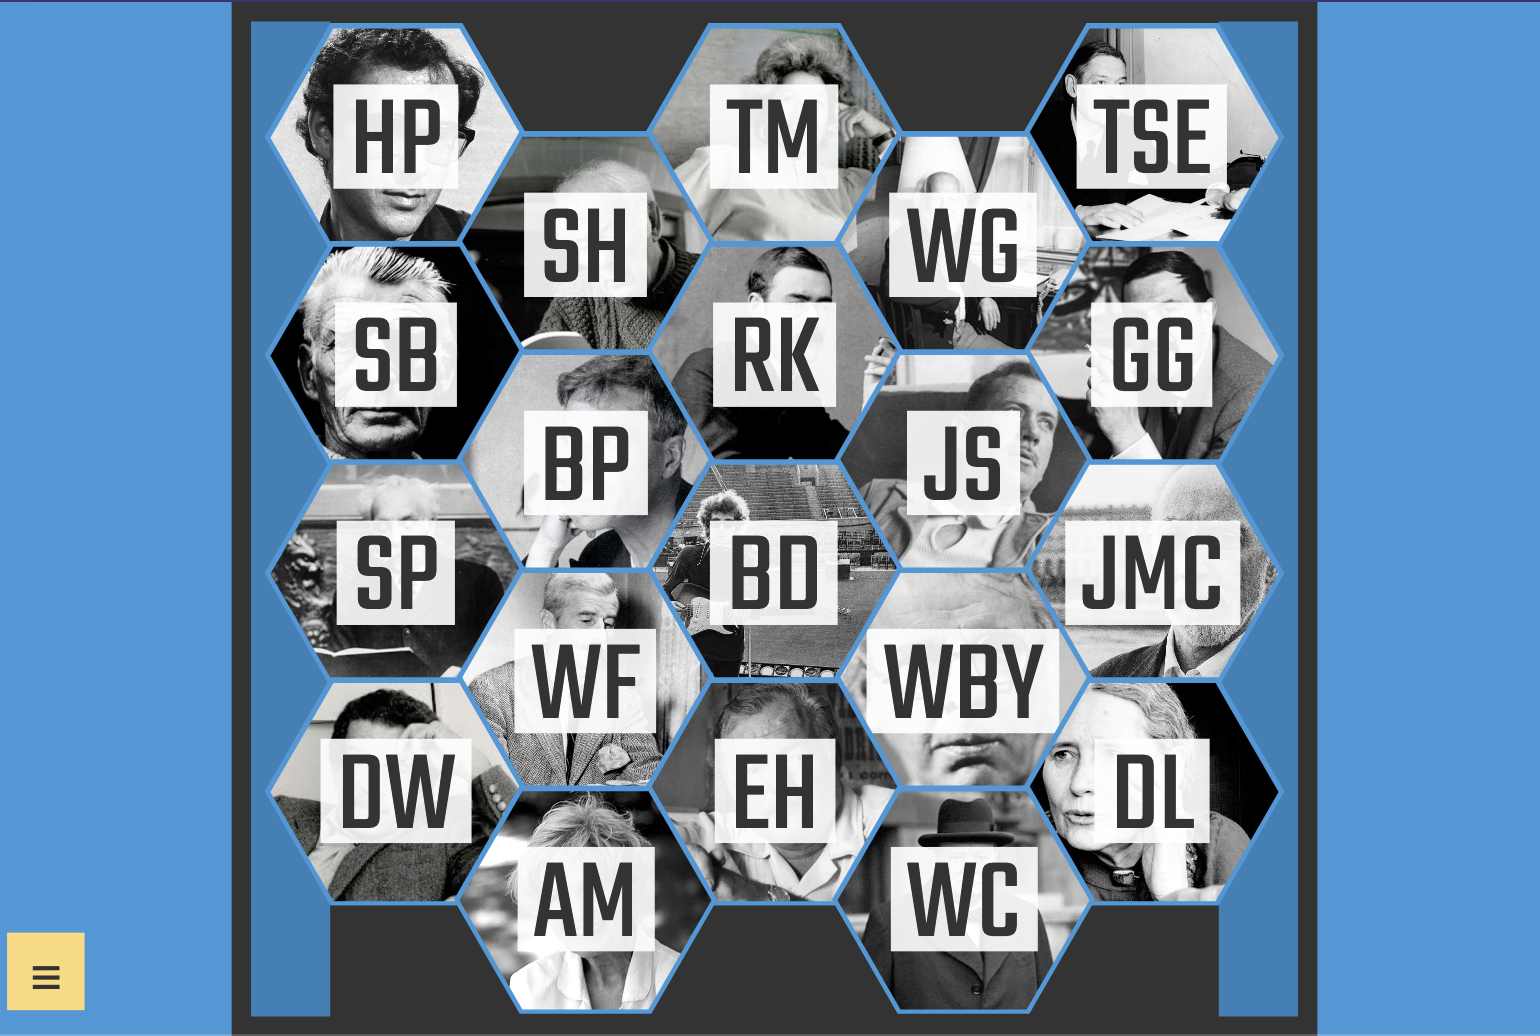
Hexagons will work with saved files containing text, images or both - as shown above.
Hidden Card
Requirements:
- A saved file with at least 12 cards.
- At least two players or teams.
Examples:
Overview:
The game uses a saved file to create twelve envelopes.
The challenge during the game is to choose an envelope and say what is on the card inside.
The first task is to decide which four envelopes are the easiest (worth 10 points), which four are of medium difficulty (worth 15 points) and which four are the most difficult (worth 20 points):
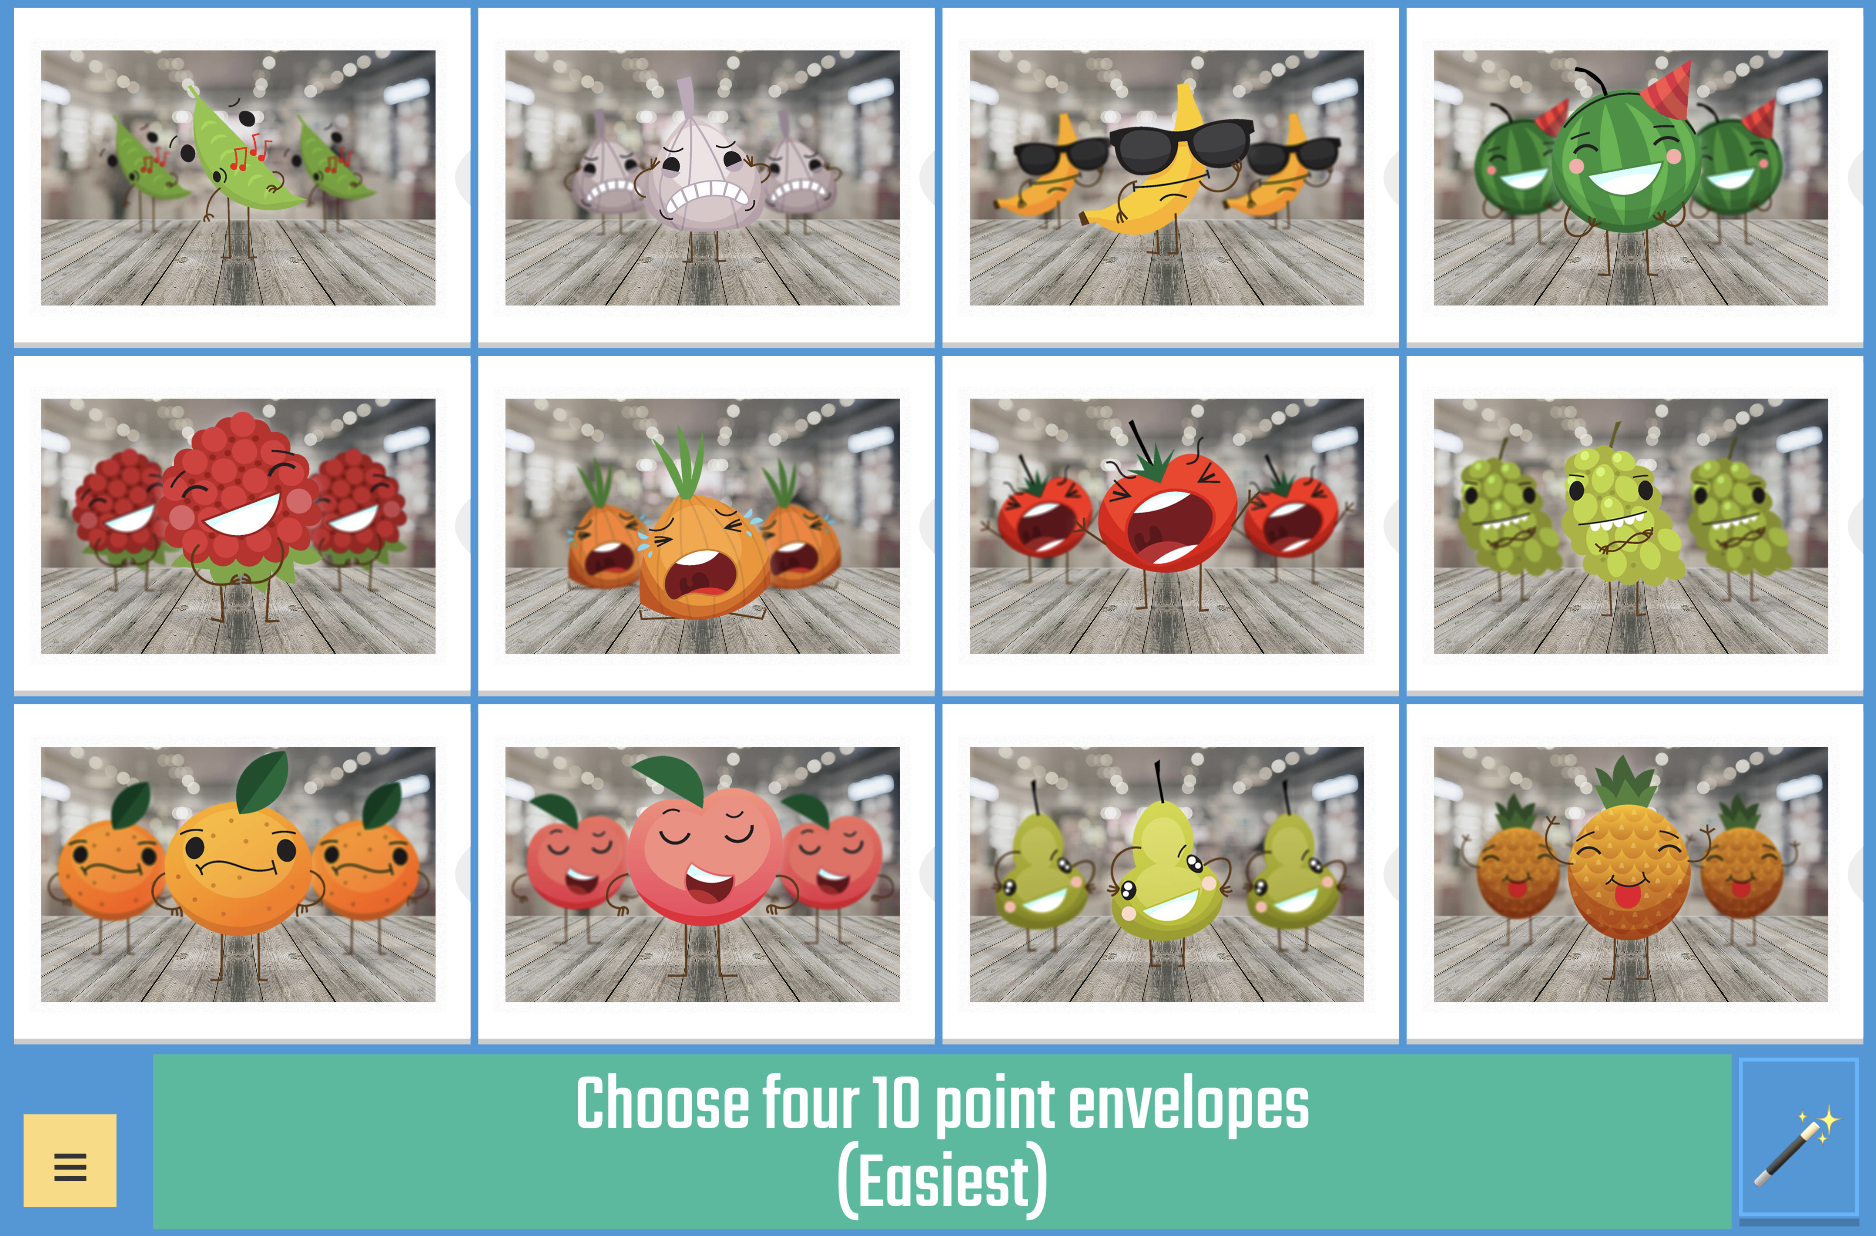
Setting up the Hidden Card Resource.
(Note: You can press the magic wand button and the resource will randomly assign values to each envelope.)
You can then decide how many players or teams are taking part.
Finally, you can decide whether to show the value of each envelope (so players or teams know how many points each is worth) or hide the value until each answer is revealed.
Playing the Game:
The resource will randomly choose a player or team to go first at the start of each round.
That team must choose an envelope and say what they think is on the card inside that envelope.
Tap the envelope to reveal the card and award the points if they were correct.
If incorrect, the other players or teams will receive the points - so there is an element of risk in selecting a difficult envelope!
Listen
Requirements:
- A saved file with at least 4 cards.
Examples:
Overview:
This resource will 'speak' the text in a saved file.
It is important to choose the correct language for the text on each side of the cards. The resource will attempt to do this for you, but you can change the initial selection if incorrect.

Playing the game:
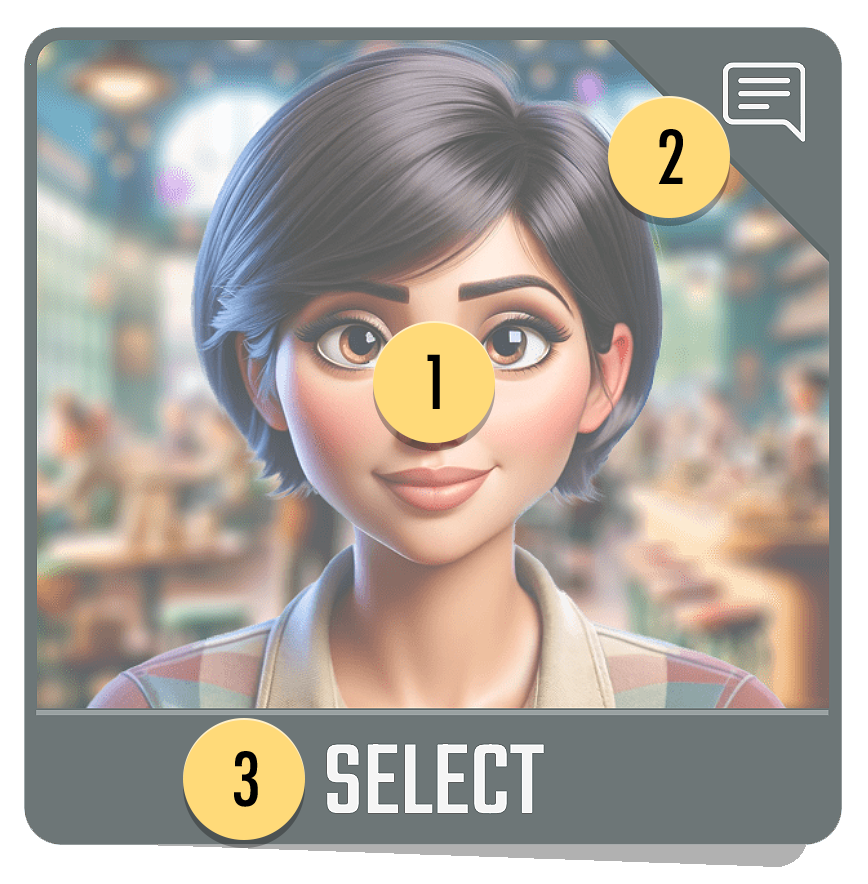
-
1: Click on a face to listen to the person speak.
-
2: Click the icon to read the text that the person will speak.
-
3: Click here to select the panel as your answer.
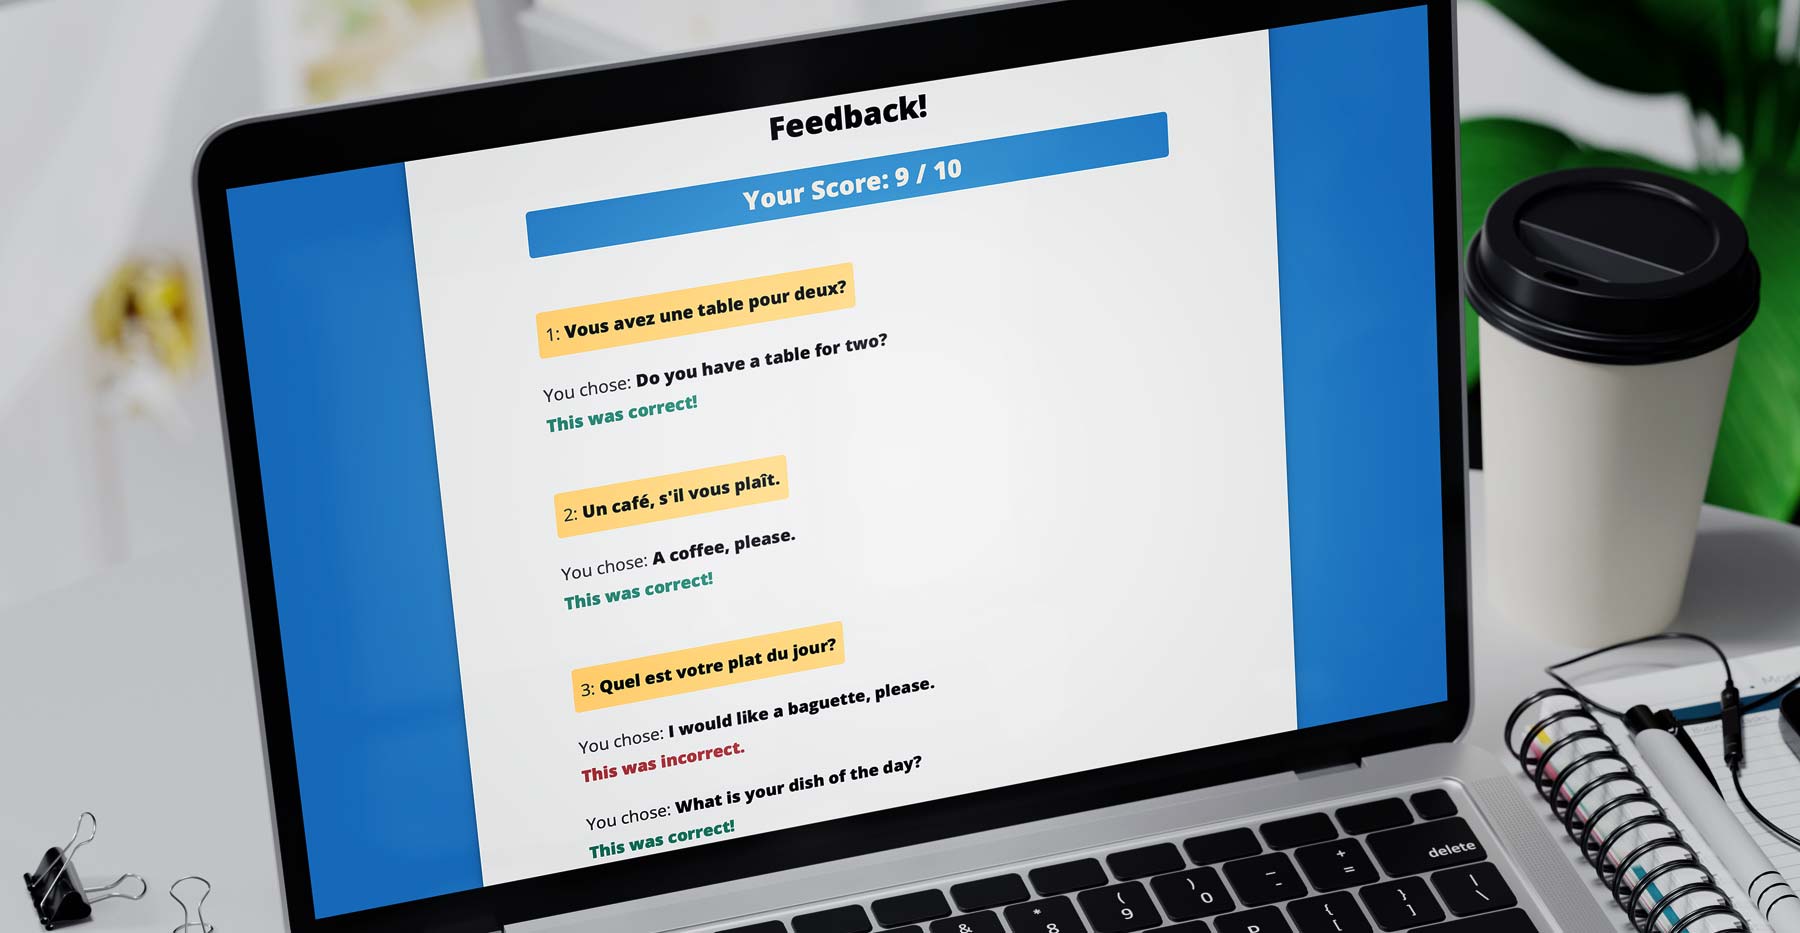
Report:
After ten questions have been asked, a report will be generated.
This presents a valuable opportunity to pause and assess understanding. Furthermore, it can be printed out for teacher review or saved for future reference:
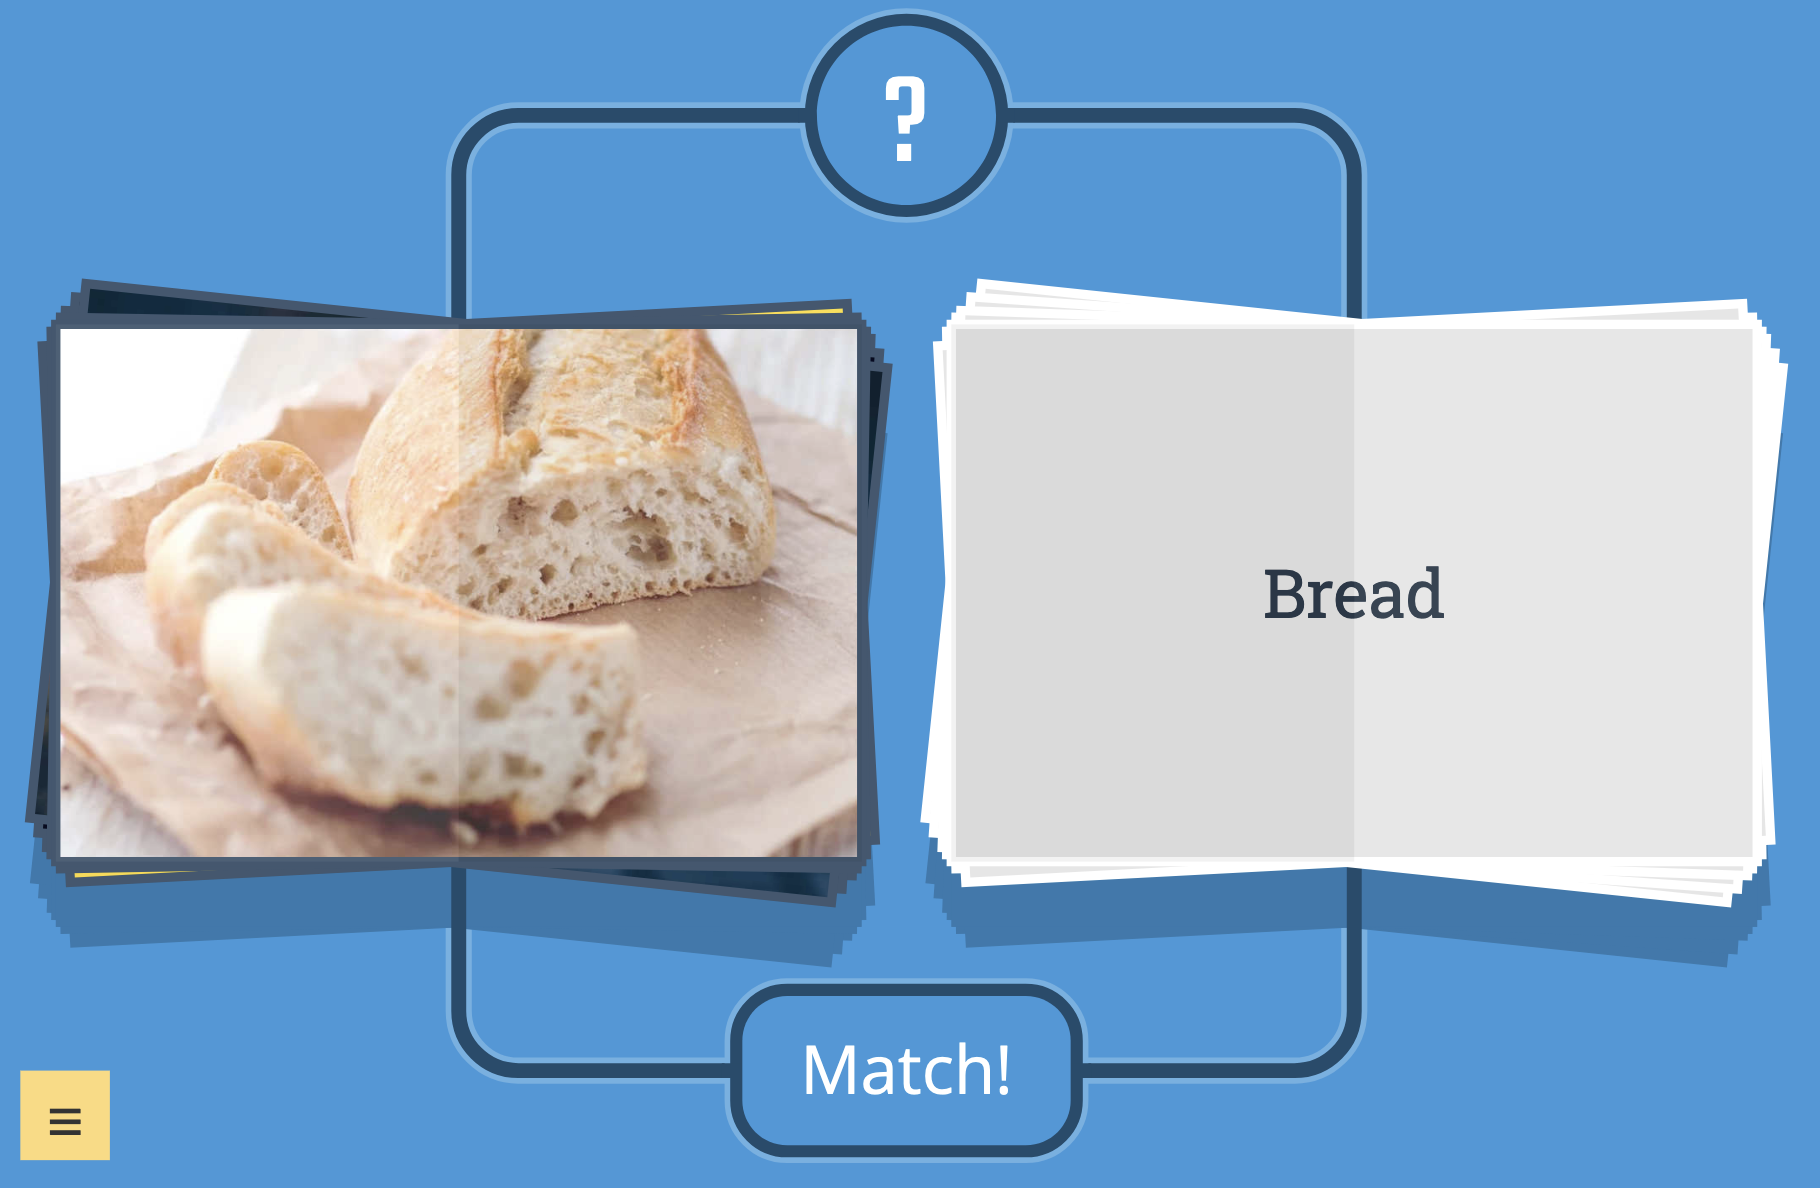
Match
Requirements:
- None.
Examples:
Overview:
Tap left or right on each pack to cycle through the cards.
When you think that you have found a match, press the 'Match' button.
Order Sorter
Requirements:
- None.
Examples:
Overview:
Use the handle on the left side of each panel to drag it up and down:
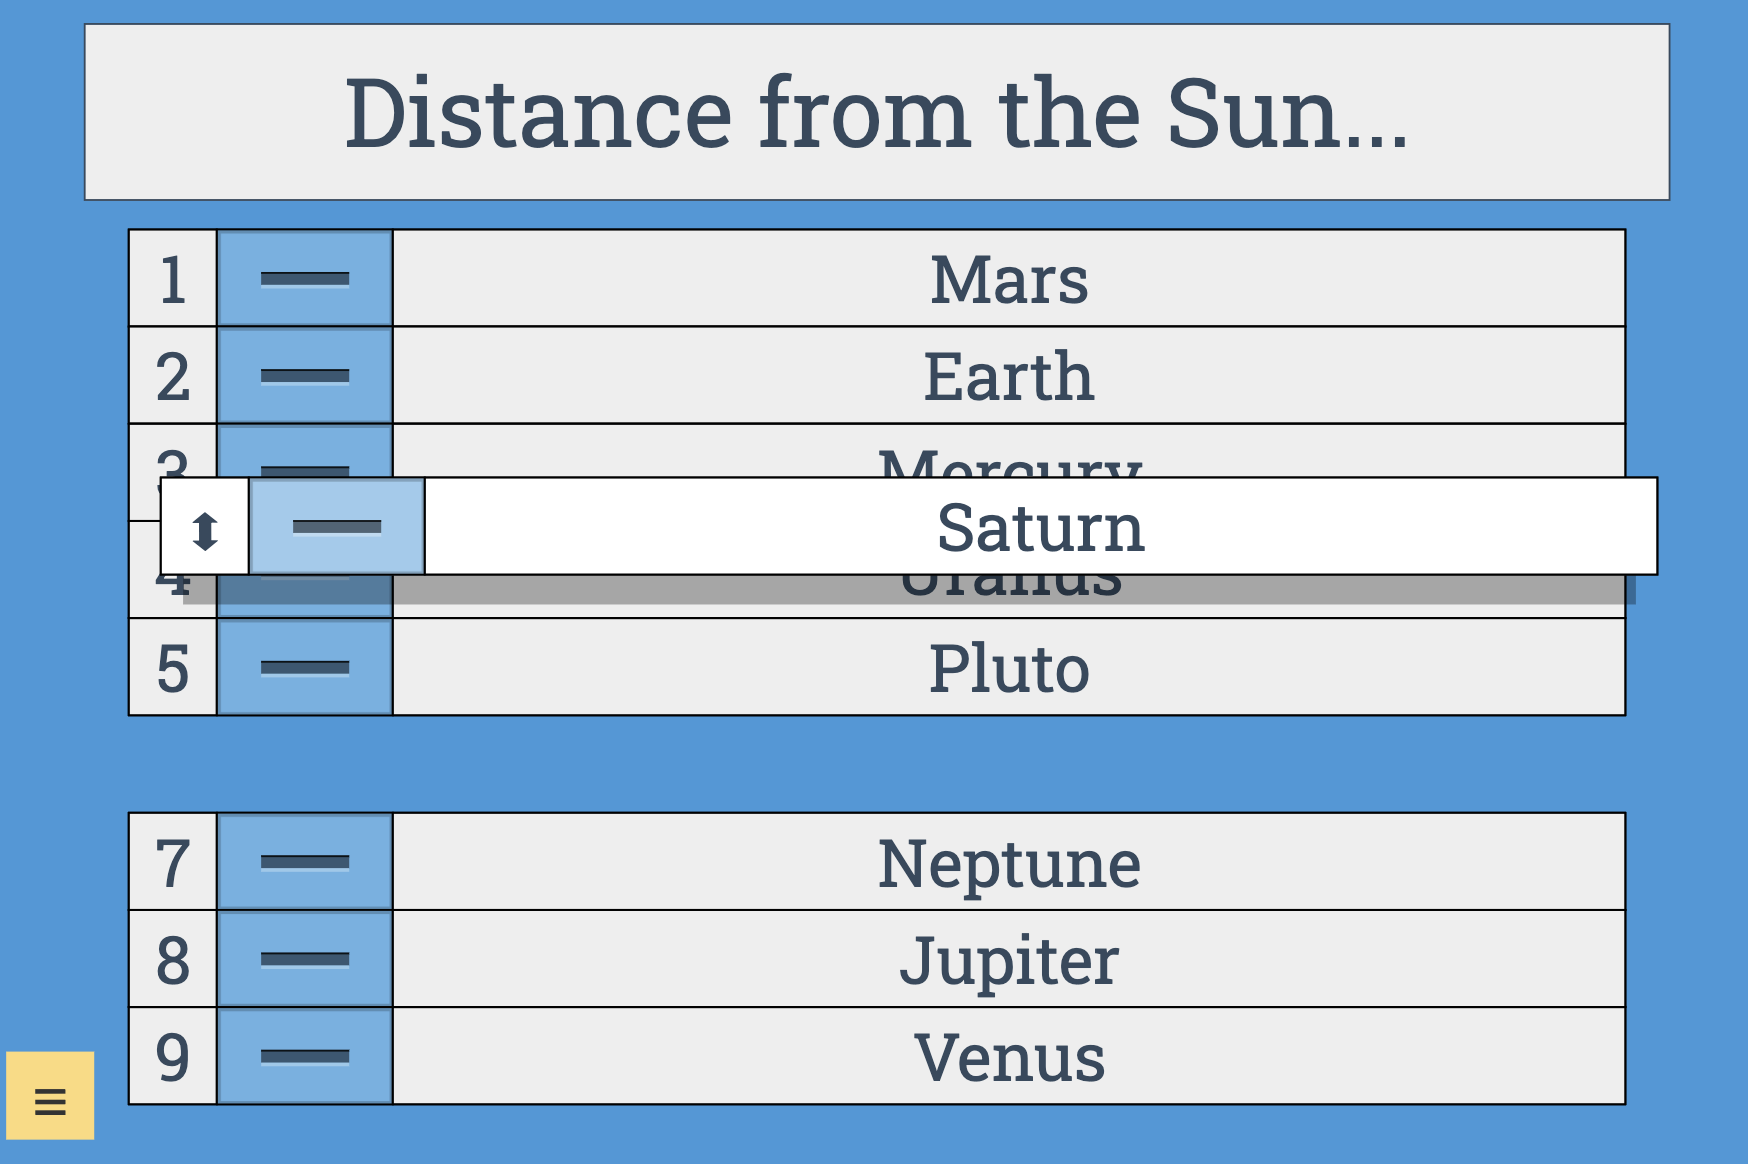
This resource can be a great way to encourage debate and discussion where is there is no 'correct' order (such as in the Romeo and Juliet example above).
Where there is a correct order, as in the screenshot, you can open the menu and add a 'Check' button to the resource.
Note: If using the 'Check' button, the resource will assume that the correct answer is the order in which the saved file was created.
Dragging a panel to the right side of the screen will turn the panel red. Releasing a panel when it is red will delete the panel.
This resource also has a collaborate mode (accessed via the menu) - this enables you to link one or more devices. Moving a panel on one device will move the panel on all linked devices.
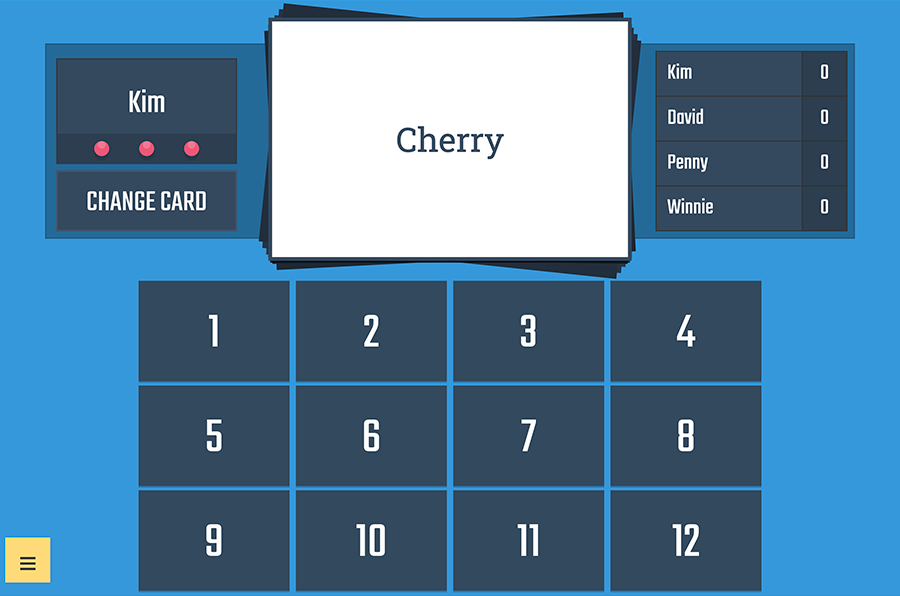
Pairs
Requirements:
- A saved file with at least 8 cards.
- One or two players or teams.
Examples:
Overview:
Press a numbered button on the left panel and try to find the matching card in the right panel.
With two cards selected, you must decide if you have found a pair or not:
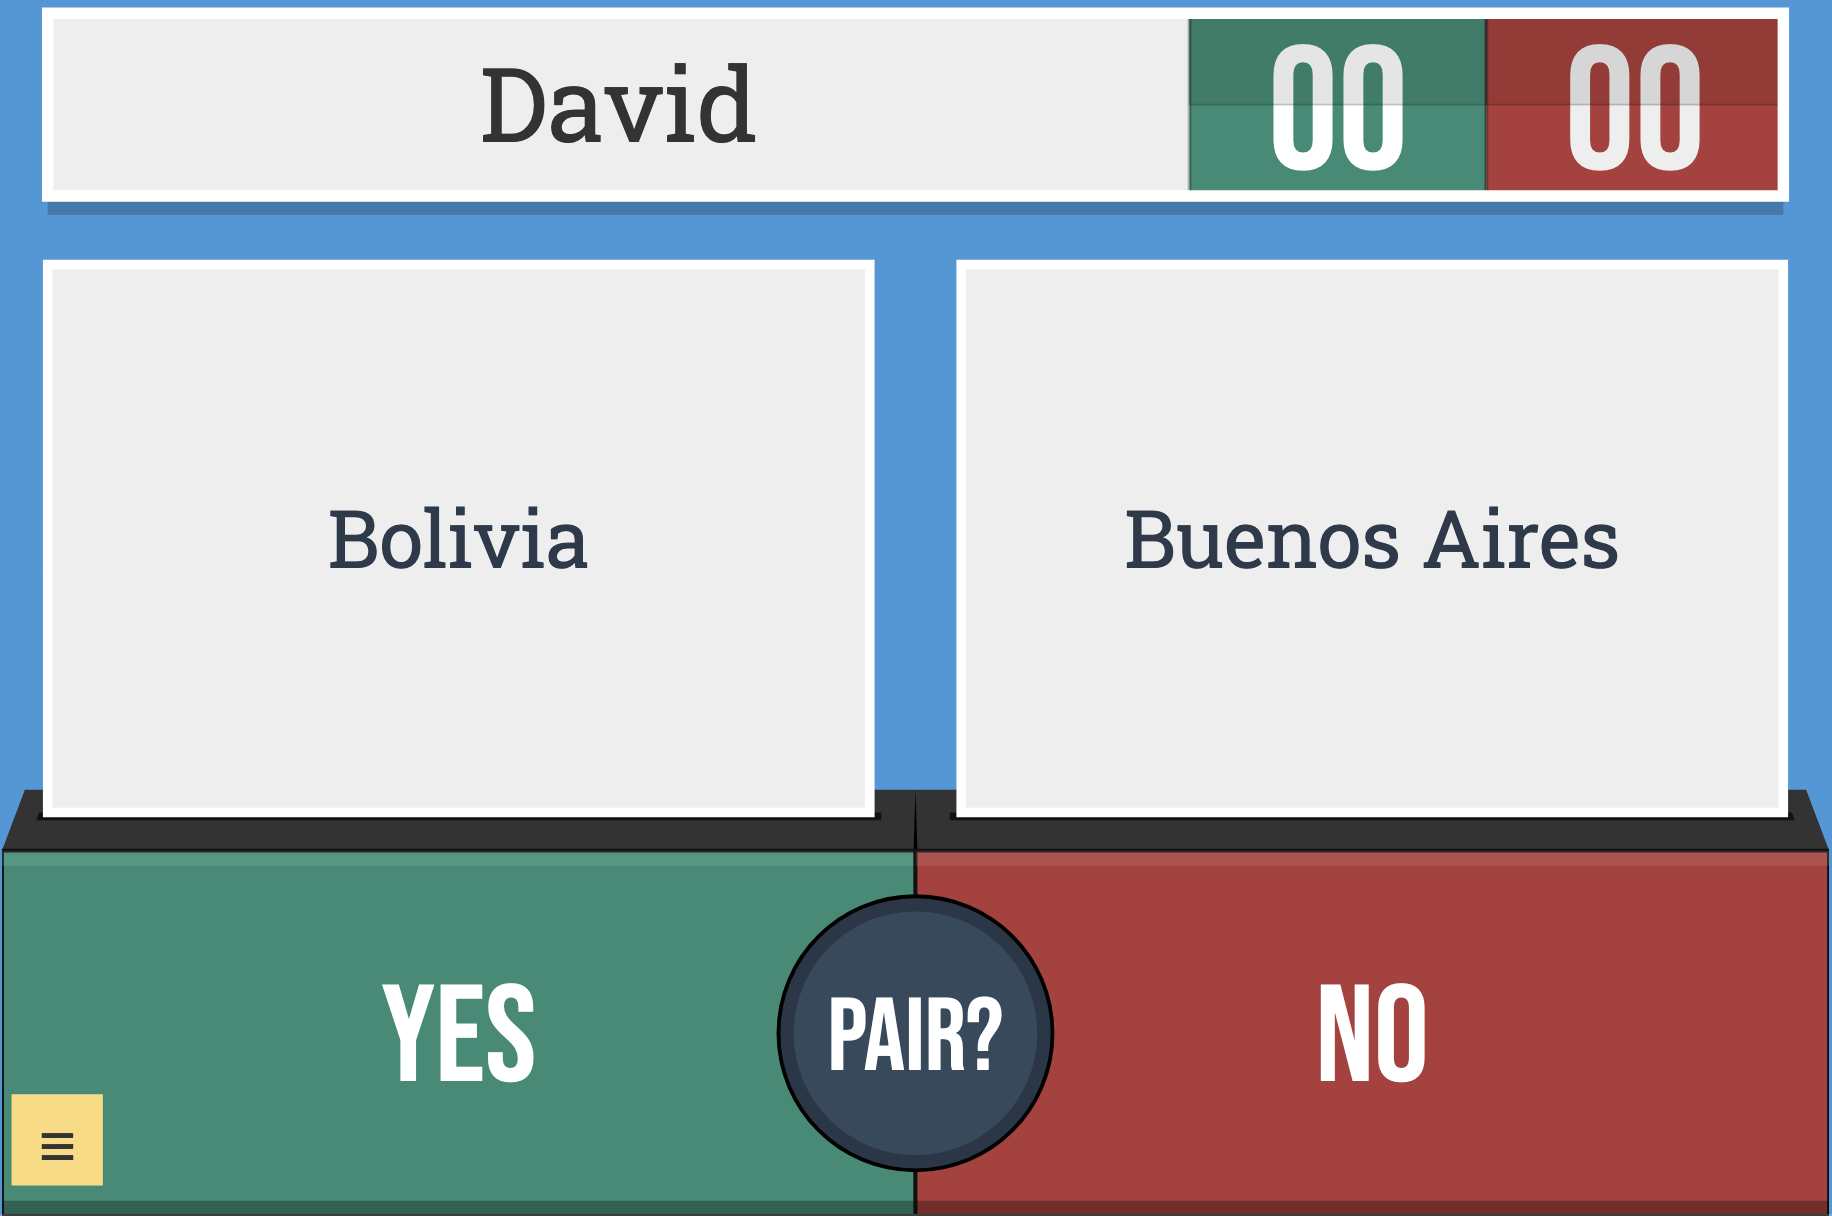
If you do not think that you have found a pair, try to remember the position of each card to help you on your next turn!
The resource keeps a score, awarding points for pairs found and identified correctly.
Pull Selector
Requirements:
- None.
Examples:
Overview:
A simple resource for selecting names, key words, images, questions - and so on.
Drag the arrow downwards (click and drag with a mouse) and release it to make a new selection:
Tip!
By default, the resource uses an uppercase font when selecting text.
You can switch this off via the menu and the resource will use your preferred font.
Quick Quiz
Requirements:
- A saved file with at least 4 cards - the more cards, the more varied the quiz.
Examples:
Overview:
The Quick Quiz resource takes a saved file and uses it to create a quiz.
Drag down across the wheel (click and drag with a mouse) to spin it and generate a new question:
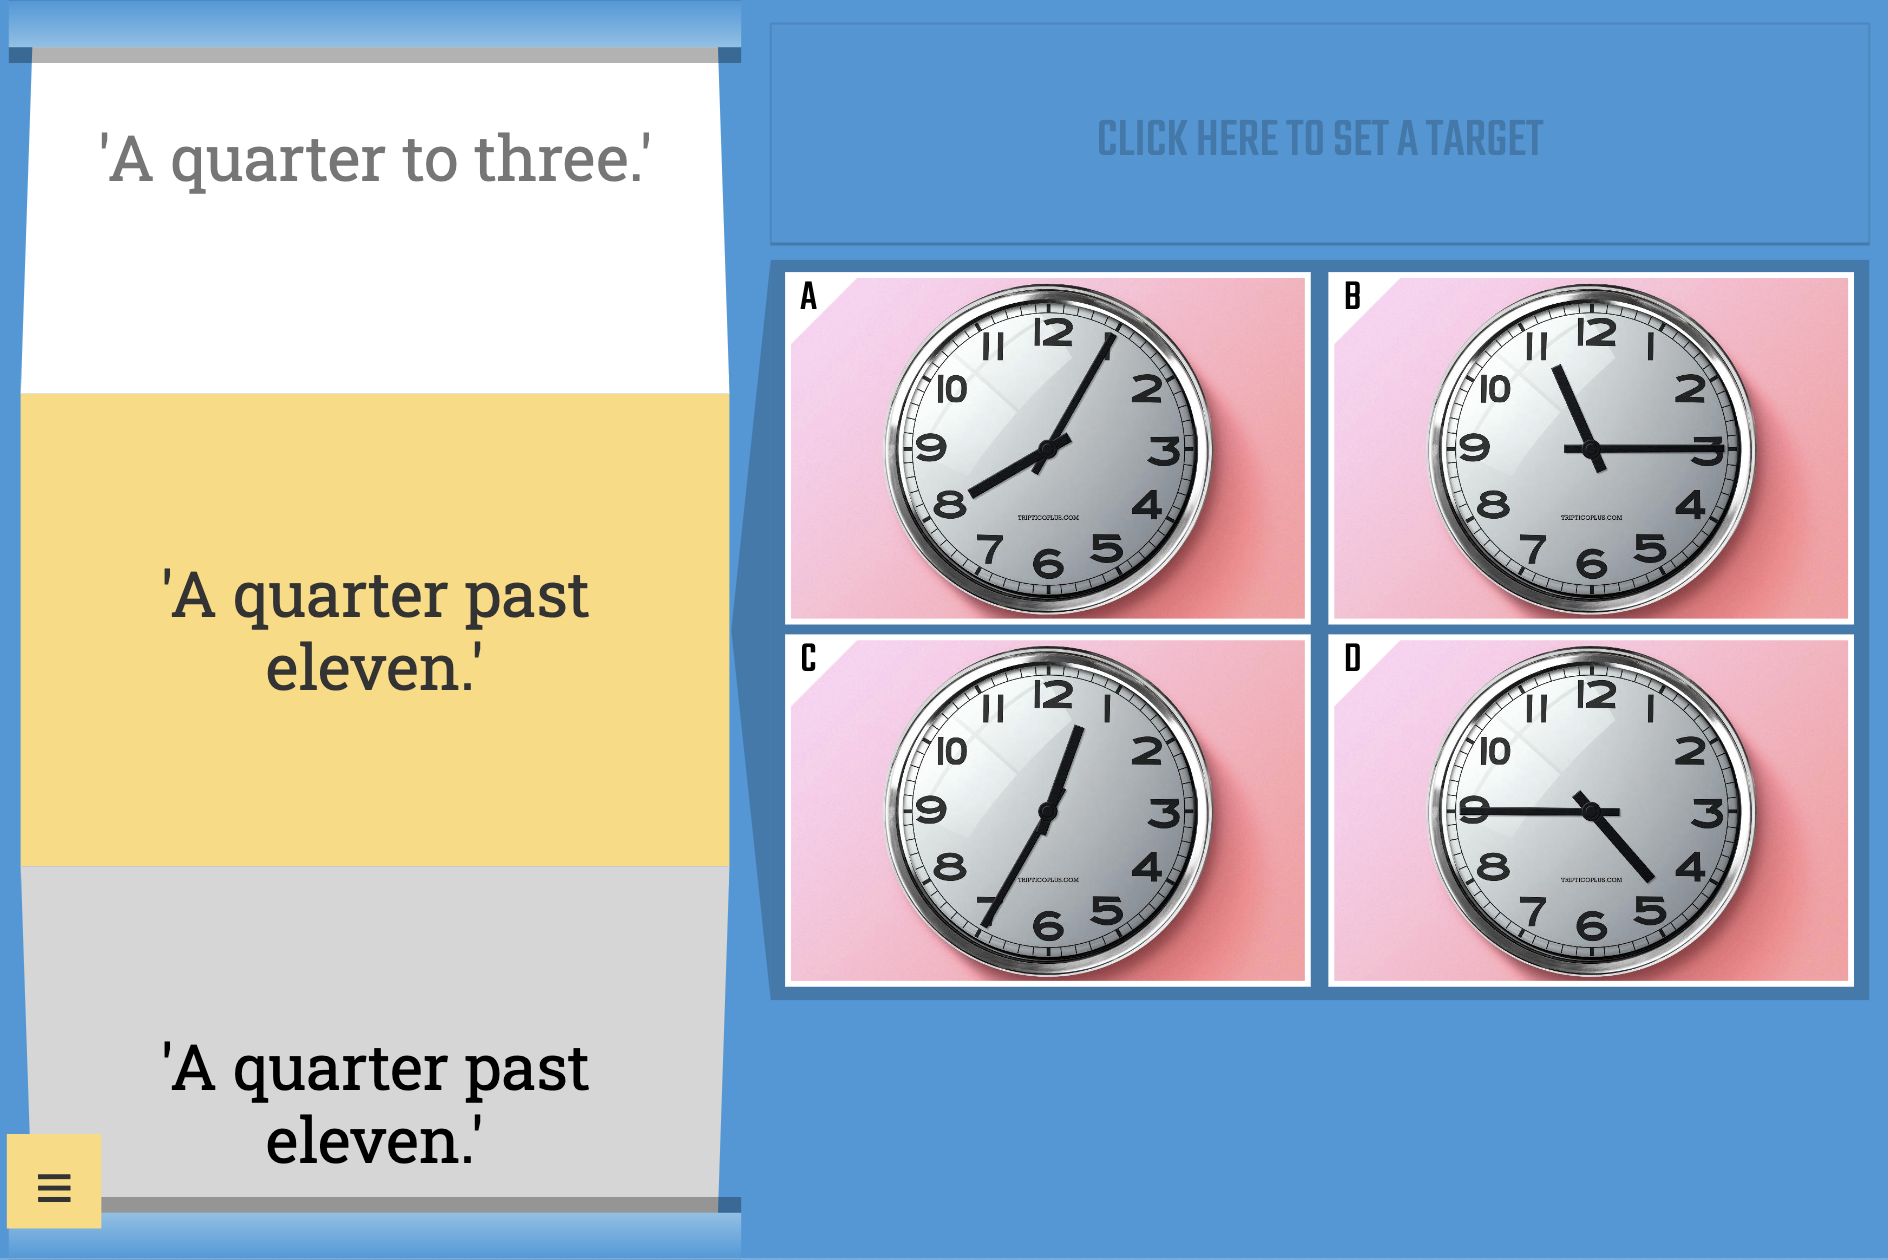
Pull down on the wheel to generate a new question.
Pull down on the wheel to generate a new question.
Select the correct option and spin the wheel to generate the next question.
You can click the bar above the answer options to set a target of correct answers.
A positive message accompanies each correct answer. By default, this message in English but - in response to feedback from users - you can open the menu and select a different language.
Simple Selector
Requirements:
- None.
Examples:
Overview:
A simple resource for selecting names, key words, images, questions - and so on.
Tap the card to make a new selection:

The resource adds a little 'tension' by displaying different cards before making a selection. You can change this to an instant selection via the menu if you prefer.
You can open the menu and choose how you would like the cards to be selected:
- In Order
The cards are displayed in the order in which they were created. (A B C D, A B C D, A B C D and so on.)
- Sequence
The cards are displayed in a random sequence. No cards will be duplicated until all of the cards have been displayed. (C A D B, B D A C, B A D C and so on.)
- Random
The cards are displayed in a completely random order. The same card may be selected several times in a row. (C C C A B C D A C B and so on.)
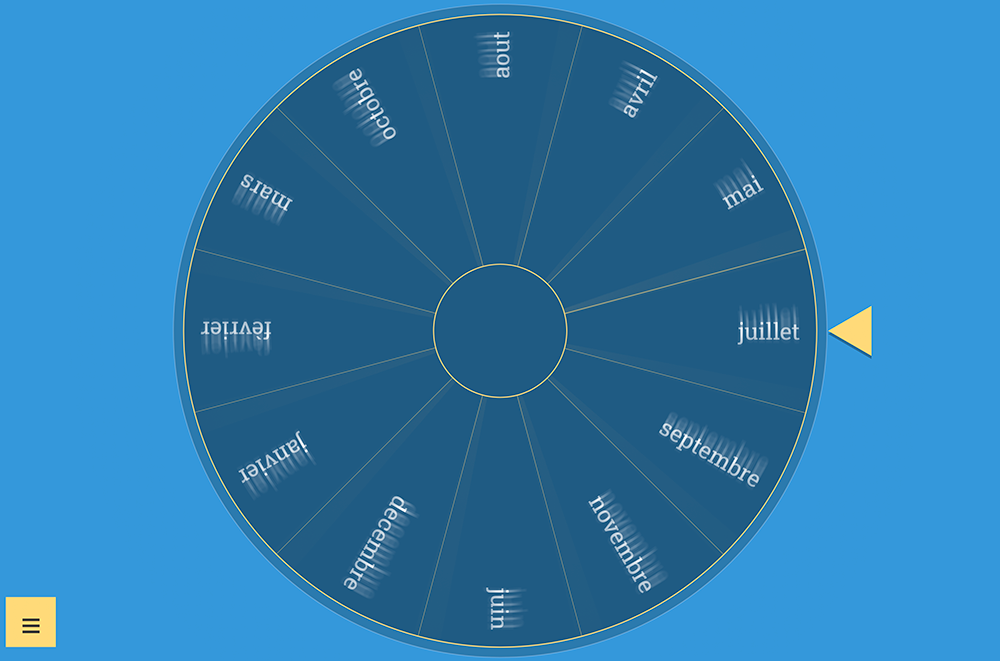
Spinner
Requirements:
- None.
Examples:
- Class List with Poetry Questions
- South America - Countries and Capitals
- Months of the Year (English and French)
Overview:
This resource converts a saved file to a spinner which you can spin by drawing circles on the screen (clicking and drawing circles with a mouse):
If the cards in the saved file that you have opened have two sides then a magnifying glass icon will appear when a new selection is made. You can click this to view the additional content.
The menu has some additional options for your spinner:
- Hide Content
With this option selected, each segment of the spinner is hidden until it is selected.
- Zoom Selected
The content of the selected segment is displayed on a card to make it easier to read.
You can also open the menu and choose how you would like selections to be made:
- In Order
The segments are selected in the order in which they were created. (A B C D, A B C D, A B C D and so on.)
- Sequence
The segments are selected in a random sequence. No segments will be duplicated until all of the segments have been selected. (C A D B, B D A C, B A D C and so on.)
- Random
The segments are selected in a completely random order. The same segment may be selected several times in a row. (C C C A B C D A C B and so on.)
Swipe
Requirements:
- Cards in the saved file must be marked as either true or false (Learn More).
Examples:
Overview:
Look at each card and decide if it is true or false.
If it is true, swipe it to the right into the green box.
If false, swipe it to the left.
You can also click on each box if you prefer.
You can open the menu and switch the timer on to add a competitive element.
With the timer activated, bonus points will be awarded for questions answered correctly in a row - but the resource will try to trick and confuse the player into answering incorrectly!
Task Spinner
Requirements:
- None.
Examples:
This first example automatically loads a list of names into the resource:
With the following examples, you will need to load a list of names (to load a demo list you can type: 78) or you can type some names in the input box.
Note too that, because the following examples are saved files with two-sided cards, you can click the card to reveal the answer.
Overview:
This resource displays a saved file as a series of cards.
In addition, it allows you to combine these cards with a list of names.
If you already have a Triptico file with the list of names that you would like to use then you can simply type the unique code of the saved file into this resource.
Alternatively, you can type or paste some names (or pairs, groups, teams and so on) into the resource.
The names are added to a wheel which you can drag to spin (click and drag with a mouse) to allocate a question or task or key word - whatever you like! - at random.
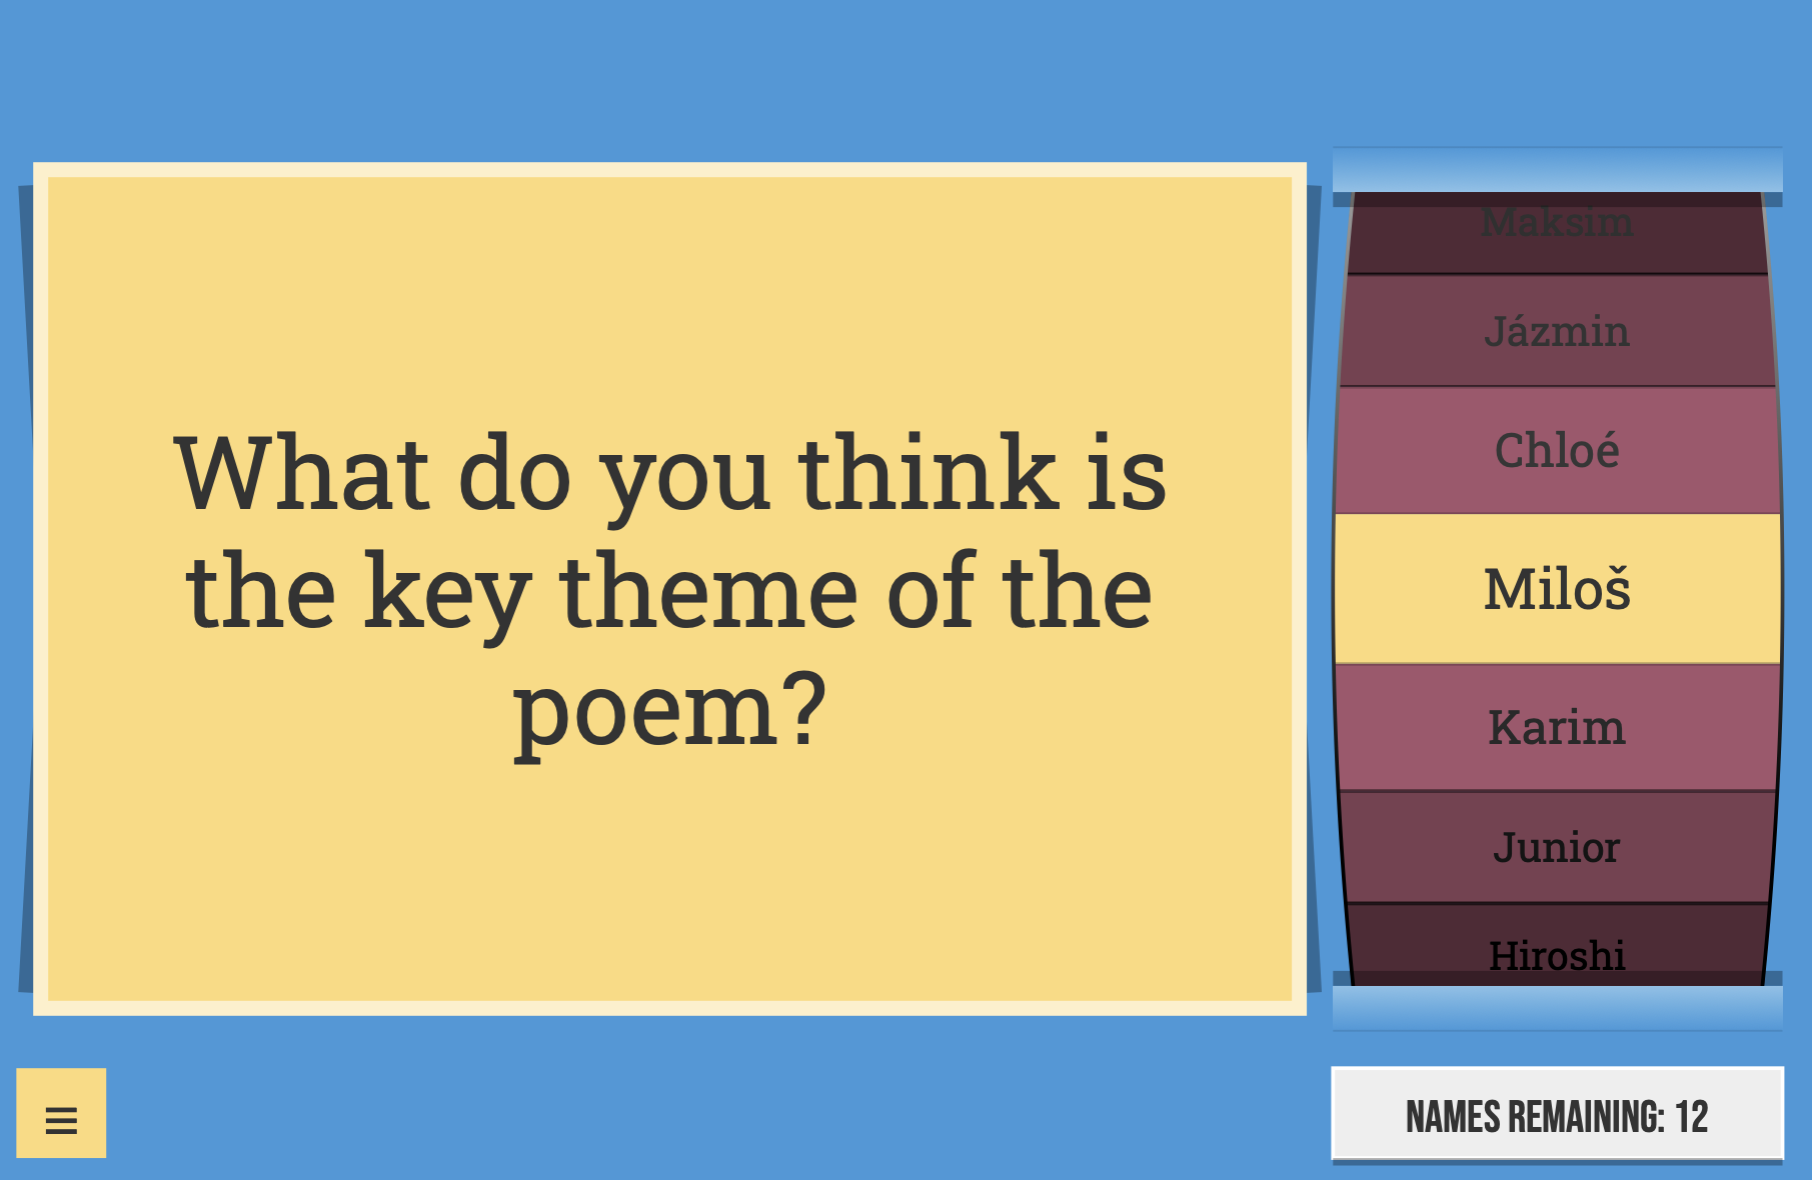
By default, when a name is selected it is removed from the wheel.
If you would prefer to keep the selected name on the wheel to be potentially selected again then you can open the menu and change this setting.
Ten in a Row
Requirements:
- A saved file with at least 4 cards - the more cards, the more varied the quiz.
Examples:
Overview:
This resource takes a saved file and uses it to create a quiz.
The goal is to try to answer ten questions correctly in a row.
Tap the 'question' card to reveal three possible answers. Click on whichever one you think is correct:
A very simple resource - a great way to reinforce learning and a great resource to share with students for them to revise in their own time on their own devices.
Where's the Answer?
Requirements:
- A saved file with at least 12 cards.
- Two or more players or teams.
Examples:
- Fruit and Vegetables
- South America - Countries and Capitals
- Months of the Year - English and Spanish
Overview:
The game begins by displaying the 12 'answer' cards.
Each team has a limited amount of time to try to remember the position of each card:
A player or team is selected to go first and a 'question' selected at random. They must try to find the matching card:
Whichever card they select is revealed and they must decide if they have found a match or not.
Claiming a match incorrectly will award points to the opposing teams - so think carefully before making a decision!
Each team also has three opportunities to change the question card.
The player or team with the most points at the end of the game is the winner!
Word Magnets
Requirements:
- None.
Examples:
Overview:
The Word Magnet resource will take the content of a saved file and convert it to draggable magnets.
It is the perfect resource for many activities - labelling, sorting, ordering, matching, grouping - the possibilities are endless!
Using the Resource:
(Please click here to view a short video demonstrating each of the gestures described below.)
- Moving Magnets
Drag magnets to move them around the screen.
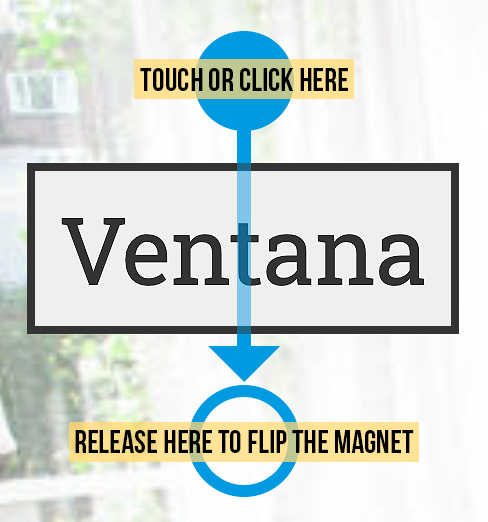
- Flip a Magnet Over
Touch the screen above the magnet that you would like to flip over and drag your finger DOWN over it.
(Note: With a mouse, click and hold down the mouse button just above the magnet you would like to flip over. Move the mouse cursor DOWN across the magnet and then release the mouse button.)
- Make a Magnet Bigger
Touch the screen to the left of the magnet that you would like to make bigger and drag your finger to the RIGHT across it. (Click and drag with a mouse.)
- Make a Magnet Smaller
Touch the screen to the right of the magnet that you would like to make smaller and drag your finger to the LEFT across it. (Click and drag with a mouse.)
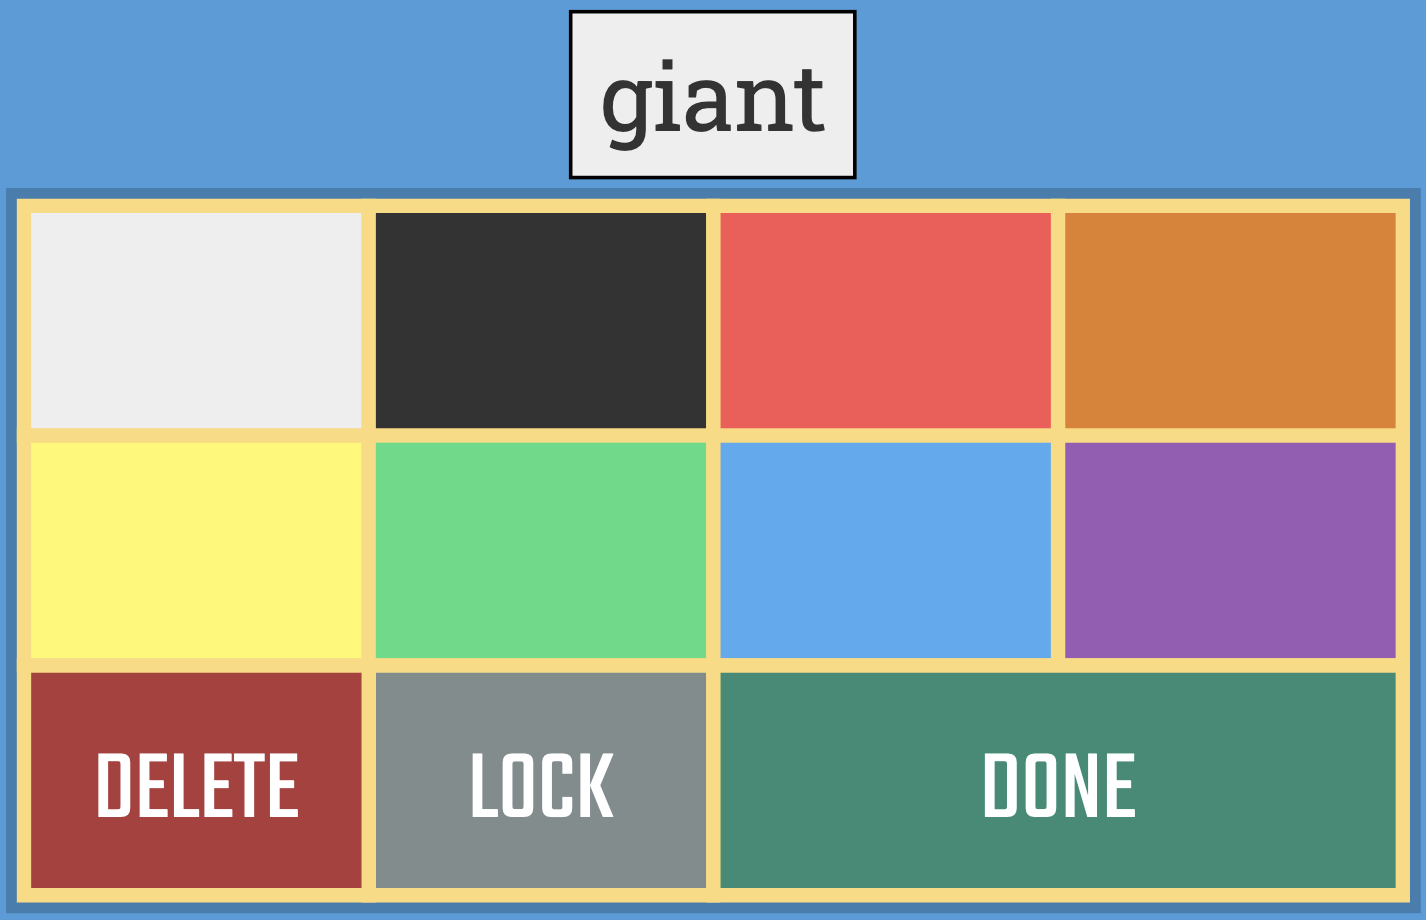
- Change the Colour of a Magnet / Lock a Magnet in Place / Delete a Magnet
Touch the screen below the magnet that you would like to make bigger and drag your finger UP across it. (Click and drag with a mouse.)
A menu panel will appear with lots of different options:
- Change the Background Colour
You can change the background colour of your Word Magnet activities.
Click the menu button and from the 'Background Options' press the 'Select' button next to 'Colour' option.
- Add a Background Template
Word Magnets has many templates that you can add as backgrounds to your activities.
Click the menu button and from the 'Background Options' press the 'Select' button next to the 'Template' option.
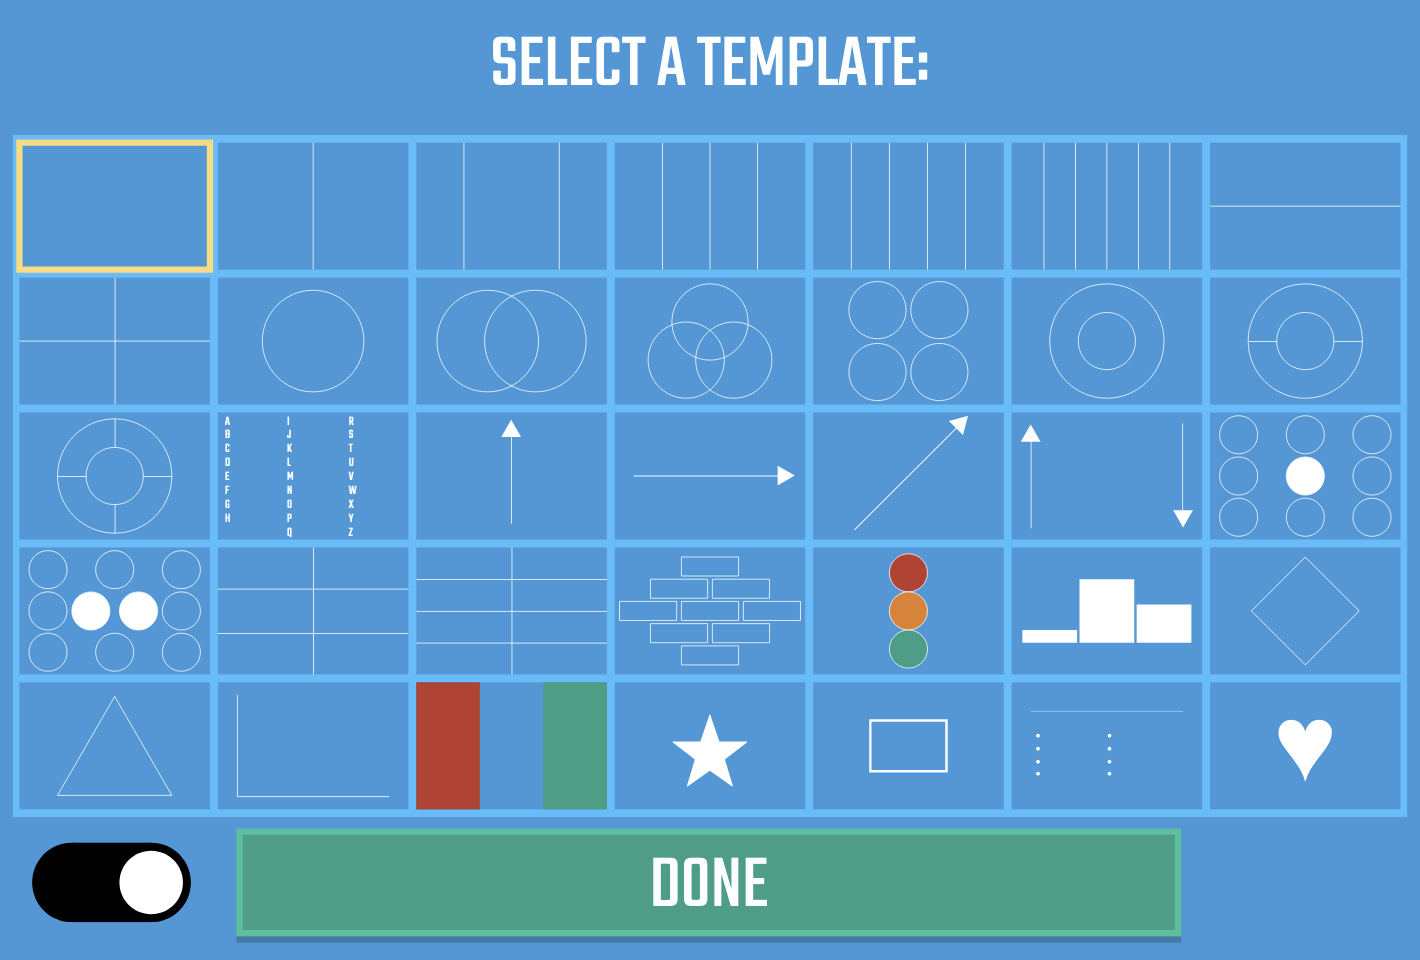
Choose a template and then click 'Done' to add it to your activity.
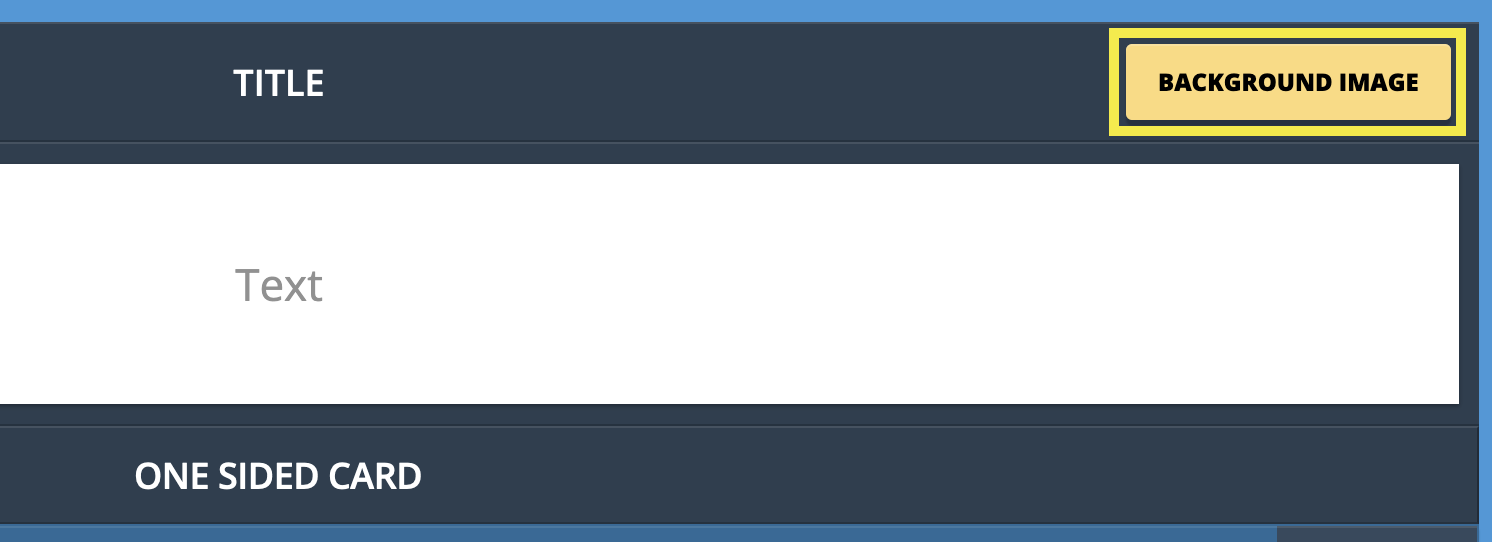
- Add a Background Image
You can add an image to the background of your Word Magnet activities by opening the menu and pressing the 'Select' button next to the 'Background Image' option.
Tip!
If you would like to embed an image in a saved file - as in this example - then you should add the image to the title bar when you create your activity.
Embed Images by Adding them to the Title of your activity
Embed Images by Adding them to the Title of your activity
When creating or editing an activity, press the 'Options' button and move the 'Images' switch to the ON position to access the 'Background Image' button.
- Magnet Options
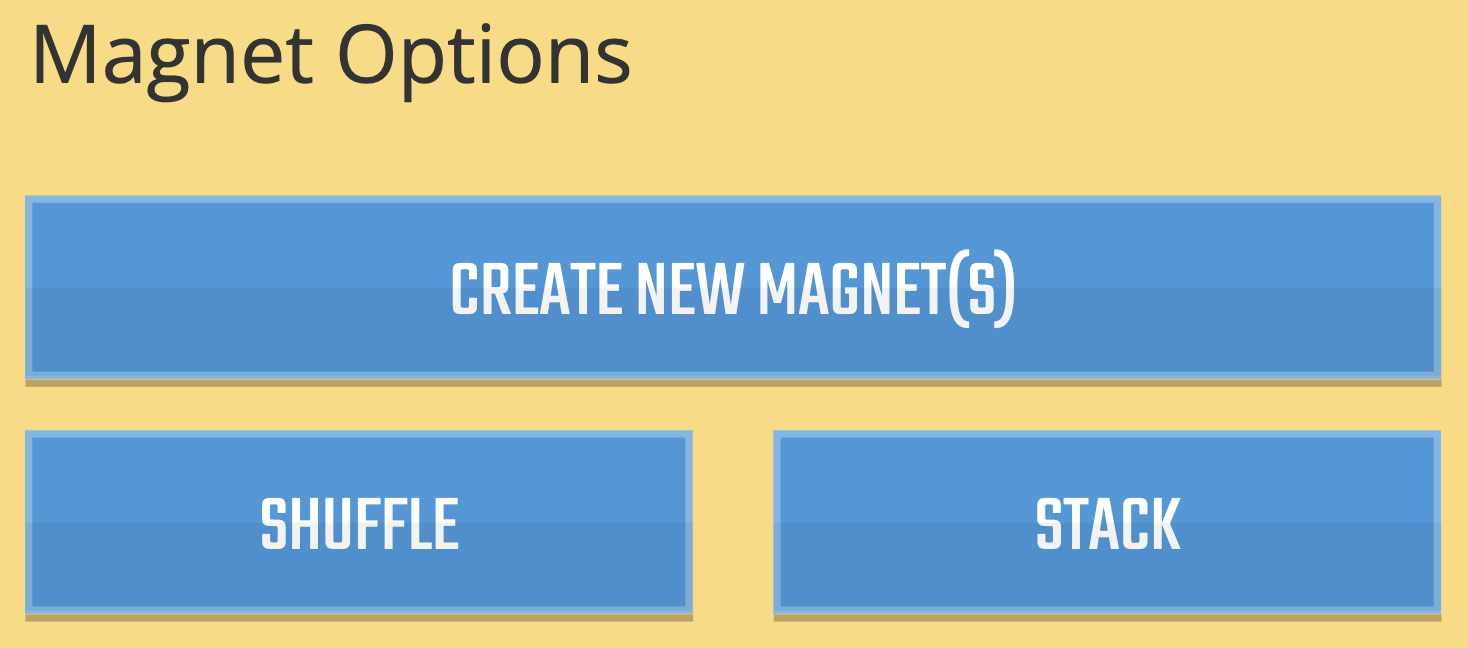
- Create New Word Magnets
You can create new magnets for your activity by opening the menu and pressing the 'Create New Magnet(s)' button.
A new panel will appear with a text box, into which you can type words to add to a single magnet or to split into individual magnets.
- Arrange Magnets
The menu has a 'Shuffle' button. Pressing this button will randomly shuffle your magnets around the board.
You could begin an activity with the magnets positioned correctly (labelling an image, for example) and then press the 'Shuffle' button to move them around. The task would then be to reposition the magnets correctly once again.
The menu also has a 'Stack' button which you can press to instantly stack all of your magnets in the centre of the screen.
- NEW FEATURE: Save Magnet Positions
The menu has a 'Save Current Positions' button. Pressing this button will ensure that the next time the activity is opened it will look exactly as it did when the save button was pressed.
Any changes that you made to the size of each magnet, the colour of each magnet and so on will be preserved.
Also, if you added a template or changed the background colour then each will be instantly displayed whenever the activity is opened.
Try an example here - you will see that Venn diagram will be displayed automatically in the background and the title magnets will be 'taped' in place:
Word Sort: Lady Macbeth and King Duncan
This also works when the activity is opened as part of a lesson or presentation:
Flip Timer
Requirements:
- None.
Overview:
A simple timer that will count up or down at the push of a button.
If counting down, you can set the start time by tapping high or low on each of the numbers.
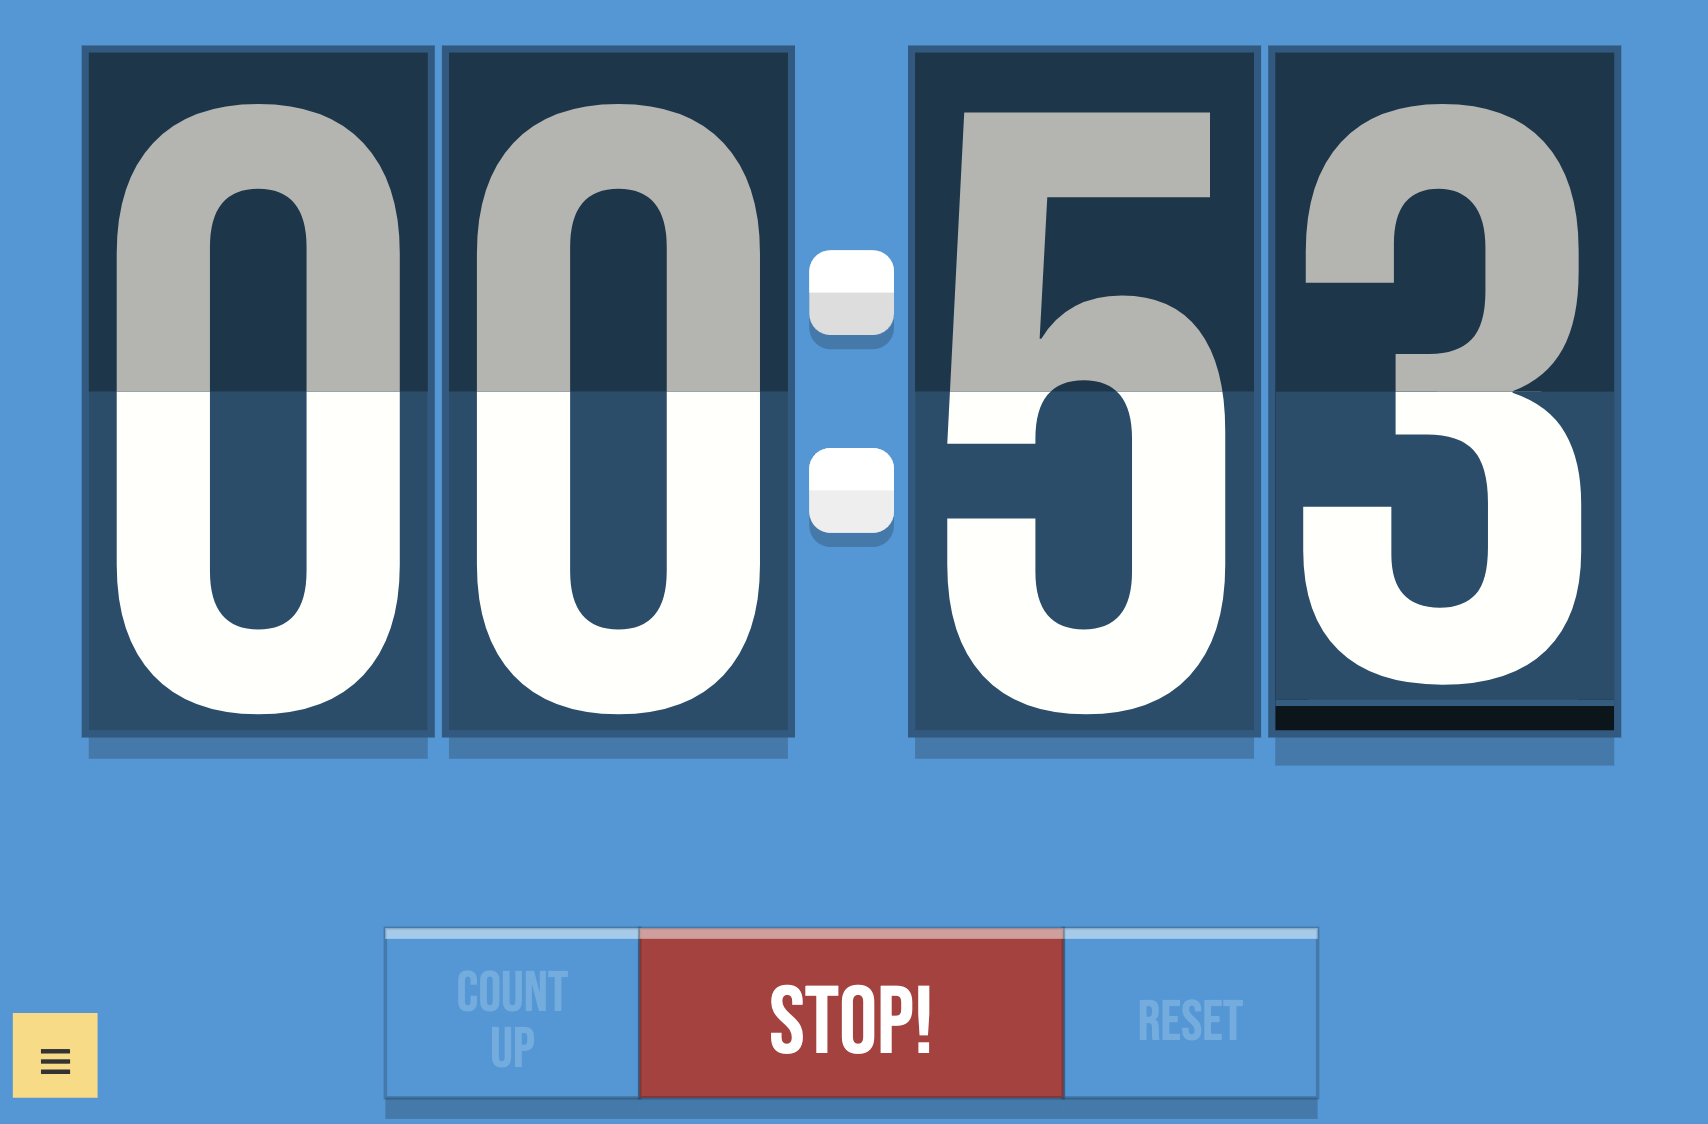
If you would like to display a title above your timer then you can do this via the menu.
The title could be the task that you would like to be completed before the time runs out!
You can also turn the sound on or off via the menu.
Hourglass
Requirements:
- None.
Overview:
Another simple timer for you to use.
Rotate the dial to set the time limit and then press the 'Go!' button'.
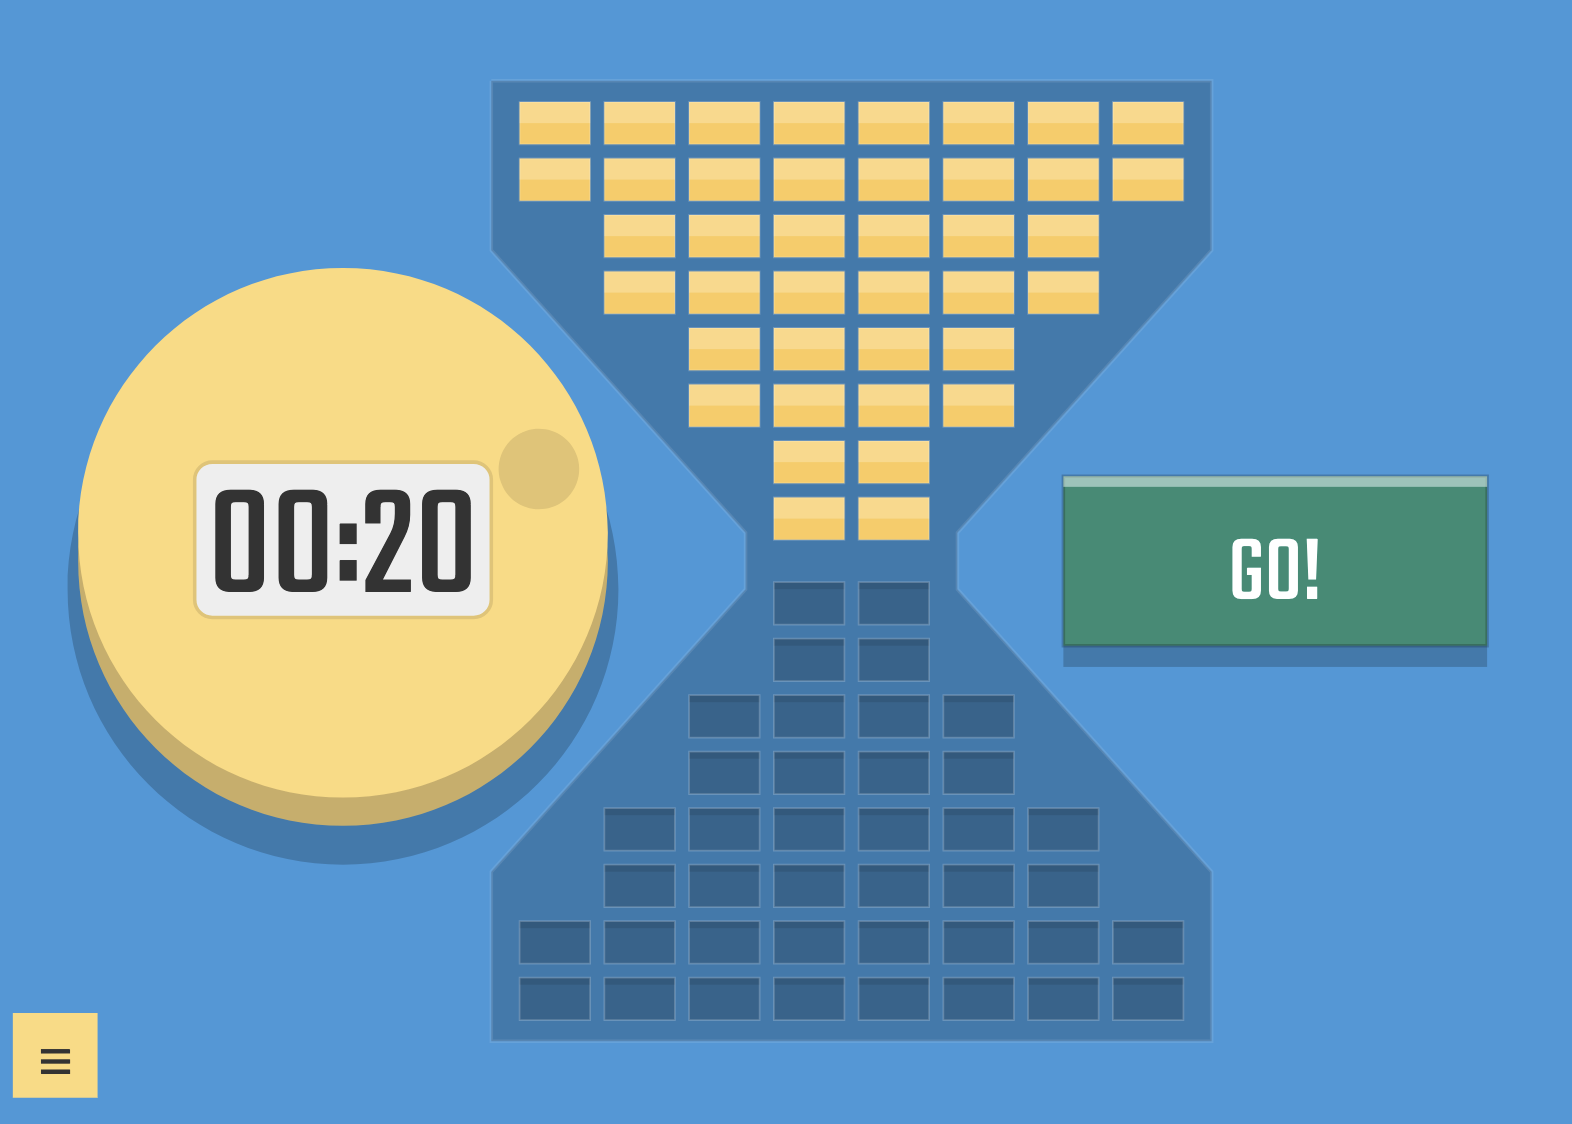
You can turn the sound on or off via the menu.
Pin Board
Requirements:
- None.
Overview:
A simple selector: drop balls down through the pins and see where they land!
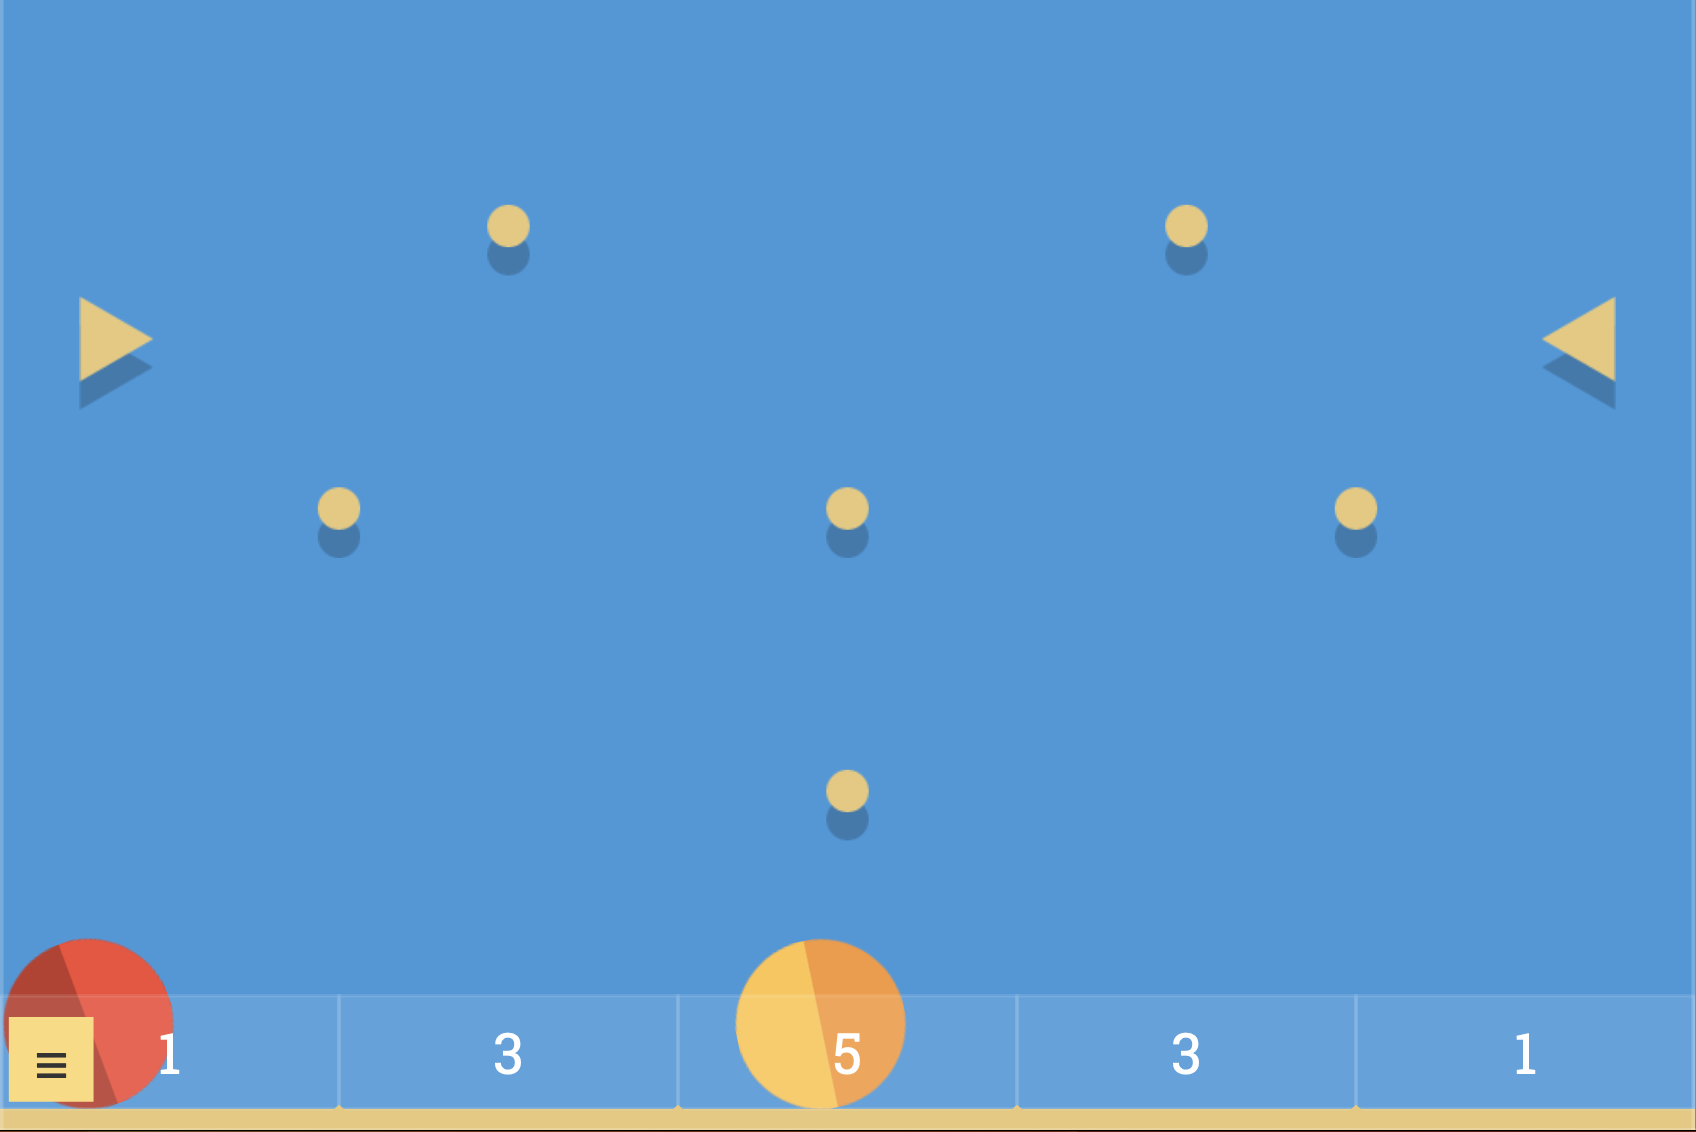
You can open the menu to set the number of balls to drop and also to edit the containers that the balls fall into.
This resource can be used in lots of different ways - to randomly decide how many points a team wins or to select key words, tasks, prompts, people and so on.
Random Number
Requirements:
- None.
Overview:
Tap to generate a random number!
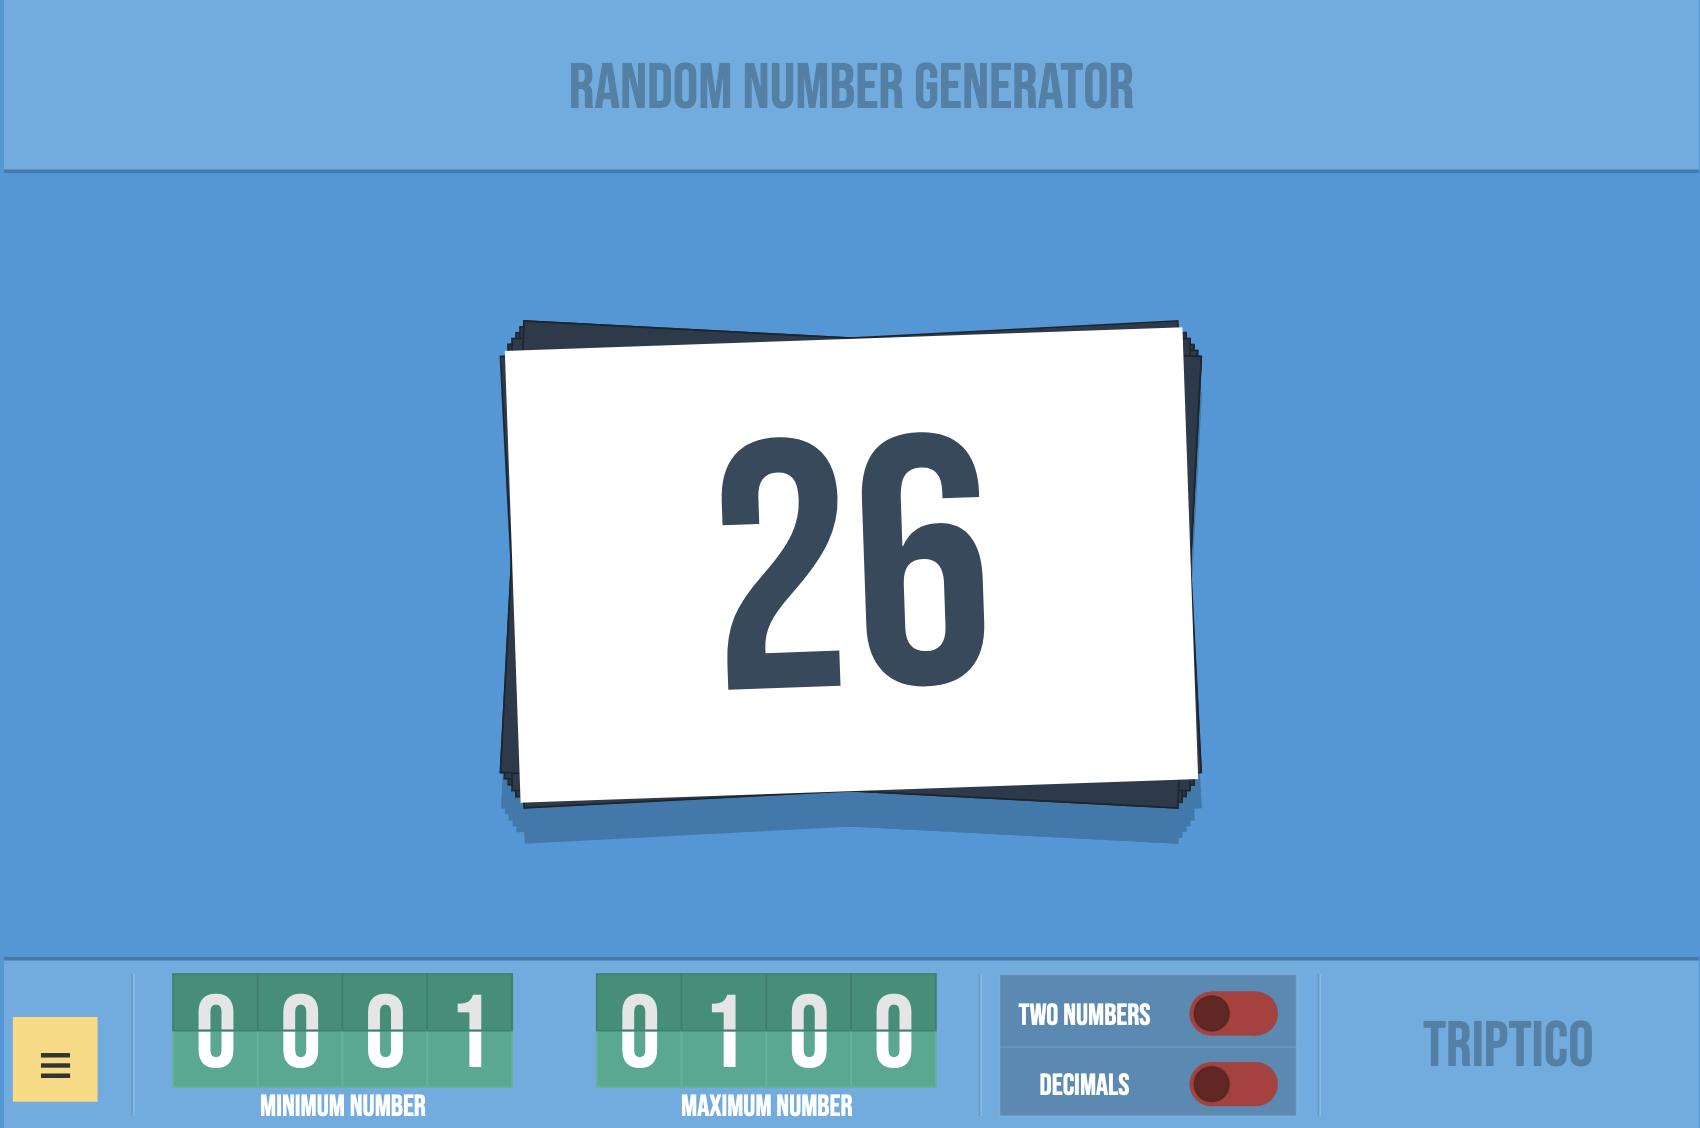
Tap high or low on the green numbers to set the minimum and maximum for the random number.
There is also the option of creating decimal numbers rather than whole numbers.
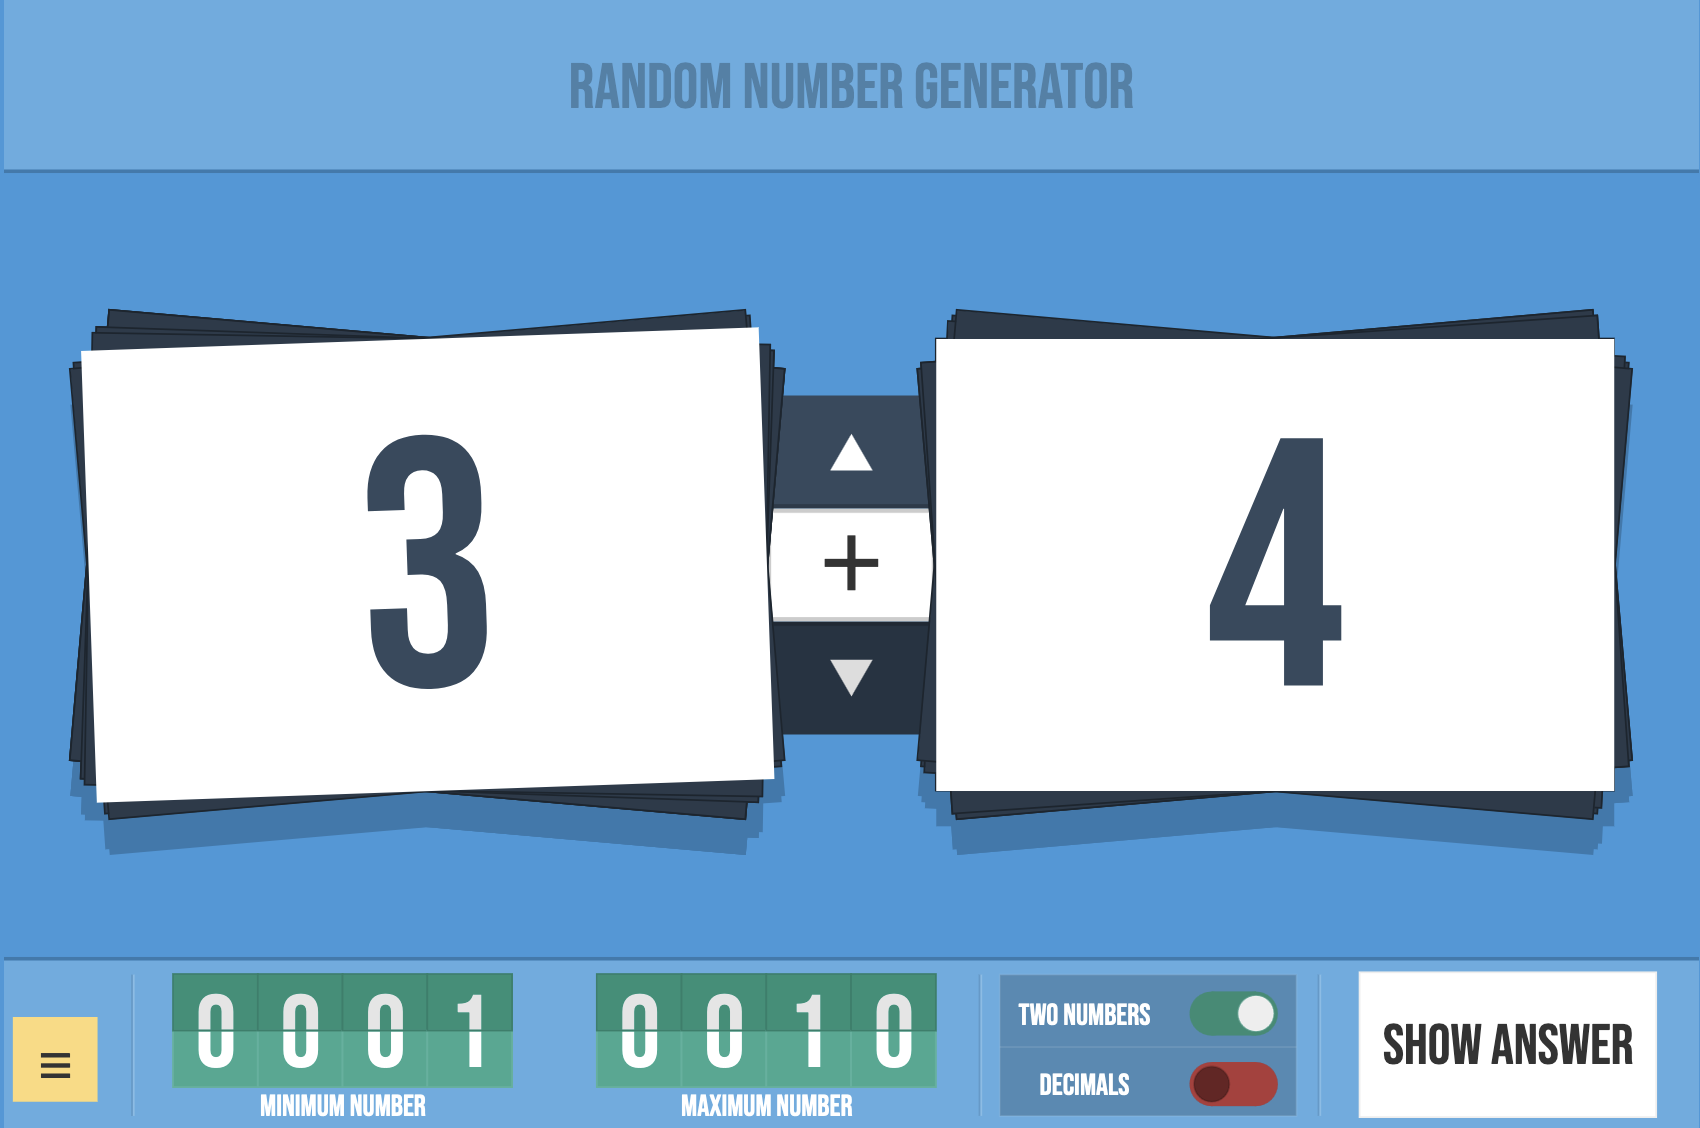
You can also slide the switch to select two random numbers.
With two numbers, you can use the resource to generate random sums. Use the arrows to choose the mathematical function to use.
Press the 'Show Answer' button to reveal the correct answer to the sum.
Scoreboard
Requirements:
- None.
Overview:
A simple scoreboard - Triptico-style!
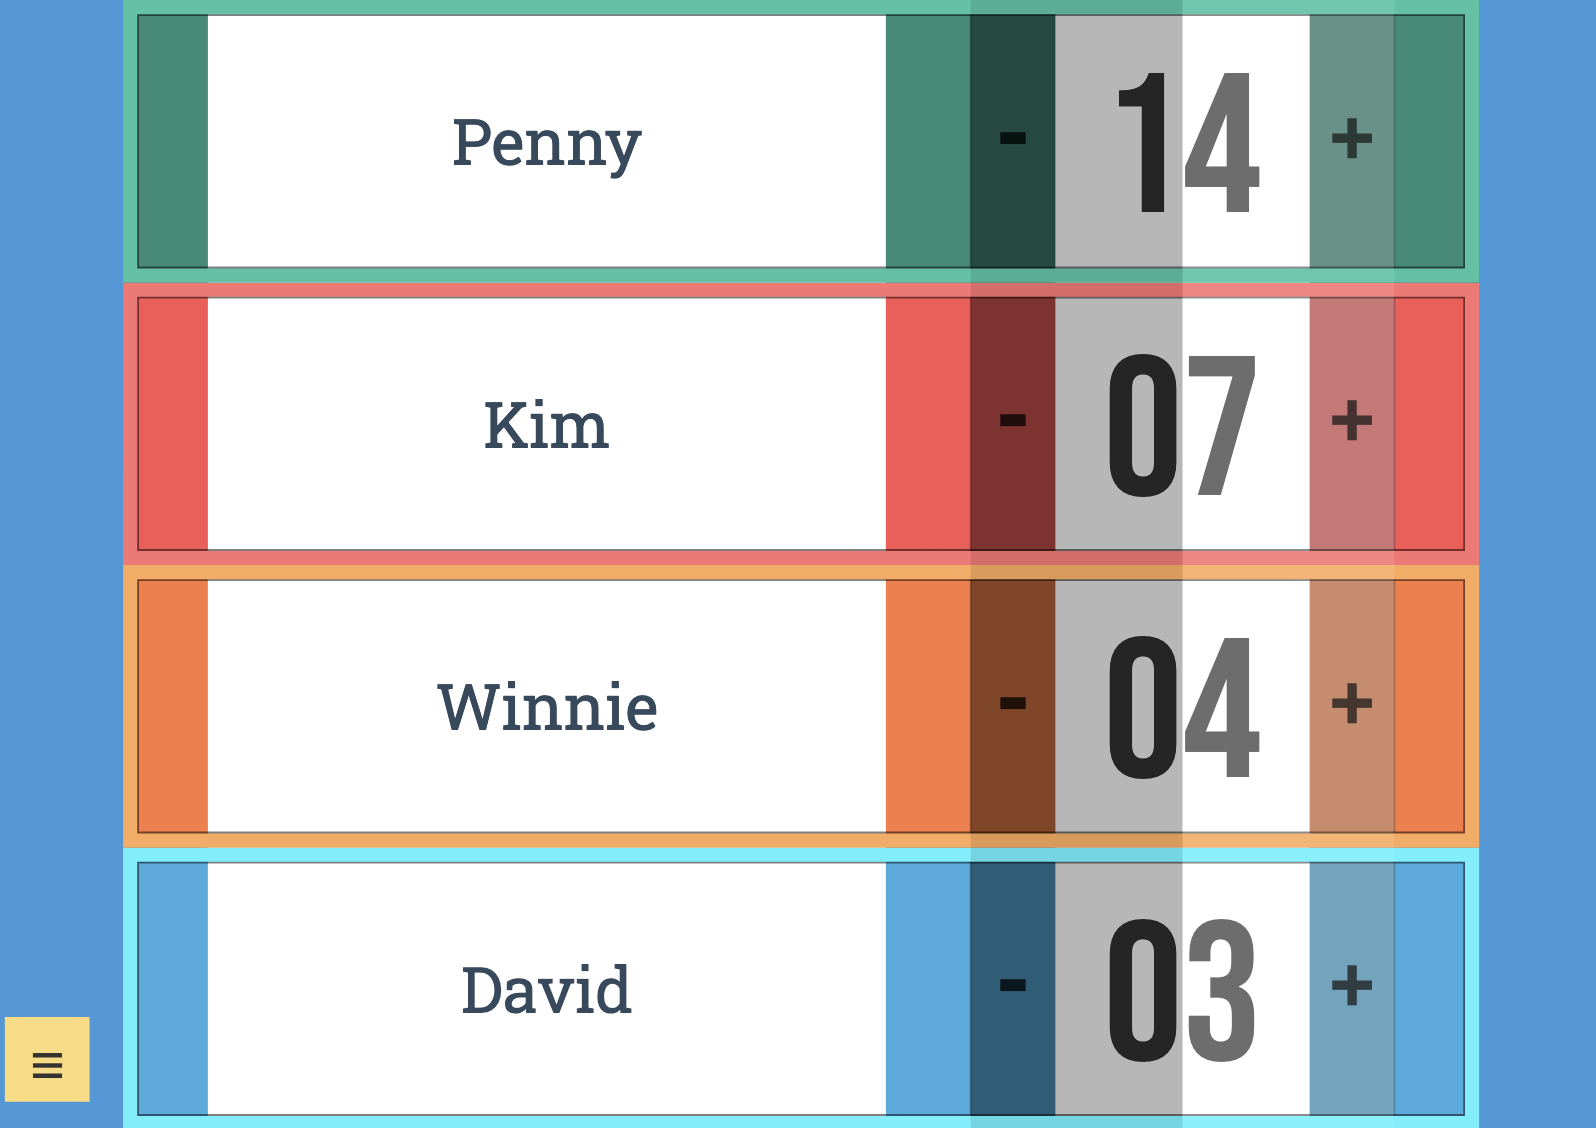
Begin by deciding how many players or teams to add to the scoreboard.
Add or remove points from a team by tapping the plus / minus icons.
The panels will reorder themselves to reflect the new totals.
This resource also has a dastardly additional feature in the menu - random points!
With this feature enabled, teams do not know how many points they will win or lose when the plus or minus icon is pressed - it is completely random (and completely unfair, but fun - use with caution!).
Another Scoreboard
Requirements:
- None.
Overview:
Another simple scoreboard!
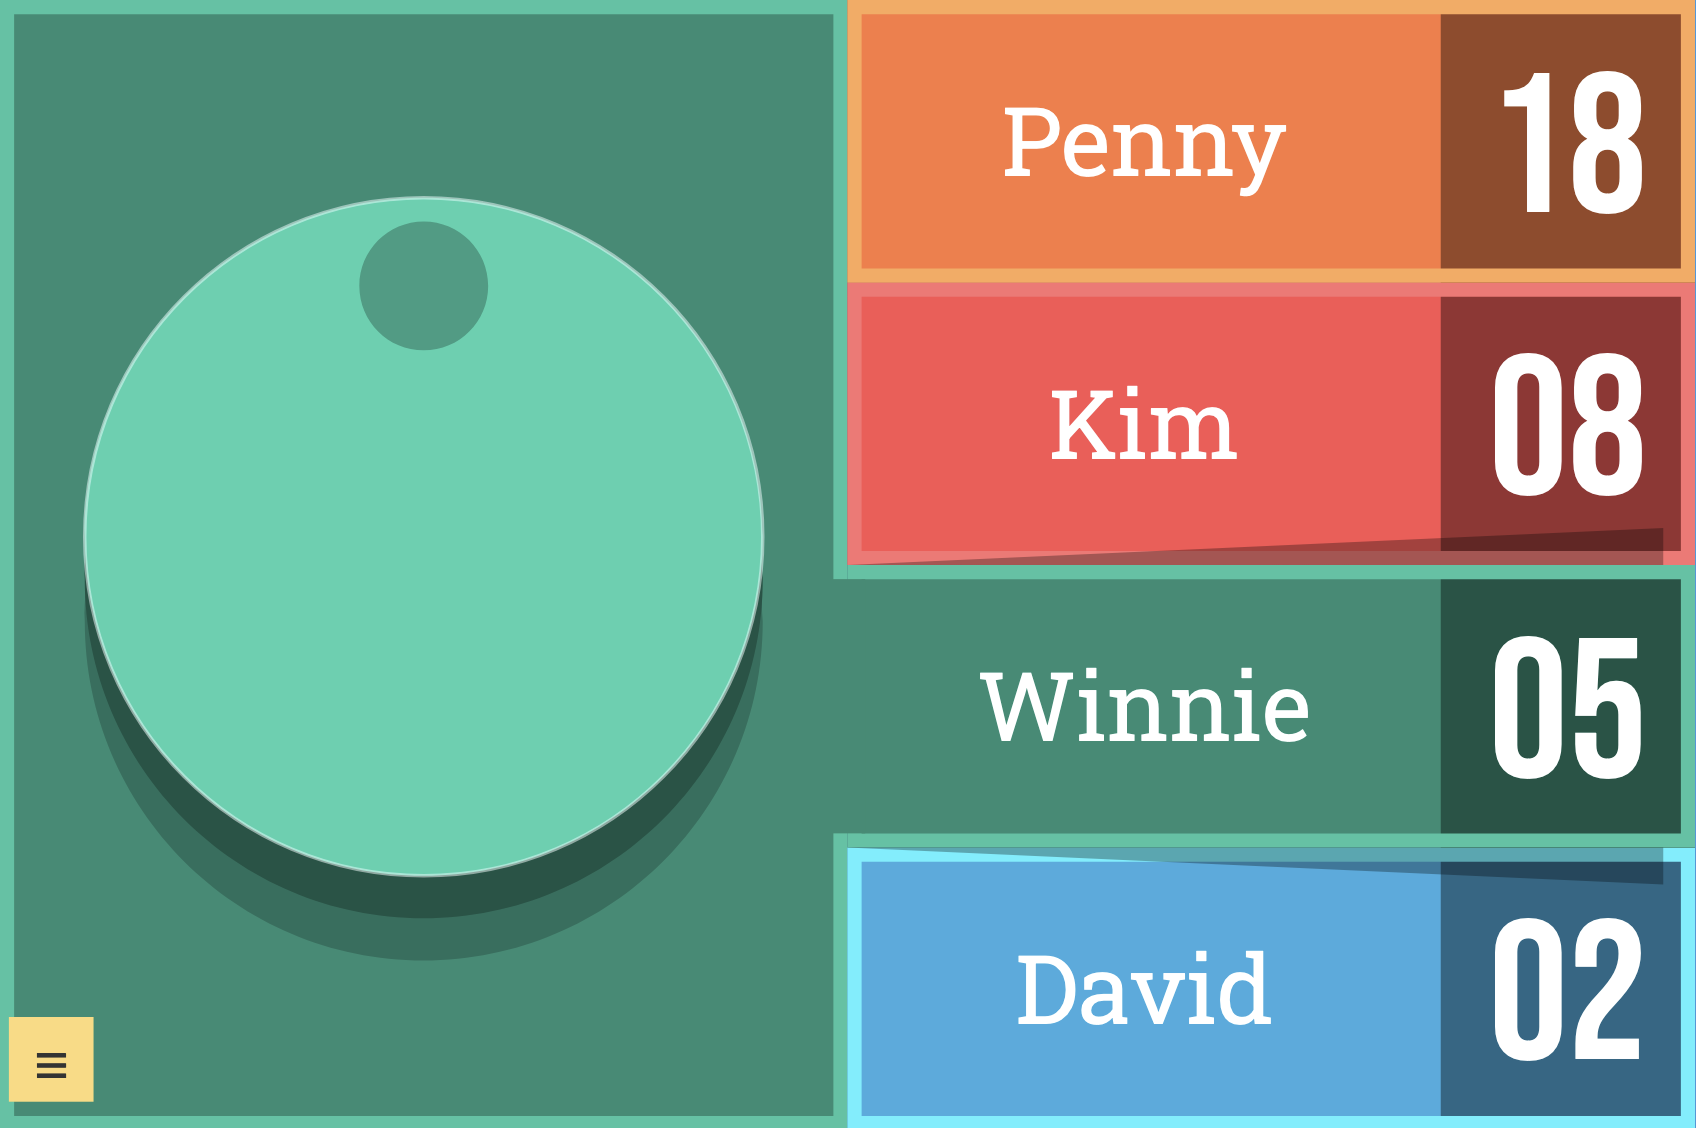
Begin by deciding how many players or teams to add to the scoreboard.
Add or remove points by selecting a team and rotating the dial.
The panels will reorder themselves to reflect the new totals.
If you prefer a simpler version, you can open the menu and choose to replace the dial with up and down buttons.